

16.7K
On this complete tutorial, I’ll stroll you thru the method of constructing an FPV drone from scratch, offering detailed steering for each analogue and digital FPV methods. We’ll cowl every little thing from choosing the correct parts, to wiring and meeting, and even share insider ideas and methods to make sure you have a dependable and fulfilling FPV drone expertise.


Among the hyperlinks on this web page are affiliate hyperlinks. I obtain a fee (at no further price to you) should you make a purchase order after clicking on one in every of these affiliate hyperlinks. This helps assist the free content material for the neighborhood on this web site. Please learn our Affiliate Hyperlink Coverage for extra info.
Can Freshmen Construct FPV Drones?
Completely! Even when you have no prior expertise, newcomers can completely construct FPV drones.
Positive, it is perhaps tempting to easily purchase a ready-made drone off the shelf—however the place’s the enjoyable (and studying) in that? By assembling your personal drone from scratch, you’ll achieve invaluable hands-on data about every element and the way all of them work collectively. You’ll even be a lot better ready to troubleshoot and restore your drone if something goes flawed.
Now, I gained’t sugar-coat it—constructing your first FPV drone will probably be difficult. It might take hours, and even days, to finish. Alongside the way in which, you’ll want to hunt recommendation from skilled pilots on-line or determine issues out by means of trial and error. However belief me—the sense of accomplishment and the abilities you achieve will make the journey extremely rewarding.
So, let’s dive in and embrace the challenges forward!
Mastering the Fundamentals
Earlier than we embark on this thrilling tutorial, it’s essential to familiarize your self with the fundamentals of a quadcopter.
To get began, try our beginner-friendly information: Getting Began with FPV Drone.
As you discover the world of FPV, you’ll probably encounter many acronyms and technical phrases. Don’t let these intimidate you! When doubtful, seek advice from our useful glossary: Decoding Acronyms and Technical Phrases in FPV.
Components Checklist
On this tutorial, we’ll be utilizing the next components to information you thru the FPV drone constructing course of.
Only a fast be aware: the hyperlinks supplied are affiliate hyperlinks. Making a purchase order by means of these hyperlinks gained’t price you something further, however it’s going to earn me a small fee. This assist helps hold the weblog operating and permits me to proceed sharing my ardour for FPV drones with you—thanks!
This specific construct focuses on the DJI O4 Professional Air Unit. In case you’re all for constructing an analog FPV drone, try my different construct log right here: https://oscarliang.com/how-to-build-fpv-drone-analog/
If in case you have a small price range, right here is a listing of the most cost effective 5″ drone components.
If you’d like extra choices, right here is a listing of components that I like to recommend.

Body

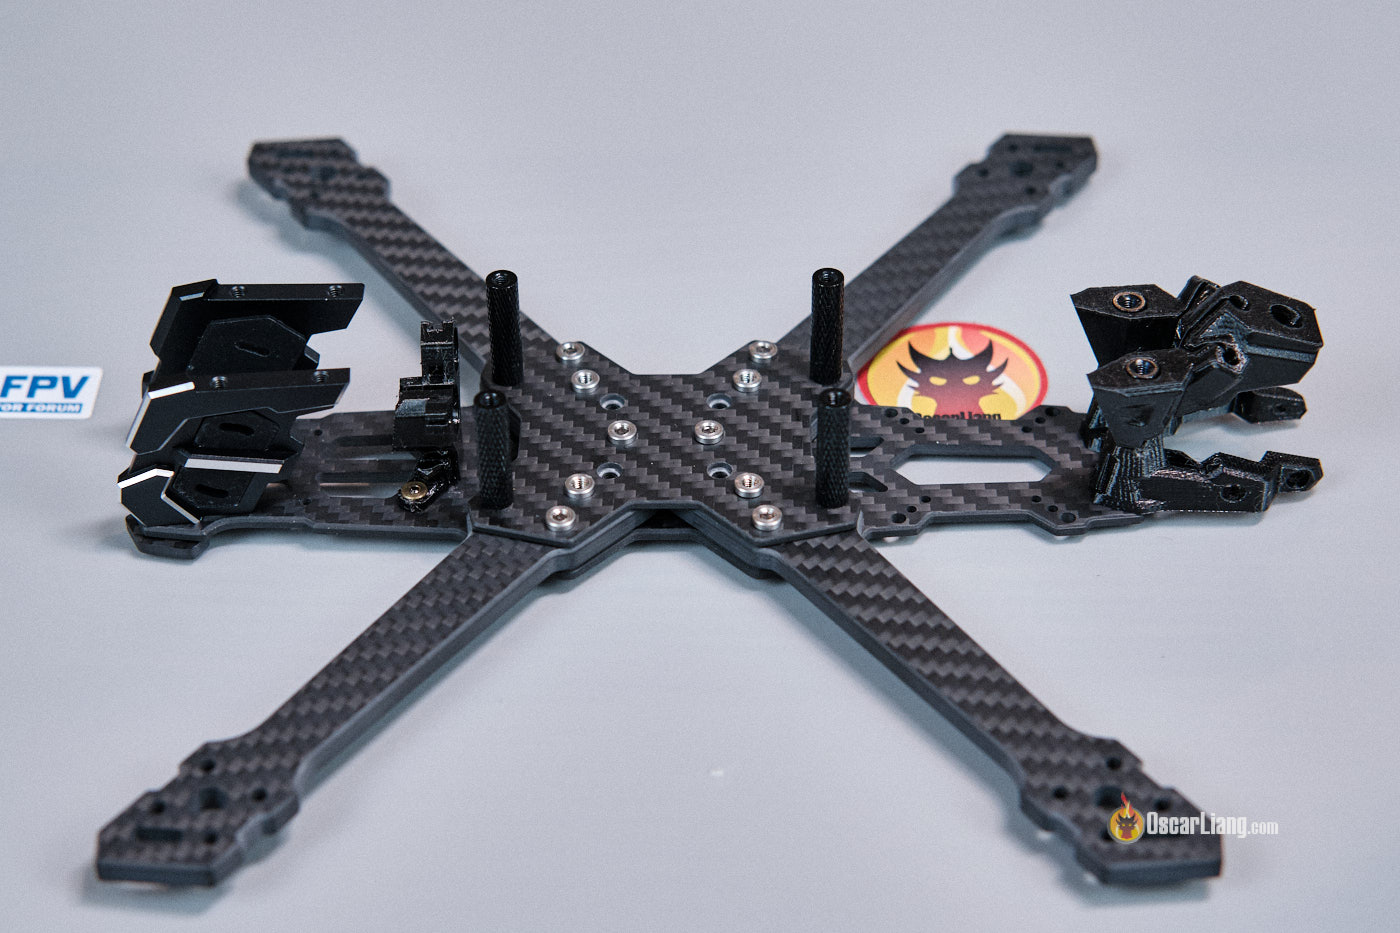
The body is the sturdy construction that holds the entire drone’s parts collectively.
For this tutorial, I’ve chosen the GEPRC Vapor—a wonderful selection due to its excessive construct high quality. It additionally comes with quite a lot of 3D-printed equipment, making for an extremely straightforward and clear construct.
Try my detailed evaluation of this body, together with step-by-step meeting directions, right here: https://oscarliang.com/geprc-vapor-x5-d5-frame/.
FC and ESC
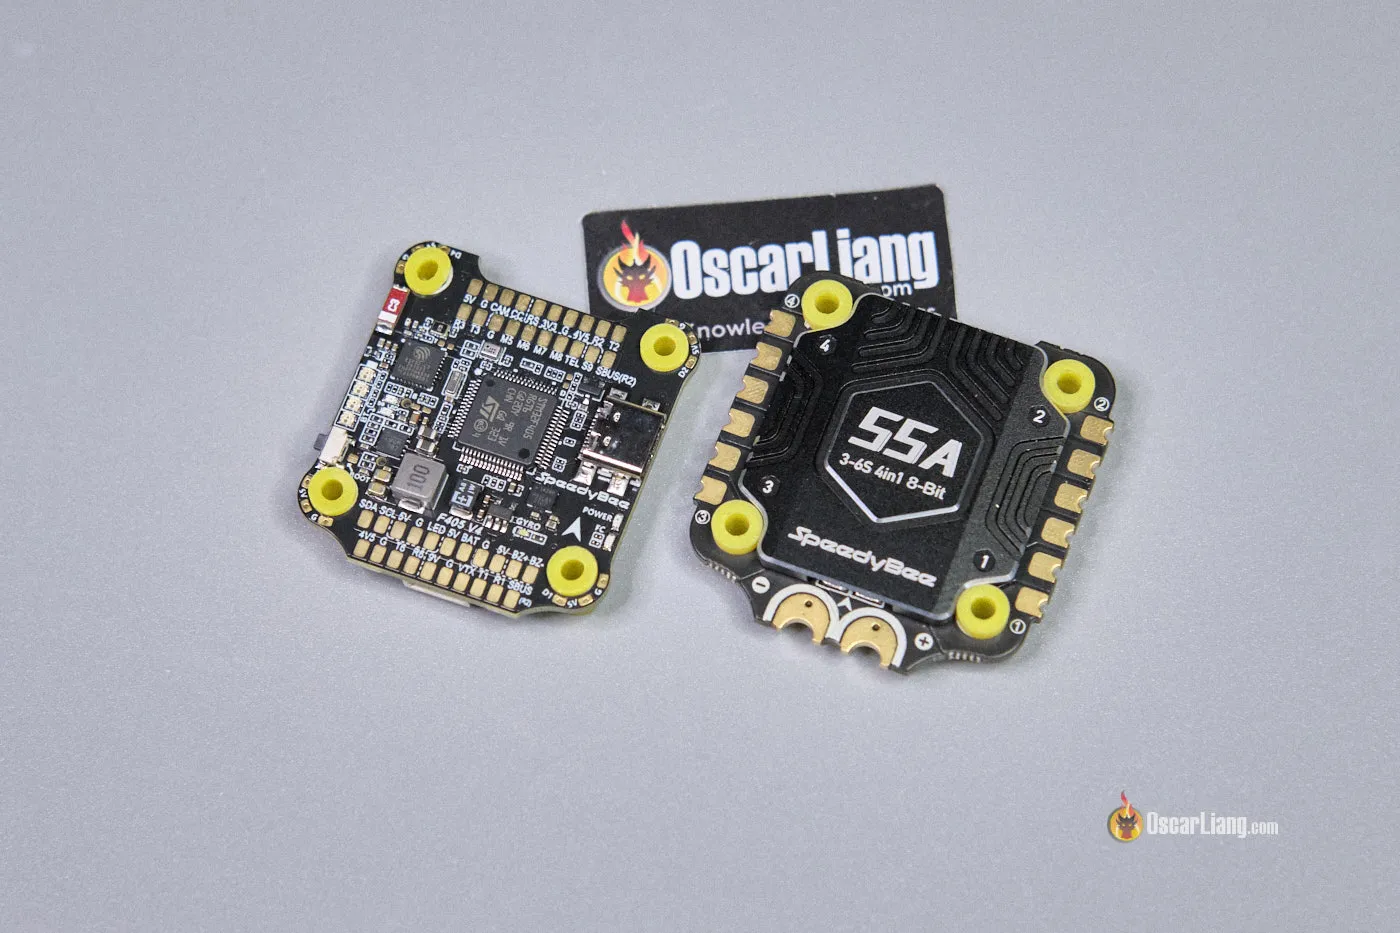
Shopping for the flight controller (FC) and ESC collectively as a stack isn’t solely extra reasonably priced, but it surely additionally ensures that they’re plug-and-play proper out of the field, making the drone constructing course of a lot smoother and extra simple.
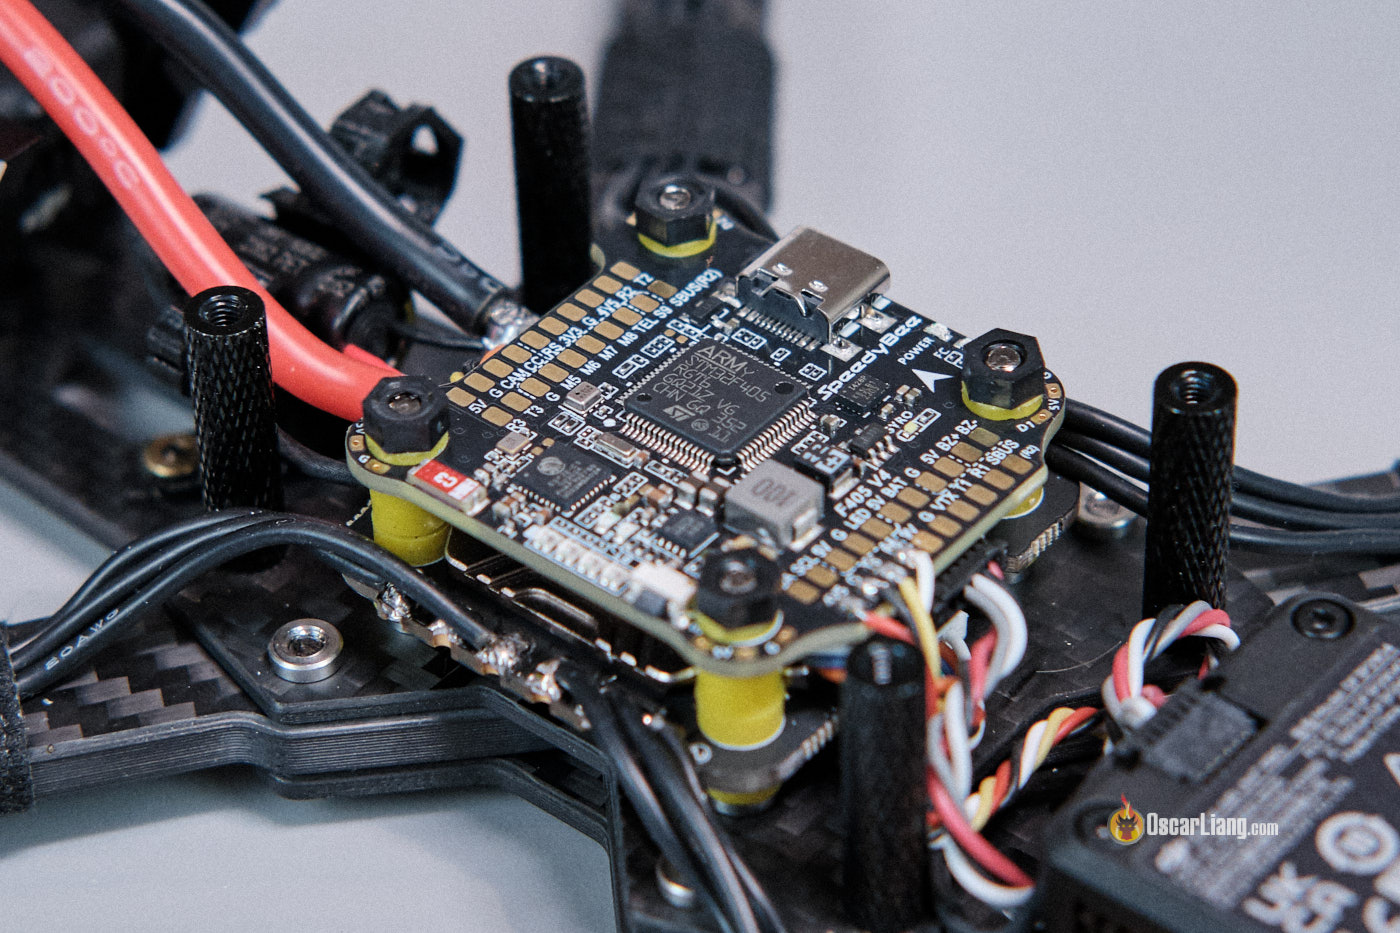
For this tutorial, I’ve chosen the Speedybee F405 V4 stack. Regardless of being one of the crucial reasonably priced FC/ESC stacks in the marketplace, it doesn’t compromise on options. It helps nearly all trendy functionalities you’d need in an FPV drone. Try my in-depth evaluation of the Speedybee F405 V4 right here: https://oscarliang.com/speedybee-f405-v4/.
If the Speedybee F405 V4 is out of inventory, don’t fear—there are many glorious options. Right here’s a listing of my prime suggestions: https://oscarliang.com/flight-controller/#The-Greatest-FC-Suggestions.
Motors

FPV motors as we speak are surprisingly comparable when it comes to efficiency, particularly on the newbie stage. Which means there’s no want to purchase the costliest motors whenever you’re simply beginning out—most individuals wouldn’t even discover the distinction. Price range choices just like the EMAX ECO II sequence are greater than ample for newcomers.
For a 5-inch FPV drone, motor sizes similar to 2306, 2207, and 2208 are all viable decisions. Personally, I imagine 2207 hits the candy spot when it comes to performance-to-weight ratio. Study extra in regards to the variations right here: https://oscarliang.com/2306-2207-mini-quad-motor/
One other essential issue to think about is motor KV, which is linked to your battery voltage. For a 6S construct, I like to recommend selecting motors with a KV ranking between 1600 and 2000. Larger KV motors ship extra aggressive and power-hungry efficiency. On this construct, I’ve chosen 1900KV motors, as the following decrease choice (1700KV) feels a bit too low for my style.
There are various different glorious motors value contemplating—try my full checklist of suggestions right here: https://oscarliang.com/motors/#Suggestions
FPV Setup

There are a number of FPV methods out there in the marketplace, however the DJI O4 Professional can be my best choice for a 5-inch freestyle drone. It presents the very best picture high quality and sign reliability, and top-notch construct high quality. If you wish to be taught extra in regards to the totally different FPV methods and their execs and cons, try my purchaser’s information: https://oscarliang.com/fpv-system/
Radio Receiver

Your selection of radio transmitter dictates the kind of receiver (RX) you should use. In case you adopted my radio suggestions, your radio ought to assist ExpressLRS (ELRS), which is at the moment my best choice for a radio hyperlink. ExpressLRS is reasonably priced, high-performance, and extremely dependable: https://oscarliang.com/expresslrs/
Quite a few producers produce receivers and transmitter modules for ExpressLRS. You may select any of those, and so long as they’re ExpressLRS, they’ll work collectively. For this tutorial, I’ve chosen the BetaFPV ELRS 2.4GHz Nano, which is likely one of the cheaper choices in the marketplace and works effectively.
That will help you arrange ExpressLRS, I’ve put collectively a step-by-step tutorial: https://oscarliang.com/setup-expresslrs-2-4ghz/
To fly a quadcopter in FPV, you’ll want the next equipment. Check out my on a regular basis gear for inspiration. Here’s a abstract:
Instruments and Provides
To construct the drone, you’ll additionally want the next instruments and provides. You could have already got a few of these objects, if not, they need to be simply discovered on-line or at your native ironmongery store.
Important:
Optionally available however advisable:
For these actually passionate in regards to the interest, right here’s a complete checklist of instruments that you could be discover invaluable in your FPV drone-building journey.
Steps of Constructing FPV Drone
Click on the hyperlink will take you to the part on this article:
1. Body Meeting
Comply with my detailed step-by-step tutorial to assemble the GEPRC Vapor body: https://oscarliang.com/geprc-vapor-x5-d5-frame/
You should full the body meeting to this stage earlier than transferring on to the following steps.
2. Putting in Motors
Now, it’s time to mount the 4 motors onto the arms.
The EMAX ECO II motors include screws of various lengths. Use the screws with a 7mm thread size, that are appropriate for 5mm thick arms.

It’s extremely advisable to make use of threadlocker (similar to Loctite) on the motor screws, as vibrations could cause them to loosen over time.
Some motors include threadlocker pre-applied (showing as a blue coating on the threads), however the ECO II motors don’t, so that you’ll want to use it your self.

Some builders use solely three screws and even two to avoid wasting weight, however I like to recommend utilizing all 4 screws for max sturdiness.

Necessary: Earlier than totally tightening the motor screws, make certain they don’t seem to be too lengthy and aren’t urgent towards the motor windings. In case you’re not sure, comply with this information: https://oscarliang.com/check-motor-screws-touching-winding/


3. Wiring Diagrams
In case you’re utilizing the parts I advisable, seek advice from this wiring diagram for steering.

Earlier than slicing and soldering any wires, you may “dry match” all of the parts within the body. This course of means that you can gauge how lengthy the wires needs to be, decide the very best location to your parts, and determine any potential spacing points.

4. Putting in ESC
Begin by putting in the 4 lengthy bolts that include the Vapor body into these holes.


Slide the 4in1 ESC and FC boards onto the bolts.
Usually, the ESC’s energy pads (+ and -) ought to face the rear. Nevertheless, as a result of the Vapor body routes the battery lead by means of the center, it’s greatest to rotate the ESC 180 levels. This implies you’ll should remap the motor order later in Betaflight (don’t fear, I’ll clarify how).

Verify rigorously, nothing ought to contact between the underside of the ESC and the body, and between the ESC and FC boards.

Subsequent, we’ll solder the motors to the ESC. In case you’re new to soldering, seek advice from the tutorial “ Solder for Freshmen“.
There are three frequent methods to route and solder motor wires:
- Easy and informal routing: Simply solder the wires on to the ESC pads. It’s quick and straightforward, however the construct gained’t look as clear. If you’re not good with soldering, do that.
- Neat routing round stack screws: Wires loop neatly across the screws. Seems to be cleaner however barely heavier on account of longer wires (a number of further grams).
- Tight, stacking routing (my favourite): Wires are lower as quick as potential. Very clear aesthetic, however tougher to solder because the wires are stacked on prime one other.

Safe the motor wires on the arms with material tape or electrical tape. The Vapor body equipment consists of plastic tubes for wire safety, they do look neat {and professional}, however I discovered them impracticable and heavy.
Measure and lower motor wires, it’s all the time higher to depart just a little slack.

Strip about 2mm off the tip of the wires and tin the ends.

Tin all of the motor pads on the 4in1 ESC (fill the pads with a pleasant dome of solder first earlier than soldering the wires).

Don’t fear in regards to the order of the motor wires—you may simply reverse motor spin path later in Betaflight.

Now, solder the capacitor that comes with the Speedybee stack. Insert the supplied heatshrink tubes, shorten and bend the legs.
Solder the capacitor onto the battery pads (+ and -) on the ESC. Take note of polarity – the unfavourable leg is marked by a light-colored stripe on the capacitor.
Why a Capacitor?
A capacitor reduces voltage spikes and electrical noise from the motors and ESC, defending your electronics in addition to decreasing noise attending to the gyro, bettering the flight efficiency of your drone. Study extra about why capacitors are essential: https://oscarliang.com/capacitors-mini-quad/

The capacitor can now sit securely contained in the included TPU mount.

Now, solder the XT60 energy result in the facility pads on the ESC, take note of polarity (constructive and unfavourable). That is maybe probably the most difficult step on this construct, as a result of quantity of warmth required to soften the solder on the massive copper pads and thick wires. Be affected person and use the next temperature in your iron.

Soldering Ideas:
- Use a great quantity of solder and solder flux (solder paste) for the massive pads, guaranteeing the solder joints are shiny and full. In case you can see the wire strands, you haven’t utilized sufficient solder.
- Apply extra flux if the solder “sticks” to the tip whenever you take away it from the joint.
- Be happy to make use of a excessive temperature when soldering giant solder pads, however be fast and keep away from overheating the pads for too lengthy. Use 450°C (840°F) for motor wires and XT60, and 380°C for sign wires.
5. Testing ESC and Motors
We are going to now check the ESC and motors by connecting the battery.
However earlier than plugging in a LiPo battery for the primary time, guarantee there are not any electrical shorts. Utilizing a multimeter in continuity mode, check the constructive and unfavourable terminals of the XT60 (or straight on the ESC energy pads). If there’s a quick circuit, the multimeter will beep repeatedly. On this case, don’t plug within the battery, as it could injury your parts. As an alternative, troubleshoot and repair the difficulty that’s inflicting the quick circuit.
For extra info on utilizing a multimeter to check your drone, try this tutorial.
Professional-Tip: A brief beep adopted by silence could happen when testing continuity on account of capacitors charging. That is regular and shouldn’t trigger concern. So long as it stops beeping after a second or two try to be high quality.

Now, join the FC to the ESC utilizing the supplied 8-pin cable, and join the FC to your laptop by way of a USB cable.
It’s extremely advisable to make use of a smoke stopper when plugging in a battery for the primary time. Whereas not obligatory, it’s a helpful funding to keep away from damaging parts.

Don’t placed on propellers but.
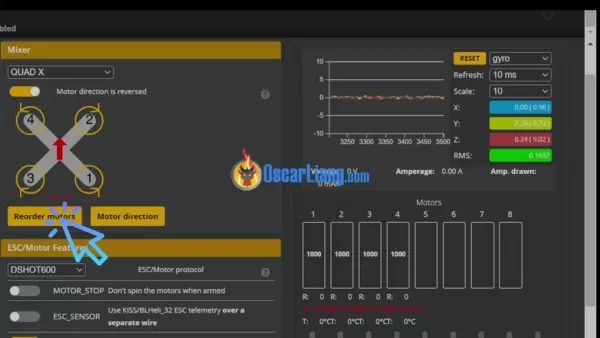
To check the motors, plug within the battery and join the USB cable to the flight controller. Open Betaflight Configurator, and go to the Motors tab.
Select DShot300 in ESC Protocol. Click on Save and Reboot.

Now, allow motor management, and you must have the ability to spin up the motors – do that one after the other, transfer the slider to round 1100 is sufficient.

You wan to ensure the motor that’s spinning matches the quantity within the diagram, e.g. motor #1 is the rear proper, motor #2 is entrance proper and so forth.

If the motor order is flawed (most definitely flawed as a result of we rotated the ESC 180 levels in our construct), you may simply repair it by clicking the “Reorder Motors” button within the motors tab, and simply comply with the straightforward directions. You may as well repair it utilizing CLI instructions but it surely’s fairly difficult, so simply use the software 🙂
As soon as the motor order is appropriate, it is advisable confirm if they’re spinning within the appropriate path. To reverse a motor path, there are a number of methods, the best is to use the Betaflight Configurator (Motors tab) as defined right here.
Troubleshooting ideas:
- If motors aren’t spinning, make sure the battery is linked and also you’ve turned on the Quick Saver in case you are utilizing it. And the ESC ought to beep as quickly as you plug within the battery. Make sure that the ESC is linked to the FC, and that the pin connections are appropriate.
- If all motors spin apart from one, that exact ESC, motor, or the ESC sign from the FC is perhaps defective. To troubleshoot, swap the non-functioning motor with a working one on the identical quad to find out if the difficulty lies with the ESC or motor.
For additional help, ask within the discussion board: https://intofpv.com
6. Receiver Setup
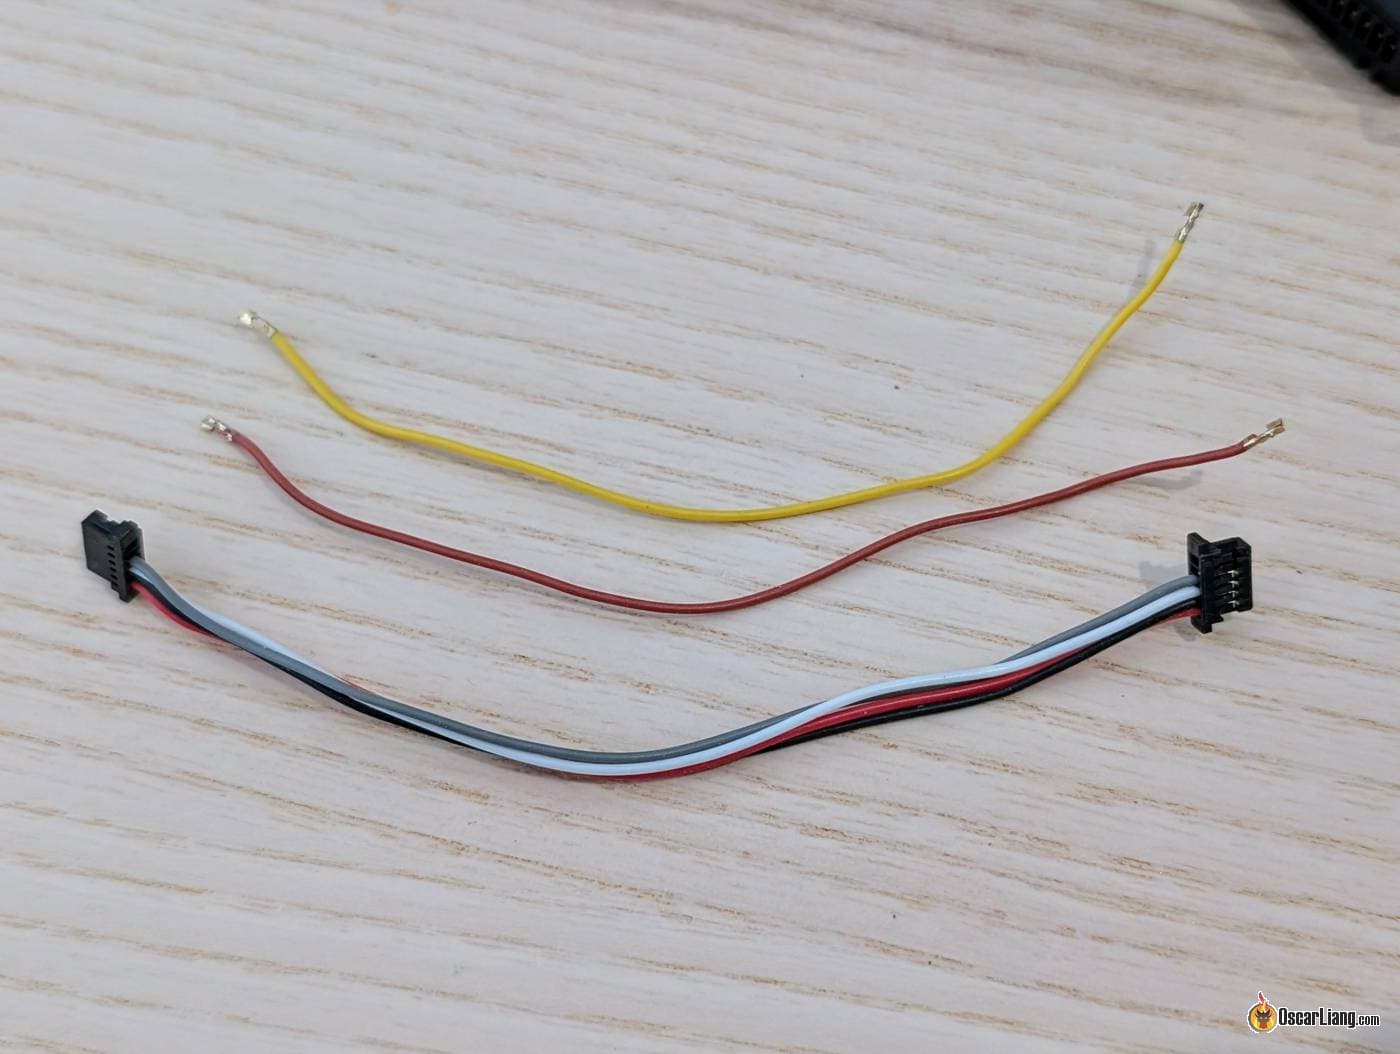
Begin by soldering the supplied wires to the receiver.
Whereas the wire colours technically don’t matter, following a constant shade scheme makes troubleshooting a lot simpler. I like to recommend utilizing this shade coding:
- Black wire → GND (G)
- Pink wire → 5V (V)
- White wire → TX (T)
- Yellow wire → RX (R)

The body features a TPU holder the place you may neatly put the receiver in.

Wire the flight controller to the receiver like this (from FC to receiver):
- 4V5 → V (5V)
- G → G (Floor)
- T6 → R (Receiver RX)
- R6 → T (Receiver TX)

Mount the receiver and antenna securely contained in the body like this.

Now, bind your radio to the receiver by following this tutorial: https://oscarliang.com/bind-expresslrs-receivers/.
As soon as that’s carried out, we are able to arrange the receiver in Betaflight configurator:
- Go to the Ports tab and allow “Serial RX” for the UART linked to the receiver (UART6 in our instance, as a result of we linked it to T6 and R6). Click on Save.
- Within the Receiver tab, choose “Serial (by way of UART)” in Receiver Mode and select “CRSF” in Serial Receiver Supplier. Allow Telemetry. Click on Save.


After this, the receiver needs to be working. To verify, go to the Receiver tab, and the bars (channel values) ought to change whenever you transfer the sticks on the radio. If the flawed channels are responding, attempt a special Channel Map similar to “default (AETR)” or “TAER”.
You will want to setup switches on the radio for arming, flight modes and beeper. Comply with this tutorial to learn the way: https://oscarliang.com/setup-switch-mixes/

If in case you have any questions, put up within the discussion board: https://intoFPV.com
7. Putting in DJI O4 Professional
Connecting the DJI O4 Professional Air Unit to the Speedybee flight controller couldn’t be less complicated—simply plug within the supplied cable and also you’re good to go. The O4 Air Unit will probably be mounted on prime of the receiver.

Push the 2 O4 Professional antennas securely into the holes within the rear TPU antenna mount.

In case you’re controlling the drone utilizing ExpressLRS, you could wish to take away the SBUS and GND wires from the O4 connection cable. These wires are supposed for the DJI distant controller, and leaving them linked could cause conflicts should you’re utilizing the identical UART for one more machine.
Mount the digital camera between the silicone dampers included with the body.
In case you’re new to flying, you may wish to begin with a decrease digital camera tilt angle like 10° to fifteen°. As you turn into extra snug and begin flying sooner, you may enhance the lean to twenty° and even 30° for higher ahead visibility at velocity.

Now we’ll configure OSD (On-Display screen Show) to indicate essential flight information like battery voltage, flight time, and warnings straight in your DJI goggles.

I’ve a full step-by-step information right here if you would like extra element: https://oscarliang.com/how-to-setup-dji-o4-pro/
To summarize the method:
- In Betaflight Configurator, go to the Presets tab.
- Seek for “OSD for DJI”.
- Choose the preset you discover.
- Within the choices, choose “map to displayport”, “set HDOSD”, and the UART you’ve linked the O4 to (in our instance that’s UART1).
- That’s it.


Now, head to the OSD tab, allow your favorite components and transfer them round as you would like. Ensure you’ve chosen HD below Video Format so you might be utilizing all of the display screen area out there. I’ve my very own OSD layouts if you wish to copy: https://oscarliang.com/betaflight-osd/#My-OSD-Setup-CLI-Instructions

8. Ending Off
Safe the flight controller (FC) with nylon nuts.
Tighten solely by hand to keep away from over-compressing the rubber grommet because it may scale back vibration damping and defeat the aim of soppy mounting.

Subsequent, set up the highest plate.

Listed here are the weights of the finished drone:
- Drone together with propellers and battery strap: 453g
- Drone + 6S 1100mAh LiPo: 645g
- Drone + 6S 1100mAh LiPo + GoPro 13: 802g

When putting in the propellers, take note of the totally different rotations—CW (clockwise) and CCW (counter-clockwise). Guarantee they’re put in on the right motors; in any other case, your quad could not take off or may flip over when making an attempt to.

Use M5 nylon lock nuts to carry the propellers securely on the motor. Tightening is perhaps difficult at first however will turn into simpler over time. Keep away from overtightening to stop prop hub shattering. Tighten simply sufficient so the prop can’t transfer whenever you attempt to rotate it together with your hand whereas holding the motor bell.
A devoted prop nut software can velocity up prop modifications.

When mounting the battery (and GoPro), make sure the COG (middle of gravity) is as near the drone’s middle as potential. To examine if the battery is positioned appropriately, seize the center of the highest plate with two fingers and see if the quad stays stage. It’s important to take care of the COG on the middle of the 4 motors. As an illustration, if the quad is front-heavy, the entrance motors will work more durable than the rear motors when making an attempt to take care of its place, negatively impacting flight efficiency.

And we’re prepared for a check flight!


9. Setting Up Betaflight

We’ve already lined a lot of the Betaflight setup throughout this construct. Nevertheless, to double-check every little thing and guarantee nothing is missed, comply with my full newbie’s tutorial right here: https://oscarliang.com/betaflight-firmware-setup/
10. Tuning
Tuning your quadcopter entails adjusting it to fly and behave the way in which you need. Betaflight has come a good distance; you don’t should tune your quad, and it’ll probably fly simply high quality with inventory settings. Nevertheless, should you’re critical about efficiency, there’s extra to be taught!
For most individuals, tuning an FPV drone entails adjusting these settings:
Tuning is kind of technical and typically entails the usage of Blackbox logs. In case you don’t know find out how to use Blackbox, that is find out how to tune your FPV drone in 10 easy steps. In case you’re acquainted with Blackbox, try this in-depth information on tuning filters and PID.
Earlier than tuning, although, I’d suggest flashing Bluejay firmware to the ESC if they arrive with BLHeli_S firmware, it offers you higher efficiency. When doing so, you’ll want to decide on between the 24kHz or 48kHz variations. The 24kHz model gives higher responsiveness and torque, whereas the 48kHz model presents smoother flight with barely much less torque. I like to recommend 48KHz. You may as well allow bi-directional Dshot, and activate RPM filter when you’ve flashed Bluejay. It’s probably the greatest filters out there in Betaflight and makes your quad flies higher.
I’ll share my PID and Filter tune for this construct in my Patreon shortly, if you wish to attempt my tune, contemplate subscribing: https://oscarliang.com/patreon-support-announcement/
11. Studying Fly
If in case you have little to no expertise flying a mini quad, contemplate trying out these tutorials to get began:
If in case you have any questions, be at liberty to ask within the feedback.
You may examine my previous construct guides (some information is outdated):