
Need to know construct a gaming PC with your personal selection of elements, however do not know the place to begin? Whether or not you are new to the fantastic world of PC constructing, otherwise you’re just some years out of the loop, you have come to the precise place.
When you’re not sure which PC elements try to be utilizing, try our information to the finest graphics card, as this it probably the most costly a part of your construct and the primary place to begin when excited about your funds. Additionally try our finest gaming CPU information to seek out the most effective processor to accompany your GPU of selection. As soon as you have chosen the specs that finest meet your wants, learn on to learn how to place all of it collectively.
This is construct a gaming PC, step-by-step:

1. Get the precise instruments
It is actually vital to have the precise instruments for the job – when you do not, that extremely anticipated Friday night of PC constructing you’ve got deliberate will come to an abrupt halt when all of the retailers are shut and Amazon cannot ship till the following day. That is our checklist of important gadgets you may want.
Cable ties
Many PC instances embrace cable ties, and even helpful Velcro ties that assist to assemble cables into neat teams. Nevertheless, practically all instances lack an enough variety of cable ties to anchor down all of the cables in a typical PC. A pack of 100 prices round $5-10, and it is undoubtedly price having a few dozen handy, so you’ve got sufficient ties to do a good job of cable tidying. Seize some cable ties on Amazon to get began.
Mini screwdrivers
There are situations the place your common screwdriver is not sufficiently small. You will want a mini screwdriver set to cope with smaller screws, akin to these in M.2 SSD slots. These units solely value a couple of quid and can be found from most {hardware} shops.
Needle-nose pliers
Chunky pliers have their place, however you may want a extra delicate set of pliers for PC constructing. Needle-nose pliers offer you extra management and accuracy when coping with fan clips, enlargement slot covers, and different gadgets that want a little bit of power to take away, however will mince your fingers when you attempt to do it along with your fingers.
Thermal paste
Most processor coolers embrace thermal paste, however some have it pre-applied or solely embrace pitiful quantities. When you mess up the primary utility, you may find yourself with out the means to correctly apply extra thermal paste. It is cheap and a small spare tube is a vital merchandise in any PC fanatic’s toolbox. If it is your first time constructing a PC, we suggest utilizing a ceramic paste, akin to ARCTIC MX-4.
Aspect cutters
Aspect cutters are perfect for rapidly trimming cable ties as soon as you have fastened them in place. They’re frequent in most toolsets, but when you have to purchase a pair they solely value a couple of kilos and are important for tidying your PC – scissors are sometimes a bit too blunt and unwieldy for the job.
No.2 Phillips screwdriver
This screwdriver will match the vast majority of screws in your PC, that are often fairly giant and require cheap power to screw into place. Keep away from utilizing an electrical screwdriver, as they’ve an excessive amount of torque and might simply strip screw threads. In case you have one with a torque setting, solely apply it to a really unfastened setting.
Having a magnetic screwdriver is important too, as many PC screws have been misplaced at midnight corners of PC instances, by no means to be seen once more. Numerous PC screws are additionally secured horizontally, and can merely fall off your screwdriver if it is not magnetic, or will at the very least require you to make use of each fingers to get it in place. If you have already got a screwdriver, but it surely is not magnetic, then you may simply magnetize it with the assistance of (yep, you have guessed it) a magnet.
In case you have some magnets mendacity round the home wherever, even when they’re simply ones sticking novelty souvenirs to the fridge, place one onto the screwdriver shaft closest to your hand after which transfer the magnet all the way down to the tip of the screwdriver. Pull it off then repeat this course of ten instances. You need to now discover the screwdriver is magnetic and can maintain onto your screws itself.
Thermal paste cleaner
Thermal paste cleaner makes eradicating previous thermal paste a lot simpler by breaking it down and cleaning the surfaces prepared for the recent paste to be utilized. It could additionally assist take away any paste that you just get in your fingers or garments, so it is helpful to have some handy. There are particular thermal paste cleaners obtainable, however isopropyl alcohol works simply as effectively and might be cheaper too.
Microfiber material
Utilizing the precise cleansing material is vital for PC constructing for a number of causes. You do not need to use a material that sheds fibers, as it will create mud that may cling to thermal paste and hamper cooling.
Commonplace kitchen towels or family tissues have to be averted, and you have to guarantee the material is lint-free too, as lint can construct up static expenses. Lint-free microfibre towels are excellent for a number of jobs with PCs, from cleansing thermal paste off your CPU to sprucing glass aspect panel home windows.
2. Know your ports and connectors
It is usually unimaginable to plug a cable into fully the mistaken port relating to PC constructing lately, so when you’re afraid of one thing blowing up, you may relaxation assured this would possibly not occur.
Nevertheless, some connectors are extra acceptable than others for sure jobs, and it may be helpful to know what every connector seems like, and the place you put in them.
Energy provides (PSUs) include dozens of various connectors to cater for various configurations of {hardware}. You do not want to verify each cable in your PSU is linked to a element – you may nearly definitely have some left over. Under you may discover a checklist of the frequent cables and connectors you may come throughout, on each your PSU and your different elements.


PCIe energy connector
This powers your graphics card and often comes cut up into two items, with one 6-pin connector and one 2-pin. Graphics playing cards have both 6-pin or 8-pin ports, so along with your PSU providing a number of of those connectors, you may energy virtually any graphics card. The one means you may come unstuck is when you have a really lowly PSU that does not have sufficient of them, however most PSUs have at the very least two, and solely probably the most large and costly graphics playing cards have greater than this variety of energy connectors.

12VHPWR energy connector
This new 16-pin energy plug was primarily popularized by Nvidia when it launched its Ada GPU lineup, beginning with the RTX 4090. Your PSU could have a devoted cable for this plug, otherwise you may need to make use of an adaptor that plugs into the usual PCIe plugs proven above. The latter will come bundled along with your graphics card if it would want one.
Keep in mind that insecure connection of those plugs of their sockets has been linked with melting graphics playing cards, so be certain your connection is tightly secured with a full click on earlier than you turn in your PC.

Molex connector
Hardly ever used as we speak, since SATA connectors do the identical job and are simpler to put in. Lately, Molex connectors are sometimes used for followers or water-cooling pumps.

SATA energy connector
When you’re utilizing a 2.5-inch SSD and/or a 3.5-inch laborious disk, you may have to energy them utilizing a SATA connector. Many liquid coolers additionally use them. You will discover a number of on a single cable in your PSU, which might pose a cable-tidying problem.


SATA information connector
Exhausting disks or 2.5-inch SSDs should be linked to your motherboard to permit the back-and-forth switch of information, requiring a SATA information cable to attach the 2. Motherboards have at the very least two of those ports, with 4 or six ports being the most typical.


24-pin ATX connector
That is the largest port in your motherboard with a corresponding connector in your PSU too. It gives energy to elements and ports in your motherboard.


8-pin EPS 12V connector
This gives energy to your CPU. Low cost motherboards sometimes have simply 4 of the eight pins, requiring you to make use of simply one-half of the connector. Some high-end motherboards have greater than a single 8-pin connector too, however that is solely wanted when you’re an excessive overclocker constructing a really highly effective system.
Within the overwhelming majority of conditions, you simply want to attach the 8-pin connector out of your PSU to the corresponding socket in your motherboard, which is often positioned above the CPU socket.


3-pin and 4-pin fan connectors
Your case’s followers (and radiator followers when you’re utilizing liquid cooling) will in all probability have considered one of these two energy connectors on the tip of their cables, however each of them hook up with the identical sort of energy header in your motherboard – you can even plug a 3-pin plug right into a 4-pin header if essential.
The three-pin connector gives energy and that is it. In the meantime, a 4-pin connector has a intelligent extra pin that gives what’s often known as a PWM or pulse width modulation sign to your motherboard. This will permit the motherboard to manage the voltage, and therefore the velocity, so you may run it at decrease than default speeds, making it run barely quieter.
USB headers
Understanding USB is not straightforward lately with so many speeds and ports obtainable, however you may have to familiarise your self with three varieties of headers in your PC, so you will get all of the USB ports in your case working correctly.


There are cables coming from these ports inside your case that should be linked to headers in your motherboard. The USB 2 header gives information and energy to your case’s USB 2 ports, and is pictured above.


Subsequent there’s the USB 3 header, which is pictured within the two pictures above, and does the identical because the USB 2 connectors, however for sooner USB 3 ports.


Lastly, there’s the newer, brief and blocky USB-C header, which is pictured above, As you will have guessed, this must be linked to your case’s entrance panel USB-C port if it has one, though that is nonetheless a function that you do not at all times discover on each obtainable case.


3-pin and 4-pin RGB connectors
There are two varieties of normal RGB lighting connectors, and these are available 3-pin and 4-pin flavors. The latter let you management all of the LEDs in a strip or element on the similar time, maybe displaying the identical colour or altering the brightness for all LEDs without delay. The three-pin RGB connectors can do all that, but in addition offer you management over particular person LEDs, offering better scope for lighting results, or just having totally different colours displaying throughout an LED strip on the similar time.

Audio header
In case your case’s entrance panel has analog jack sockets for mic and headphones, then it can even have an audio cable that hooks as much as the header in your motherboard and allows these jack sockets to work – it is often within the backside left nook of your motherboard.

Entrance panel headers
Your case may have an influence button, and sometimes a reset button too, in addition to lights that present when it is powered on, and generally for when the SSD or laborious disk is being accessed. All these case options work through the use of cables that hook up with your motherboard in the identical means because the USB ports coated earlier, besides they are much smaller.
You join them to your motherboard’s entrance panel header. You will have to confer with your motherboard handbook to establish the precise pins and, be warned, this could usually be fiddly, particularly when you do it as soon as your motherboard is already screwed into your case. We’ll have a look at the most effective methods to cope with this a part of the set up in a while.
3. Select appropriate elements
It goes with out saying that you have to make sure you’ve chosen the proper {hardware} with the intention to keep away from any compatibility points along with your newly constructed PC. You will have to ensure you’re conscious of the assorted motherboard sizes obtainable, that you just decide the precise motherboard to your case or vice versa and that your chosen CPU cooler is appropriate along with your motherboard.
It is also price checking case clearances. Circumstances have limits for the size and peak of CPU coolers and graphics playing cards. A typical ATX case does not often have any points, however sometimes a very giant CPU cooler may not match right into a smaller-than-average case. Nvidia’s new SFF-Prepared certification program is one actually helpful sources for having the ability to discover graphics playing cards and small kind issue (SFF) instances that match collectively. Intriguingly, Nvidia’s personal model new flagship card, the RTX 5090 Founders Version is definitely SFF-Prepared due to its modern double flow-through fan design.
You will additionally want to make sure your CPU is appropriate along with your motherboard. The simplest means to do that is to go to your motherboard producer’s web site and even an etailer web site, and use the menus to pick merchandise that solely use a selected chipset or CPU socket.
Equally, you may want to select RAM that matches along with your motherboard. All fashionable CPUs use DDR5 now however when you’re procuring round for secondhand or cheaper, older CPUs and motherboards, they could use DDR4.
For extra assist discovering the precise mixture of elements, the web site PCPartPicker is a extremely great tool as you may choose your components as you go, seeing what’s and is not appropriate, with costs for reference too.
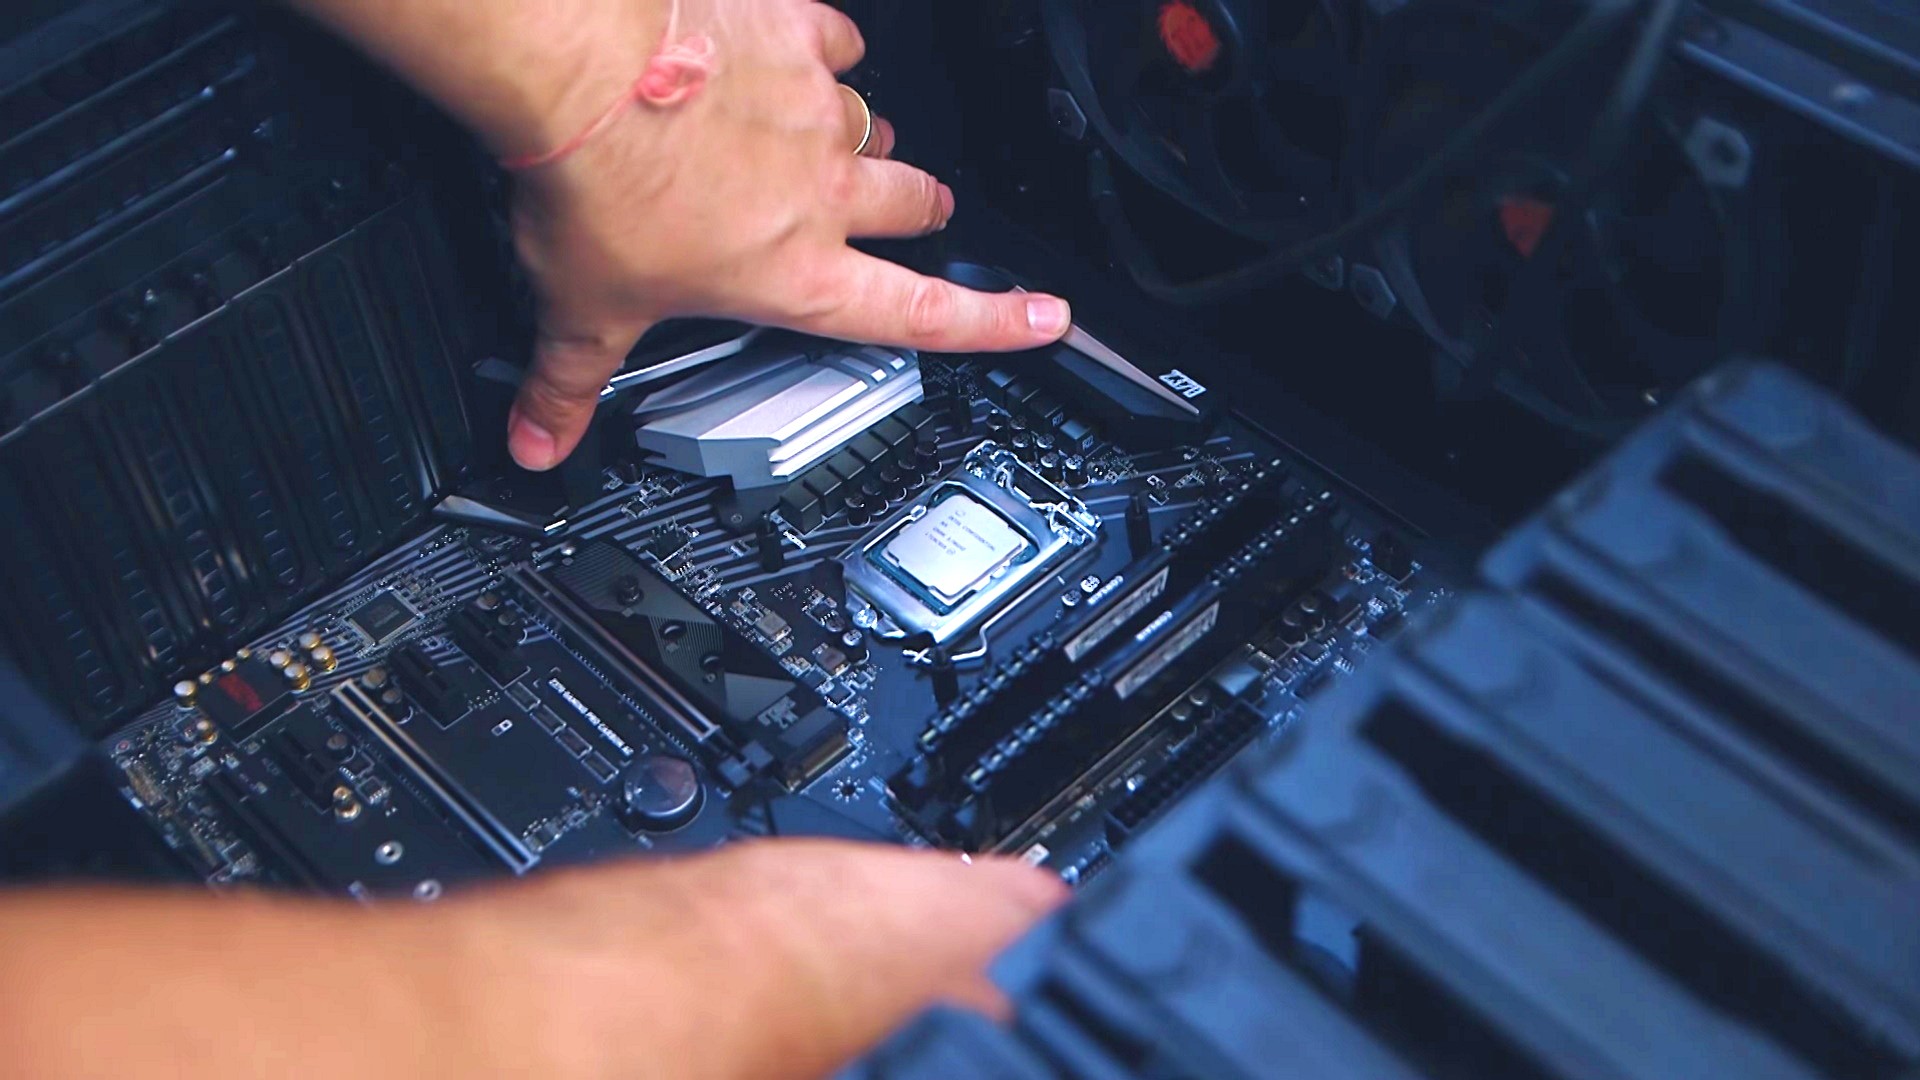
4. Set up your CPU
We’ll begin with a warning, which is that the pins in Intel and AMD’s CPU sockets and on the backs of AMD’s Socket AM4 CPUs are extraordinarily fragile. The socket pins are notably damage-prone and the slightest knock can kill your motherboard. Be extraordinarily cautious whenever you set up the CPU into the socket because it’s by far probably the most hazardous step whenever you’re constructing a PC.

With Intel LGA1700 and AMD Socket AM5 CPUs, go away the black socket cap in place (as seen above). It’ll come out itself whenever you set up the CPU. It is designed to guard the socket pins till you truly set up the CPU. Begin by prising out the CPU socket latch to the precise and lifting it as much as open the socket.

Subsequent, decrease the CPU down subsequent to the socket, so there is not any likelihood of you dropping it into the socket and damaging the pins. There are notches on the aspect of the CPU that will help you orient it accurately. You’ll be able to then deliver it throughout to take a seat within the socket.

As soon as the CPU is in place, deliver the CPU socket cowl down over the CPU after which bend the latch down, securing it in place.

With AMD’s Socket AM4 platforms, the pins are on the CPU. Like Intel’s CPUs, they match into the socket in a selected orientation, which might be discovered by aligning arrows on the socket and fringe of the CPU. The pins sit in holes within the socket, however you have to open the holes first by opening the latch on the aspect of the socket.
Decrease the CPU into the socket. It ought to slot freely down into place. Sometimes it might require a small push to make sure its underside sits flush with the socket all the best way round.

As soon as it is sat flat within the socket, decrease the latch, which is able to lock the CPU in place. When you ever have to take away your CPU cooler, twist it first. It will loosen the thermal paste, which might in any other case persist with the CPU and really pull AM4 CPUs out of their sockets.
5. Set up your reminiscence
Reminiscence modules can solely be fitted into your motherboard’s DDR4 or DDR5 DIMM slots a method round, and it is simple to establish because the modules have notches that match up with pins within the slots.
Most motherboards have 4 slots, however your reminiscence equipment will in all probability solely have two reminiscence modules. It’s essential place your modules into particular slots, although, as your motherboard has the flexibility to entry information on each modules without delay utilizing a function known as dual-channel mode. This will dramatically enhance efficiency and is one purpose why utilizing only one giant reminiscence module is a foul thought.

To make sure dual-channel mode is activated, place your pair of modules into slots two and 4, or the second and fourth furthest away from the CPU socket. To truly set up the modules, insert one fringe of the module into the slot first, lifting any latches on the ends of the slots first in the event that they’re current.
It’s essential press fairly firmly on the center of the module to get it to clip into the socket and you may hear it click on into place. Any latches on the ends of the CPU socket will lock into the module. Guarantee each modules are seated correctly – they should be degree and sitting on the similar peak.
6. Apply thermal paste
Thermal paste is commonly pre-applied to CPU coolers, however there are nonetheless loads of conditions the place you have to apply it your self. If that is so along with your chosen CPU cooler, that is the way you do it. Purpose to attract a skinny cross form from nook to nook on the CPU’s steel heatspreader.
Each AMD and Intel’s present CPUs have heatspreaders which are giant sufficient to wish an inexpensive quantity of paste, so simply making use of a small blob in the midst of the heatspreader will not assure that the paste will unfold over the entire floor. We additionally suggest utilizing a thermal paste guard when you’re utilizing a brand new AMD Socket AM5 CPU, so you do not find yourself with thermal paste leaking into the crevices on the heatspreader.

Any areas that do not have paste utilized will not switch warmth as rapidly from the heatspreader to the cooler’s contact plate and will hinder cooling. Use skinny traces across the width of a dry stick of spaghetti. For older, smaller Intel CPUs, a single line from high to backside in the midst of the heatspreader is sufficient.
For extra details about which thermal pastes to make use of, and apply them, learn our full information on apply thermal paste.
7. Match a CPU air cooler
There are two varieties of CPU cooler you may sometimes need to use in your first PC. The primary is an air cooler comprising a heatsink and fan, and we’ll have a look at set up one now. With Intel motherboards, there are merely 4 mounting holes across the CPU socket that allow coolers to safe to the motherboard and clamp down onto the CPU heatspreader.

Some Intel coolers use push pins, the place you push the often white exterior plastic components of the pins into the holes across the CPU socket, then push down the often black inside components of the pins and switch them to safe them. Nevertheless, air coolers that retail for greater than $20 often have extra elaborate mounting kits that use backplates and thumbscrews.

Begin by eradicating the plastic movie on the bottom of the cooler. That is there to guard the polished floor because it’s in any other case straightforward to scratch, and it will possibly additionally tarnish when it is uncovered to air, each of which might cut back thermal switch. It is easy to overlook the movie is there, although, solely to see your CPU temperature skyrocket whenever you by chance go away it on the cooler. We have all accomplished it.

Subsequent, set up any mounting gear to your CPU cooler onto the CPU socket. We won’t cowl each variation right here, however your cooler will include directions displaying you match it to a wide range of CPU sockets. You will in all probability want to suit a backplate to your motherboard to mount your CPU cooler for an Intel CPU, after which screw the cooler’s mount into the backplate.
Coolers for Intel CPUs will often require a selected set of mounts to your socket, and it’s possible you’ll want to purchase a separate adaptor for Intel’s LGA1700 CPUs. At all times take care along with your screwdriver relating to mounting your cooler, as one slip may find yourself scraping a hint on the motherboard and render it ineffective.

AMD coolers use considered one of two routes for securing the cooler to the motherboard. Some make use of the usual socket brackets with which AMD motherboards are outfitted, whereas others require the elimination of those brackets and have their very own mounting mechanisms that you’re going to want to put in.
Utilizing the mounting clips on AMD’s AM4 sockets may be very straightforward, because the cooler has its personal clips that hook onto them, though you would possibly want a pair of needle nostril pliers to press them into place.

Eradicating the clips from AMD motherboards is straightforward as effectively. There are two screws in every clip that should be eliminated, permitting you to carry the clips off the motherboard.

Beneath, there is a backplate, which is likely to be used to mount your cooler or it can embrace a brand new backplate – this will likely be detailed in your cooler’s directions. The set up course of will then very in all probability contain screwing the mount to your cooler into both the default backplate on the again of your motherboard or a brand new one which comes with the cooler.

Relating to mounting your cooler, orient it in order that the fan is blowing air by way of the heatsink and towards the rear of your case. That is the airflow course for the overwhelming majority of instances, particularly if they’ve a rear exhaust fan, as this helps the CPU cooler expel its heat exhaust air out of the case. Nevertheless, some instances do differ of their airflow designs, for instance with a bottom-to-top airflow course, so it is effectively price checking the handbook to your case.

The fan is prone to be powered utilizing a 4-pin connector, which must be linked to your motherboard’s CPU fan header. That is often labeled on the PCB, however its location can fluctuate. It is vital to make use of this header and never any of the opposite ones dotted round your motherboard’s PCB, as this one is particularly designed to cope with the fan in your CPU cooler and should dish out totally different fan speeds accordingly.
8. Match an AIO liquid CPU cooler
The initialism in AIO cooler stands for ‘all-in-one’, and these coolers basically provide a sealed loop comprising a pump and waterblock that sit in your CPU, plus a radiator with followers mounted to it, which work in an identical solution to an air cooler.
With two key elements making up the setup, they’re barely extra difficult to put in than air coolers, however the course of continues to be simple. We’ll run by way of the entire course of of putting in one right here, so you may refer again to it later after we cowl the important thing PC constructing steps.

Begin by eradicating the plastic protecting movie off the underside of the pump’s contact plate, then supply the components from the field wanted to suit the block to your motherboard’s particular CPU socket. As with most coolers, a number of sockets are prone to be supported by your liquid cooler.

Set up the elements required to safe the pump to your motherboard. This course of at all times entails a mounting equipment for Intel motherboards, whereas with AMD Socket AM4 motherboards you both use the plastic brackets already on the board, otherwise you’ll be required to take away them with the intention to create a extra elaborate mounting contraption.

It is now finest to put in the pump/waterblock unit to your motherboard prior to installing the motherboard in your case. Chances are you’ll want to carry a backplate in place whilst you safe the pump from the highest aspect of the motherboard, as that is a difficult job if the motherboard is already put in in your case.
Ideally, you need to set up the radiator in order that it is larger than the pump, and any air within the loop will get trapped within the radiator and never within the pump. For that reason, it is best to put a liquid cooler’s radiator in your case’s roof.

The followers can even should be positioned in order that they blow air by way of the radiator, which must be mounted on to the roof. Begin by becoming the followers to the radiator utilizing the lengthy screws included within the field. These move by way of the followers and safe them to the radiator. The open aspect of the fan is the consumption, with the framed aspect of the fan being the exhaust.

To safe the radiator to the case, you may want to make use of the smaller screws included within the field. Place the radiator within the roof fan mounts and line up the radiator mounting holes with the fan holes within the roof.

Not all instances have roof fan mounts or area sufficient for a radiator, so when you’re on this scenario place the radiator within the entrance of the case with the tubes on the high. You ideally need to have the tube finish of the radiator sitting barely larger than the pump connected to your motherboard.
Lastly, you have to join your cooler’s followers and pump to your motherboard. Some AIO liquid coolers require the usage of a SATA connector out of your PSU for energy, relying in your motherboard just for fan velocity management, whereas others get all their energy from the motherboard.

In any case, until the cooler makes use of some kind of hub, or a software program management system, you may want to attach the followers to your motherboard to get their energy.

Most motherboards have a devoted header for pumps (usually labeled ‘AIO’), which gives a gradual voltage stream, because it’s a good suggestion to run the pumps at full velocity on a regular basis – that is the header to which you join your cooler’s pump/waterblock unit – do not hook up the followers to this header, nonetheless. The one exception is that if there’s only a single cable that powers the pump and followers collectively, wherein case this cable ought to be linked to the CPU fan header.

With the pump linked to your motherboard’s pump header, join the followers to your CPU fan header. Your cooler ought to include a splitter cable if it has a number of followers, permitting you to energy two or extra followers from a single CPU fan header.
9. Set up M.2 SSDs
When you’re constructing a PC for the primary time, or upgrading from an previous system, you may not have seen M.2 SSDs earlier than. In contrast to laborious disks or 2.5-inch SSDs, they do not require cables and as a substitute join on to considered one of a number of M.2 ports in your motherboard, and you may want to make use of the precise one.
When you’ve purchased an M.2 SSD just lately, it in all probability makes use of your motherboard’s PCIe interface to ship and obtain information. If it is the older PCIe 3 normal then it ought to work in any M.2 port. If it is the PCIe 4 or new PCIe 5 normal, although, then verify your motherboard’s handbook to see which M.2 ports help PCIe 4 and/or PCIe 5. Your drive will nonetheless work in a PCIe 3 M.2 slot, however it can run slower.

Your motherboard can even very in all probability present a heatsink for at the very least one M.2 SSD, notably if it is a new mannequin. This is not important for PCIe 3 M.2 SSDs, however it will possibly assist PCIe 4 M.2 SSDs hit their most speeds for lengthy intervals with out thermally throttling. Take away the heatsink from the motherboard and peel off any protecting plastic that is on the thermal pad beneath.

Your SSD will likely be secured utilizing a small screw or latch. The previous screws right into a standoff, which you will want to put in your self. The overwhelming majority of M.2 SSDs are 80mm lengthy and the proper threaded gap for the standoff will likely be labeled both 80mm or 2280.

Subsequent, insert the M.2 SSD into the connector, so its finish part traces up with the notches within the M.2 port. You will want to carry the opposite find yourself by round 30 levels, so it is inserted at a slight angle.

Subsequent, you may want a mini screwdriver to cope with the tiny screw that secures the M.2 SSD. Relying in your motherboard, this may occasionally additionally safe the heatsink too in a single go.

Some newer motherboards use tool-free latches to safe the SSD as a substitute, that are far much less fiddly than utilizing screws. To make use of considered one of these, set up the SSD then safe the latch by rotating it till it locks the SSD in place. You would possibly have to rotate it round a couple of instances to see the way it works. For extra element, try our full set up an SSD information.
10. Check your elements
On very uncommon events, considered one of your elements could arrive defective. The probabilities of this occurring are extraordinarily slim, but it surely pays to check your elements earlier than you construct your PC. You do not need to need to undergo the method of constructing your PC solely to need to dismantle it once more if it does not work.
There is a easy solution to verify all of your components are working, which is to construct your PC exterior of the case. This entails connecting the core {hardware}, plugging in a keyboard, powering it on, and guaranteeing there’s an output to your show from the graphics card. When you get a show, then the essential system works, and you may then get into the EFI to verify the SSD is acknowledged and set the proper reminiscence velocity.
You will need to have your CPU, reminiscence, cooler, and SSD put in within the motherboard at this level, however when you’re utilizing an AIO liquid cooler, be certain it is linked to the motherboard and energy provide, however with out the motherboard or radiator put in in your case but. Put the radiator to 1 aspect – we’ll cowl match the radiator to your case later.

Place the motherboard onto its field, as it will insulate it and offer you room to put in enlargement card backplates. Consider the field as a short lived take a look at bench.

Subsequent, find the 24-pin and 8-pin CPU motherboard energy connectors in your PSU and hook them as much as the corresponding ports on the motherboard.

Subsequent, do the identical to your graphics card, utilizing no matter combos of PCIe energy connectors you want, earlier than putting in the graphics card into the highest 16x PCIe slot on the motherboard. The 16x PCIe slots are the longest horizontal slots on the motherboard beneath the CPU socket, and the one on the high at all times helps the quickest velocity obtainable.

Join your mouse, keyboard, and monitor, with the primary two going to USB ports on the motherboard’s I/O panel, and the latter utilizing an HDMI or DisplayPort cable to a corresponding port on the rear of your graphics card.

Subsequent, we’d like to have the ability to energy in your PC. Join your PSU to the mains and guarantee it is switched on on the again.

In case your motherboard does not have an influence button on-board, the simplest solution to flip in your PC is with a small screwdriver to brief the ability button pins on the entrance panel header. That is the place you join your case’s energy button. Shorting or connecting the pins collectively for a second will inform the motherboard and energy provide to fireplace up. There are not any excessive voltages going by way of these pins – you are completely secure.
Hopefully, your PC will energy on, followers will begin spinning and you may give your self a pat on the again for constructing your first PC. Nevertheless, we’re not fairly accomplished but.
When prompted, hit the Del key in your keyboard to enter the EFI. When you’re not prompted, flip off the PSU to energy the PC down, then energy it on once more and begin tapping the Del key at one-second intervals.

In some unspecified time in the future, the PC ought to enter the EFI, the place we have to verify a couple of settings. Begin by in search of the XMP profile setting on Intel motherboards, or EXPO on DDR5 AMD motherboards (in case your reminiscence helps it).
This is likely to be seen on the EFI’s touchdown web page immediately, but when not, search for the Superior or Tweaker settings tabs and verify the menus for XMP or EXPO profile settings. Enabling the profile that matches your reminiscence’s velocity will make sure the reminiscence runs on the appropriate settings akin to frequency and timings.

Subsequent, find the boot choices within the EFI. Discover the boot menu and verify your SSD is listed within the drop-down menu. It will guarantee it is accessible and put in correctly, ready for Home windows to be put in.

Lastly, we’d like to verify the cooler is working correctly, so the CPU is not going to overheat whereas we’re putting in Home windows. The temperature is seen on the house web page of most BIOS screens, or within the fan management and monitoring part.
At inventory velocity the CPU temperature should not be a lot above 50°C whereas it is sitting idle within the EFI – if it is above 80°C there’s an issue, so be certain the CPU cooler’s fan is spinning, or that the pump in your liquid cooler is certainly plugged in and dealing.
11. Troubleshoot defective PC elements
Your PC does not energy on
This factors at a basic downside someplace, however first be certain the PSU’s energy swap is on, that you have plugged it into the mains and verify all the ability cables to your elements, giving every an additional press into its port. It is even price detaching the 24-pin ATX connector and plugging it in once more, as we have seen this resolve issues sometimes. It is also price unplugging your reminiscence modules and reinserting them – as a final resort, do the identical with the CPU.
Your PC powers on, however there is not any show
This will level once more at unfastened elements, such because the graphics card, energy connectors, CPU or reminiscence, so be certain they’re all seated correctly, but in addition be certain your BIOS is updated and helps the CPU you are utilizing. You’ll be able to strive updating it in case your motherboard has USB BIOS flashback, but it surely’s additionally price resetting the BIOS too through the use of the clear-CMOS function. Your motherboard could have a button to do that, or it’s possible you’ll have to brief two pins utilizing a screwdriver, however seek the advice of your motherboard handbook on one of the best ways to do it.

Figuring out defective {hardware}
When it comes to element failures, there are a few methods to check among the {hardware} to see if it is defective. For instance, you may verify in case your graphics card is defective by eradicating the graphics card, connecting your monitor to your motherboard and utilizing your CPU’s onboard graphics. Not all CPUs have onboard graphics, together with most of AMD’s newest CPUs and Intel’s F-series CPUs, however this can be a helpful possibility when you have it obtainable.

Your reminiscence may be at fault, but it surely’s extremely unlikely each sticks are lifeless. Take away one and place the opposite into the final slot in your motherboard, powering in your PC to see if the difficulty is solved, then do the identical with the opposite stick.
Your CPU, motherboard, and energy provide are tougher to isolate, and you may have to borrow a appropriate mannequin from a buddy or get them to check the elements of their PC. Alternatively, when you have an area PC retailer, they’ll usually take a look at elements for a price. Lastly, it is best to attain out to the retailer from which you bought the {hardware} and clarify that you just suspect one element is defective.
12. Flash your motherboard BIOS
Motherboard releases usually coincide with the launch of a selected vary of CPUs, so the previous are programmed out of the field to help the latter. There might be updates to the motherboard’s software program mind, often known as an EFI or BIOS, that repair sure points recognized after launch or permit it to carry out higher, however you may assure that the motherboard will work with the era of CPUs with which it launched.
For instance, Intel’s present Twelfth-gen CPUs are all supported by 600-series chipset motherboards, akin to these with Z690 and B660 chipsets. Nevertheless, Intel plans on releasing its Thirteenth-gen CPUs this 12 months, and it is probably that motherboards on the market for the time being will not help them out-of-the-box, and can as a substitute want their EFI to be up to date. This similar problem applies to utilizing previous AM4 motherboards with AMD’s newest CPUs.
The issue arises when you purchase a brand new or second-hand motherboard and attempt to mix it with a CPU that is bodily appropriate however not supported by the EFI at the moment put in on the motherboard. If this occurs, you may probably be met with a black display and an successfully ineffective PC.
If this occurs, you have to replace the motherboard’s EFI. There are two methods you are able to do this. You’ll be able to borrow an older CPU from a buddy to fireplace up your PC, set up the newest BIOS, after which drop in your new CPU. Alternatively, you may replace the BIOS utilizing a extremely helpful function often known as BIOS flashback.
This can be a function included with some, however not all motherboards, and it lets you replace the EFI with no appropriate CPU. Actually, you do not even want a CPU to be put in within the motherboard. Each motherboard producer has a barely totally different means of going about it, but when your PC fires up, there’s nothing on the display and you have checked all of the cables, subsequent verify if the processor was launched similtaneously the motherboard. If it wasn’t and the motherboard helps BIOS flashback, it is effectively price attempting the next.
First, you may want entry to a different PC – ask your pals if essential, then obtain the newest EFI out of your motherboard producer’s web site and unzip the file if essential. This will likely be obtainable within the ‘help’ or ‘obtain’ part in your motherboard’s product web page. Ensure you go to the precise product web page. For instance, in case your motherboard is an Asus TUF Gaming Z590, however you attempt to obtain the EFI for the Asus TUF Gaming Z590 WiFi, it will not work.

Subsequent, comply with the producer’s directions for putting the file onto a USB stick. For instance, MSI requires you to rename the BIOS file MSI.ROM, whereas Asus requires you to make use of a easy renaming program to permit your motherboard to see the file. It is vital to comply with this recommendation step-by-step, and in addition make sure the file is not in a folder on the USB drive.
Subsequent, find the USB BIOS flashback port in your motherboard’s I/O panel. When you’re undecided about its location, confer with the handbook. Now comply with the following step within the replace information, which is often to attach the USB persist with the BIOS flashback port, guarantee the ability cables are linked to the motherboard, swap on the PSU after which press the BIOS flashback button.
There’s usually a lightweight close to the button that may flash, displaying you the assorted phases of programming the EFI – after a couple of minutes the method will likely be full. If an previous, incompatible BIOS was stopping your PC from working correctly, you then’ll know immediately, as powering it on will now deliver up a show and let you get into the EFI. You can even try our full information on flash your BIOS for extra element right here.
13. Mount the PC in your case and tidy the cables
Plan your PC construct
We now know what goes the place, that our {hardware} works and we’re prepared to put in it into our case. Nevertheless, there are nonetheless some components to contemplate earlier than you attain to your screwdriver. Begin by having a superb have a look at your case and cables, and understanding the place your wires have to go.

As soon as which elements go the place you have to work out get the cables to and from all the precise locations whereas minimizing litter. Your case may have cable routing holes conveniently positioned across the motherboard tray and elsewhere, enabling you to route cables cleanly out of your PSU to your elements with out trailing all of them throughout your motherboard.

Match the ability provide
Most instances have only one PSU mount, however you’ll want to comply with your case’s handbook to verify whether or not the fan factors up or down.

Feed the cables into the case after which safe the PSU to the mount. Modular PSUs have removable cables, permitting you to take away these you need not save area.
Set up the motherboard
Prior to installing the motherboard, verify that there are standoffs put in in your case’s motherboard space. These are small steel pins that help the motherboard in particular areas, elevating it off the motherboard tray beneath and stopping it from short-circuiting.

These are often put in out of the field, however sometimes you have to screw them your self, so verify the case’s handbook to work out if you have to do that, after which line up the standoffs with the screw holes in your motherboard.

It is a good suggestion to put in some cables earlier than you decrease the motherboard into the case. One in every of these is the 8-pin EPS 12V connector. Route this from the PSU, across the again of your case’s motherboard tray, to the cable-routing gap on the high of the case, after which pull it out of the opening by a couple of inches. Then decrease the motherboard into the case and join the cable to the connector.
Now is an effective time to attach your case’s entrance panel cables to your motherboard’s entrance panel header, which will likely be a lot simpler earlier than the motherboard is fitted into the case.

Run them behind the motherboard tray and out of a gap under the motherboard space, earlier than hooking them as much as the proper headers, which will likely be detailed in your motherboard handbook. Nevertheless, in case your case’s cables aren’t lengthy sufficient, you will have to attend till the motherboard is inside your case earlier than you are able to do this.
The ultimate step earlier than putting in your motherboard is to put in the I/O protect. Most motherboards have these built-in lately, however some nonetheless have separate shields that you’re going to want to put in your self. This will likely be included with the motherboard and sits across the rear ports to stop mud ingress and supply an earth.

Line up the protect with the rear of the motherboard and its ports, then place it into the I/O panel cut-out within the rear of the case. This will take some persuasion, however it can match into place ultimately.
Lastly, gently decrease the motherboard into place in order that the I/O panel is a centimeter or so out from the I/O protect then transfer it throughout in order that its mounting holes line up. Watch out to not let the motherboard scrape towards the standoffs, as they will injury the PCB traces. As a substitute, carry the motherboard barely earlier than transferring it throughout.

Now you should use your case’s motherboard screws to safe the motherboard. Ensure you use all of the obtainable mounting factors and have the case sat flat, so the motherboard is not left dangling vertically.
Set up SATA drives
Your case will in all probability have mounts for each 3.5-inch laborious disks and a pair of.5-inch SSDs, so verify your case’s handbook to see the place these mounts are positioned.

Relating to 3.5-inch laborious drives, you often need to screw a mounting system to the edges of your drive, with the intention to simply slide it out and in of the drive bay.

The tip with the connectors practically at all times wants to take a seat dealing with the motherboard tray aspect of the case, so cables might be routed out of sight and the drive might be simply eliminated, usually by sliding it out. Attempt to mount your drives as near your motherboard’s SATA connectors as doable, as this gives you a better time when cable tidying.

SSDs are extra versatile than 3.5-inch laborious drives and have mounts in all method of positions, however they’re often secured to the mount utilizing screws in both the edges or underside of the drives.

Numerous instances have 2.5-inch SSD mounts behind the motherboard tray, which is our most popular location for them, because it retains the drives out of sight and makes cable tidying straightforward.
Take away enlargement slot covers
To forestall mud ingress, your case’s rear slots, the place the rear panels for PCIe enlargement units akin to graphics playing cards sit, are coated by blanking plates.

You will have to take away those that sit the place your graphics card must go, as it can have its ports and cooling vents there. These often unscrew and slide out, however sometimes you may have to pry out steel sections utilizing pliers – do not use your fingers as they will get scraped.
Set up further followers
In case you have any further followers to put in, have a look at your case’s airflow out of the field and goal to enhance it. If there is not any rear fan, however there is a fan mount, this is a perfect place for an additional fan, as are any vacant entrance fan mounts.

The previous ought to be put in so it is in step with your CPU cooler’s fan, whereas entrance followers are finest positioned, so at the very least one is in step with your graphics card, with most of its depth sitting under the cardboard to feed its cooling followers.
Tidy your cables
With all of your cables put in and linked, it is time to tidy them up behind the motherboard tray. This would possibly seem to be a waste of time, however a mass of spaghetti seems hideous and might truly hinder airflow and make your PC run hotter too, in addition to rising the danger of cables discovering their means into uncovered followers and blocking entry to elements.

In case your case has any pure channels to which you’ll be able to anchor cables, undoubtedly use them, however the bottom line is consistency. Pull any slack from the motherboard space by way of the cable routing holes to the again, collect bunches of cables collectively, and do a take a look at match to see which anchor factors make sense and that are out of vary of some cables.

You’ll be able to then use cable ties to safe the cables in bunches to the case’s anchors. Run the ties below the bunches of cables, thread the cable ties by way of your case’s anchors, put the skinny finish of the tie by way of the buckle, and pull it tight. Do not be afraid to assemble giant bunches of cables collectively and stow them below the PSU cowl in case your case has one.

It’ll have minimal impression on airflow down there and hold all of it out of sight. As soon as you have completed your cable tidying, it is time to use your aspect cutters to trim the ends, leaving a neat line of cable ties. Do not forget that you have to put your case’s aspect panel again, so attempt to hold bunches of cables as flat as doable, with out bulging outwards. Your cable tidying does not have to look immaculate, but it surely does should be safe.

At this level, you are mainly accomplished with the {hardware} aspect. You’ll be able to join your keyboard, mouse, and monitor, plug in an influence cable, swap in your PSU, and hit your case’s energy button prepared for the following stage.
If it does not hearth up, double-check all of your energy cables, in addition to the cables for the case entrance panel – you already know your core PC works from the primary take a look at, so it ought to be straightforward to seek out the issue.
14. Arrange your motherboard BIOS
Energy up your PC and hit the Del key to enter the EFI system so you may carry out some last tweaks. First, head to the EFI’s fan management part and familiarise your self with it. If any followers in your case are annoyingly loud, you may establish them and choose a much less aggressive velocity profile, and even create your personal fan curve.

Watch out for limiting fan speeds an excessive amount of, although, as prolonged gaming periods on sizzling days may see your PC stifled – at all times permit your followers to hit most velocity in case your CPU temperature tops 90°C.
In case your graphics card helps Resizable BAR (known as Good Entry Reminiscence by AMD), you may want to make sure it is enabled within the EFI as it will possibly enhance efficiency in some video games. That is positioned in other places relying in your motherboard producer. First, find the choice for CSM, which is often positioned within the boot menu, and disable it.

Subsequent, you have to allow Resizable BAR. Gigabyte boards have the choice for BAR below the Settings menu, whereas Asus and MSI boards have it below the Superior tab in PCIe Subsystem Settings. ASRock motherboards put it within the Superior menu, and it is generally known as Good Entry Reminiscence. As soon as you have discovered it, allow it. Take a look at our full information on allow resizable BAR for extra element about this course of.
15. Set up Home windows
In case you have entry to a different PC or laptop computer, you may obtain the Microsoft Media Creation Software software program, which lets you create a bootable Home windows set up USB flash drive and makes the method of putting in Home windows straightforward.
This device will seize the newest model and let you set up the working system, that means you simply have to get hold of an official license code to enter later. Your USB stick must have a capability of at the very least 8GB, and the method will wipe every part on the drive, so again up any information you need to hold. 
If you do not have entry to a different laptop, however have already got a license for a real copy of Home windows, USB flash drives can be found on eBay pre-loaded with the identical installer for as little as $7. Microsoft itself now provides Home windows 11 on USB flash drives too, so seize a kind of when you’re beginning afresh and do not have one other PC.

After you have your bootable USB flash drive, head to the EFI and discover the boot menu. Choose boot choices and find your USB flash drive, which can point out it has a Home windows set up on it, then decide it as your first boot possibility. You then want to save lots of and exit your settings and restarting the PC will see it enter the Home windows set up.
Head by way of the installer’s menus till you get to the half the place you decide the drive and partitions on which to put in Home windows. Right here, it is best to be capable to establish the storage gadget onto which you need to set up Home windows, but when not, it is safer to modify off your PC, disconnect all different storage units other than this drive and your set up USB flash drive, and check out the method once more.

If there are any partitions in your SSD, they will present up just like the picture above and you may delete them when you now not need any information on the drive when you’re reusing one.
Permit Home windows to do the remainder of the method by clicking on the drive and deciding on Set up. When the PC reboots, you may be free to enter the EFI once more and swap the first boot gadget to your SSD somewhat than the USB thumb drive – by now, your SSD will point out that it has the beginnings of a Home windows set up on it.
16. Set up your drivers
As soon as you have put in Home windows, hopefully, you may have entry to the Web, at which level you may obtain your motherboard’s chipset drivers from its product net web page, and seize the newest networking and sound drivers too.
In case your motherboard’s Wi-Fi or Ethernet adaptors aren’t acknowledged whenever you first boot into Home windows, and you do not have entry to a different PC, it is best to get an inexpensive 802.11ac USB Wi-Fi adaptor from a web based retailer akin to Amazon.
This fundamental, old-standard Wi-Fi adaptor will likely be extra prone to be acknowledged by Home windows than among the newest built-in Wi-Fi adaptors, and let you hook up with your Wi-Fi router and entry the newest drivers to your {hardware}.
When you’re on-line and in a position to entry your motherboard producer’s web site to obtain the drivers to your particular motherboard, begin by putting in the chipset driver first, then your networking and sound drivers. You additionally have to obtain the newest driver to your graphics card, both from Nvidia or AMD. You’ll be able to then hearth up Home windows Replace and let it verify for updates and set up any it finds for itself and your {hardware}.
17. Set up your software program
A fast solution to set up a number of applications without delay robotically is to make use of Ninite. This lets you choose from a number of installers, akin to Chrome, Firefox, Steam, Skype, Discord and iTunes, and it’ll set up all of them with out you needing to do something.
Some further bits of software program to seize are CoreTemp, GPU-Z, CPU-Z and Cinebench R23. CoreTemp will present you the CPU temperature and Cinebench R23 can run a ten-minute stress take a look at in your CPU.
So long as the CPU temperature does not high 90°C you may be high quality. In the meantime, GPU-Z does the identical to your graphics card, besides it is price taking part in your standard video games for half-hour and recording the height GPU temperature. So long as it is not topping 80°C regularly then it is high quality.
And that is every part you have to find out about constructing a PC – we hope you take pleasure in taking part in along with your new gaming rig. If you wish to know which merchandise you have to purchase to construct the most effective gaming PC, ensure you additionally try our full information to the finest PC case, in addition to our finest SSD for gaming information.