
The Zebralight SC600w IV Plus HI flashlight encompasses a impartial white Cree XHP50.3 HI emitter and a deep reflector for a fantastic beam profile. Learn on for extra!
Official Specs and Options
Right here’s a hyperlink to the Zebralight SC600w IV Plus HI flashlight product web page.
Variations
Whereas there’s only one model of the Zebralight SC600w IV Plus HI flashlight particularly, there are variations on this mild and there are earlier variations, too! That is the IV mannequin, in spite of everything.
Worth
The Zebralight SC600w IV Plus HI flashlight has seen a worth improve pretty just lately and is at present out there for $109.
What’s Included
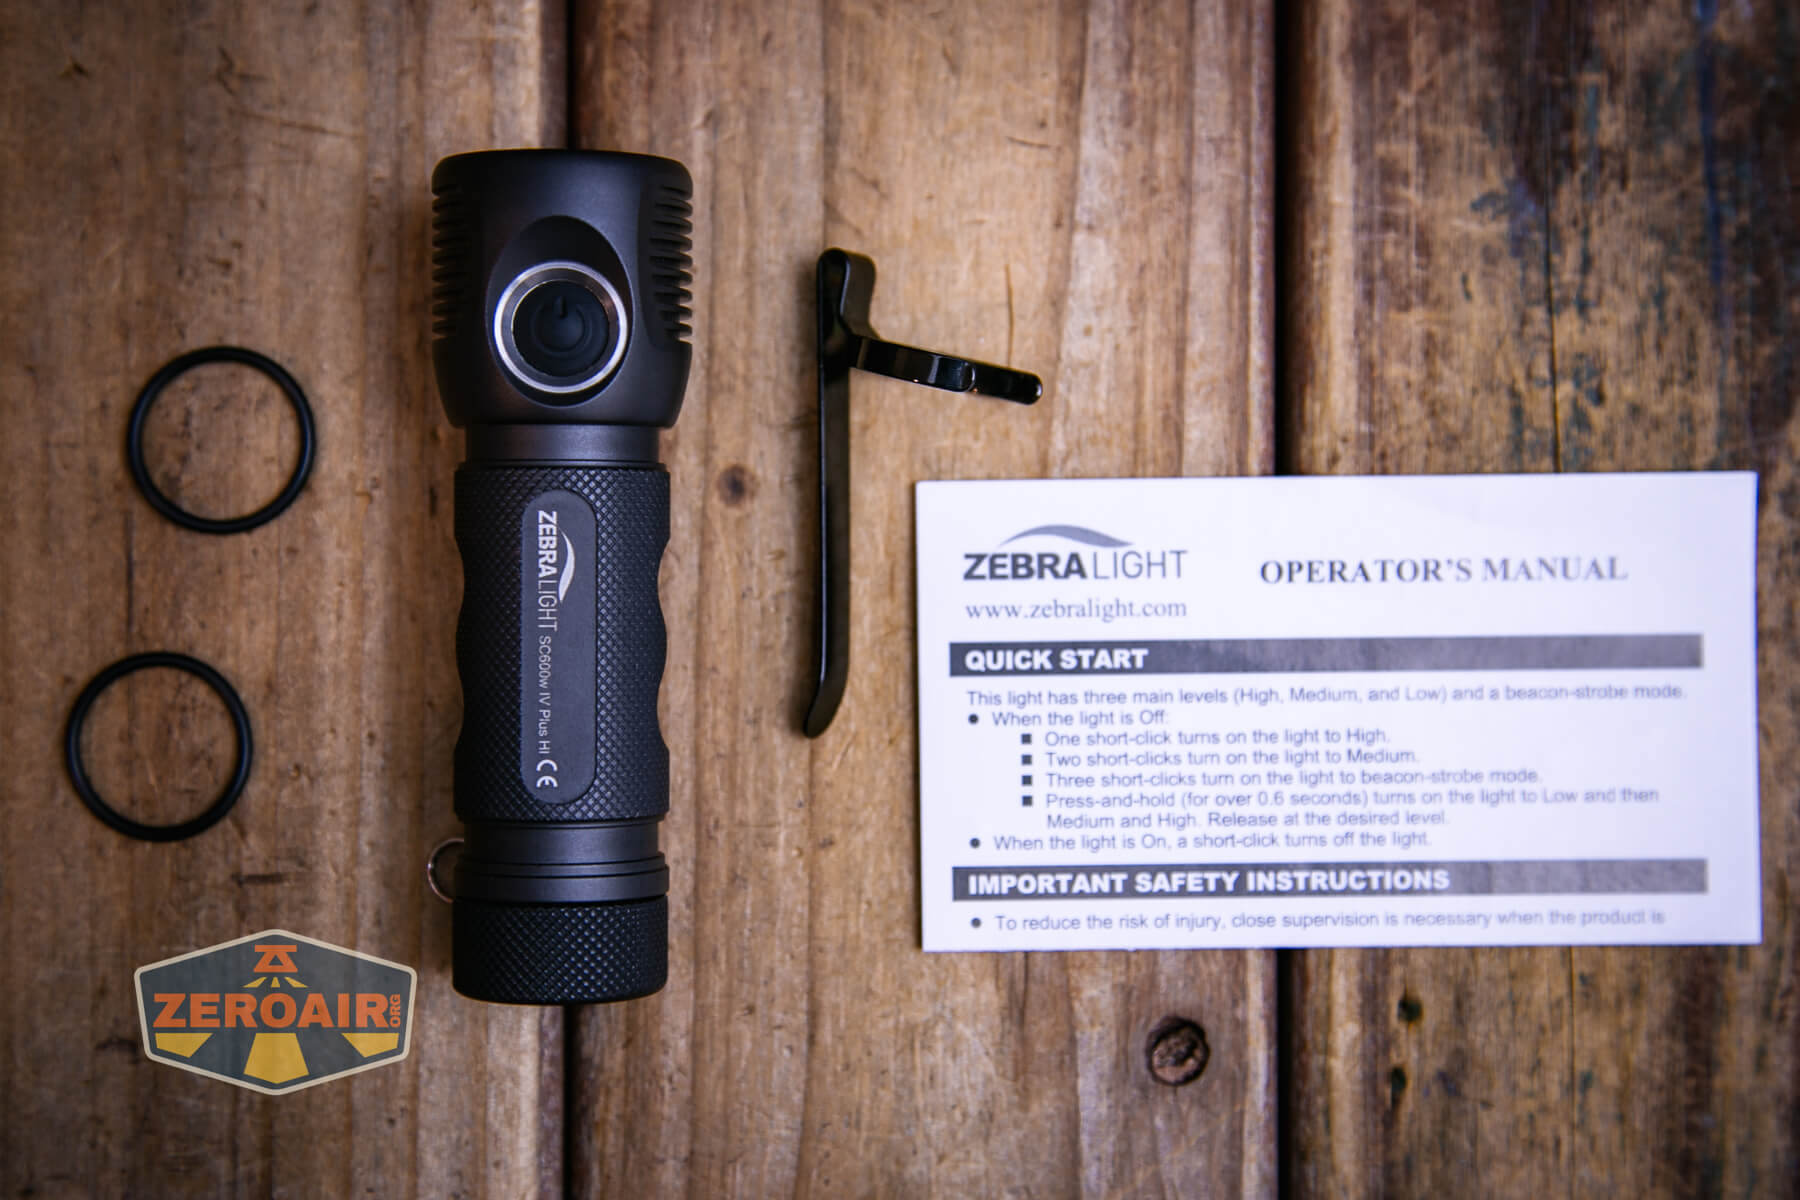
- Zebralight SC600w IV Plus HI flashlight
- Spare o-rings (2)
- Pocket clip
- Guide
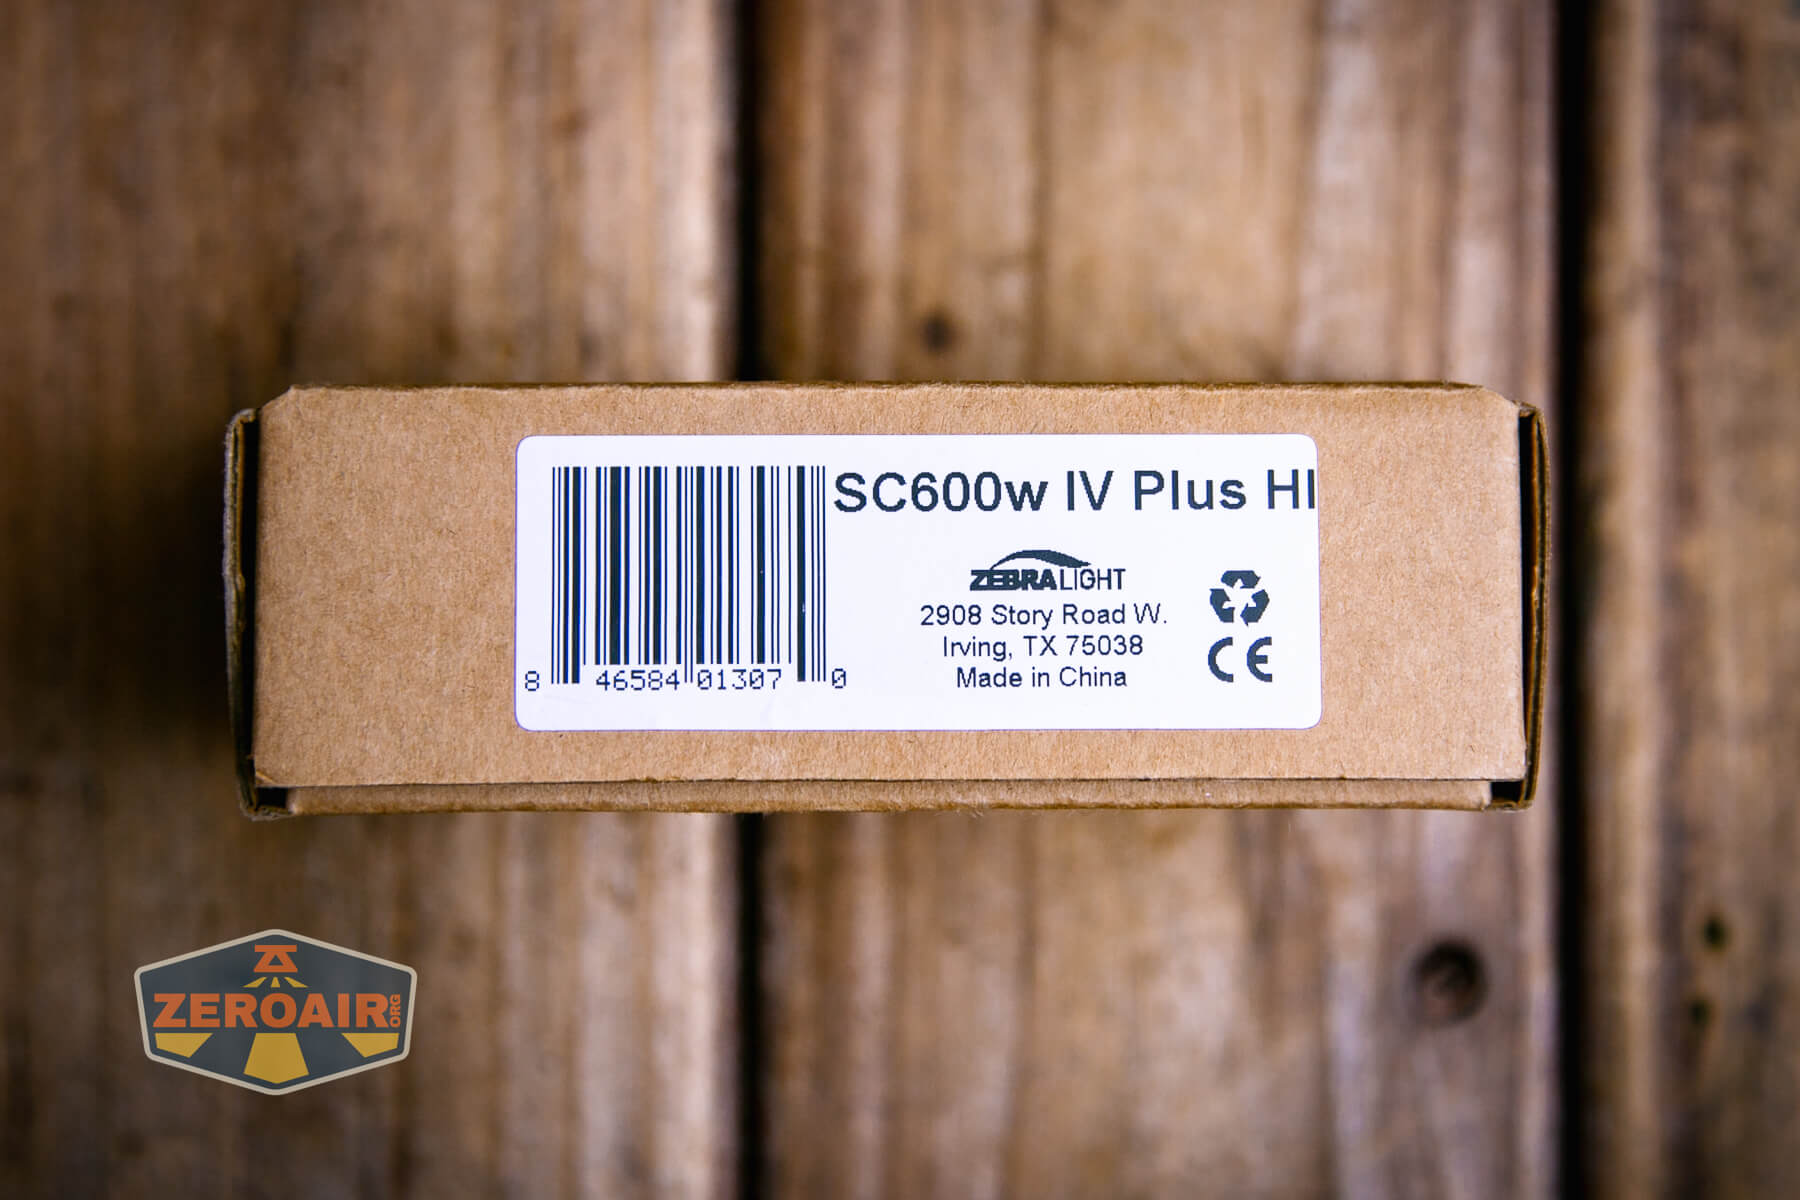
Bundle and Guide

Construct High quality and Disassembly

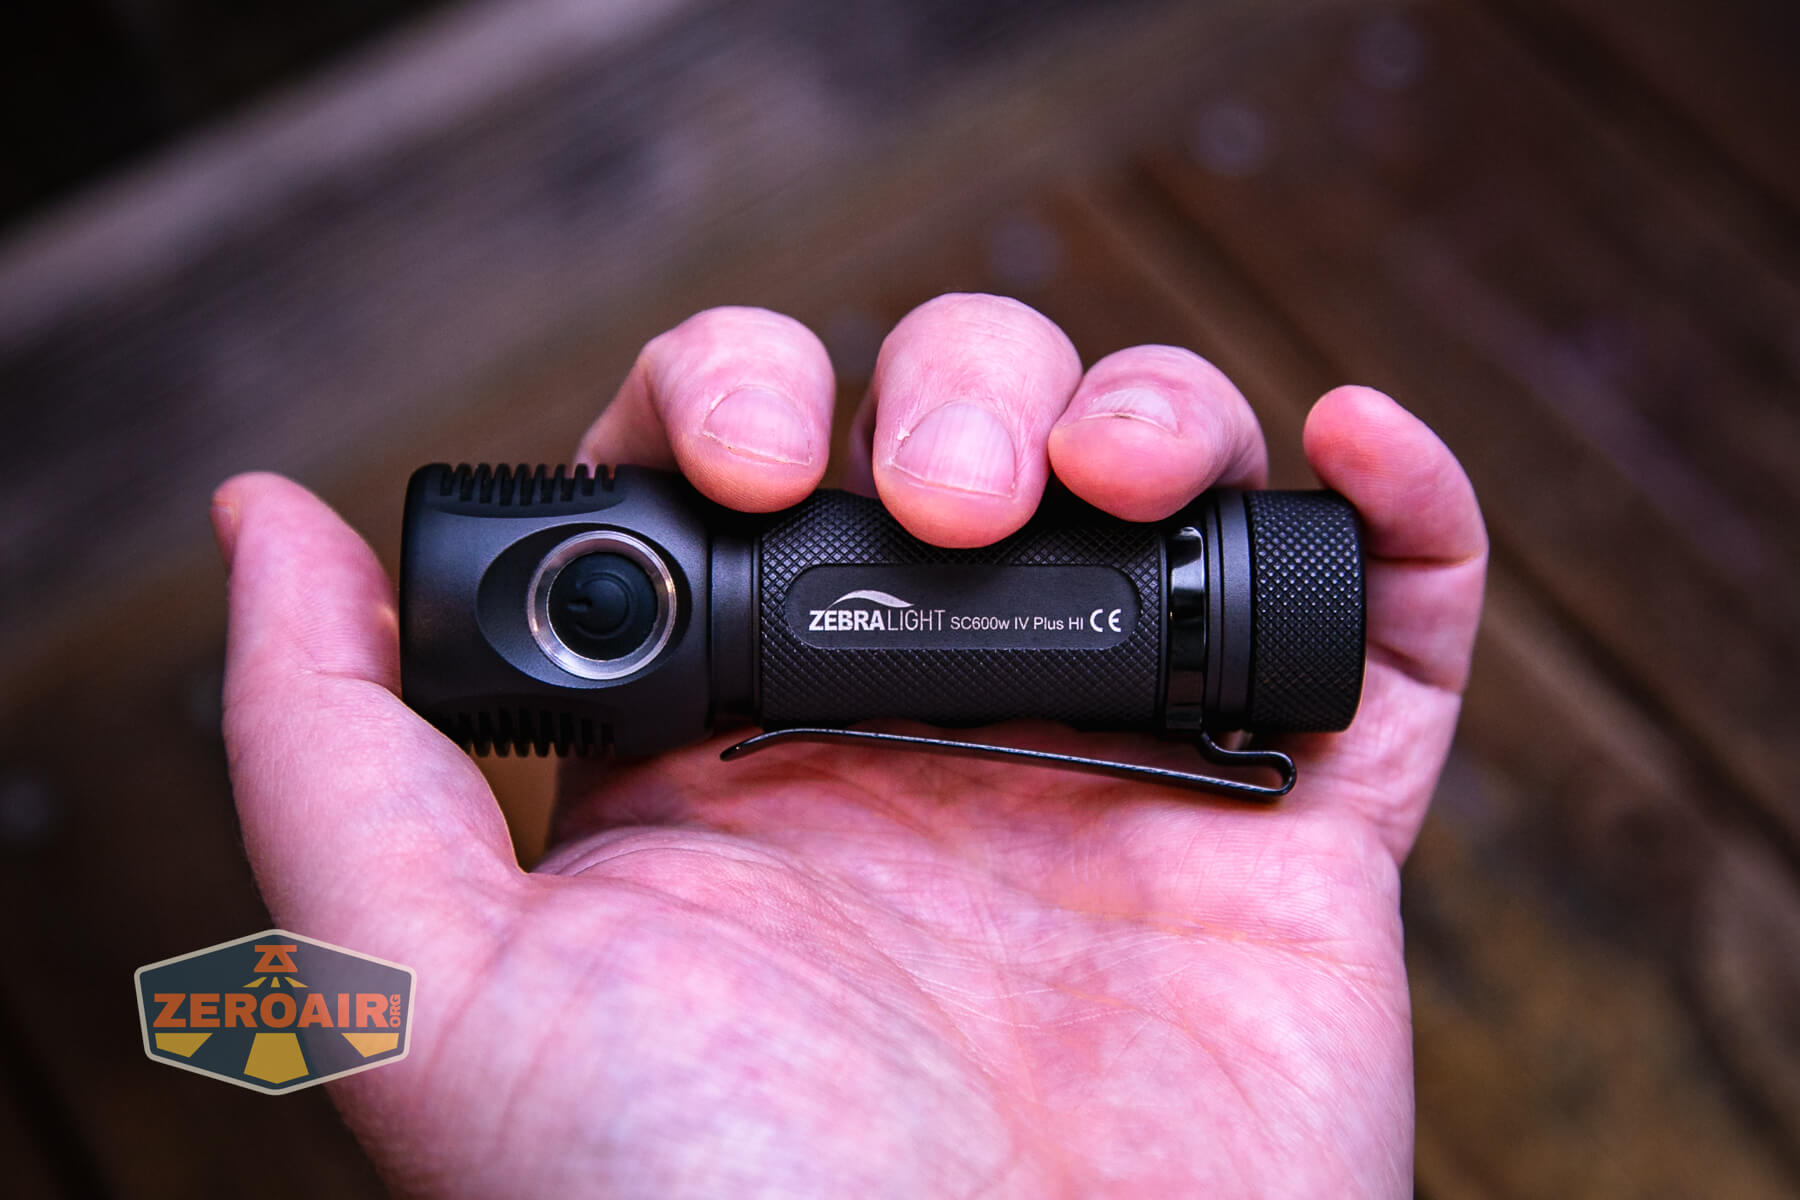
Zebralight is thought for this “pure” anodization that’s used on all their lights. The Zebralight SC600w IV Plus HI flashlight has this too. This model has a bit extra shiny end, although, and is perhaps an developed model of among the older-style “pure” anodizing. Both method, it’s very good.
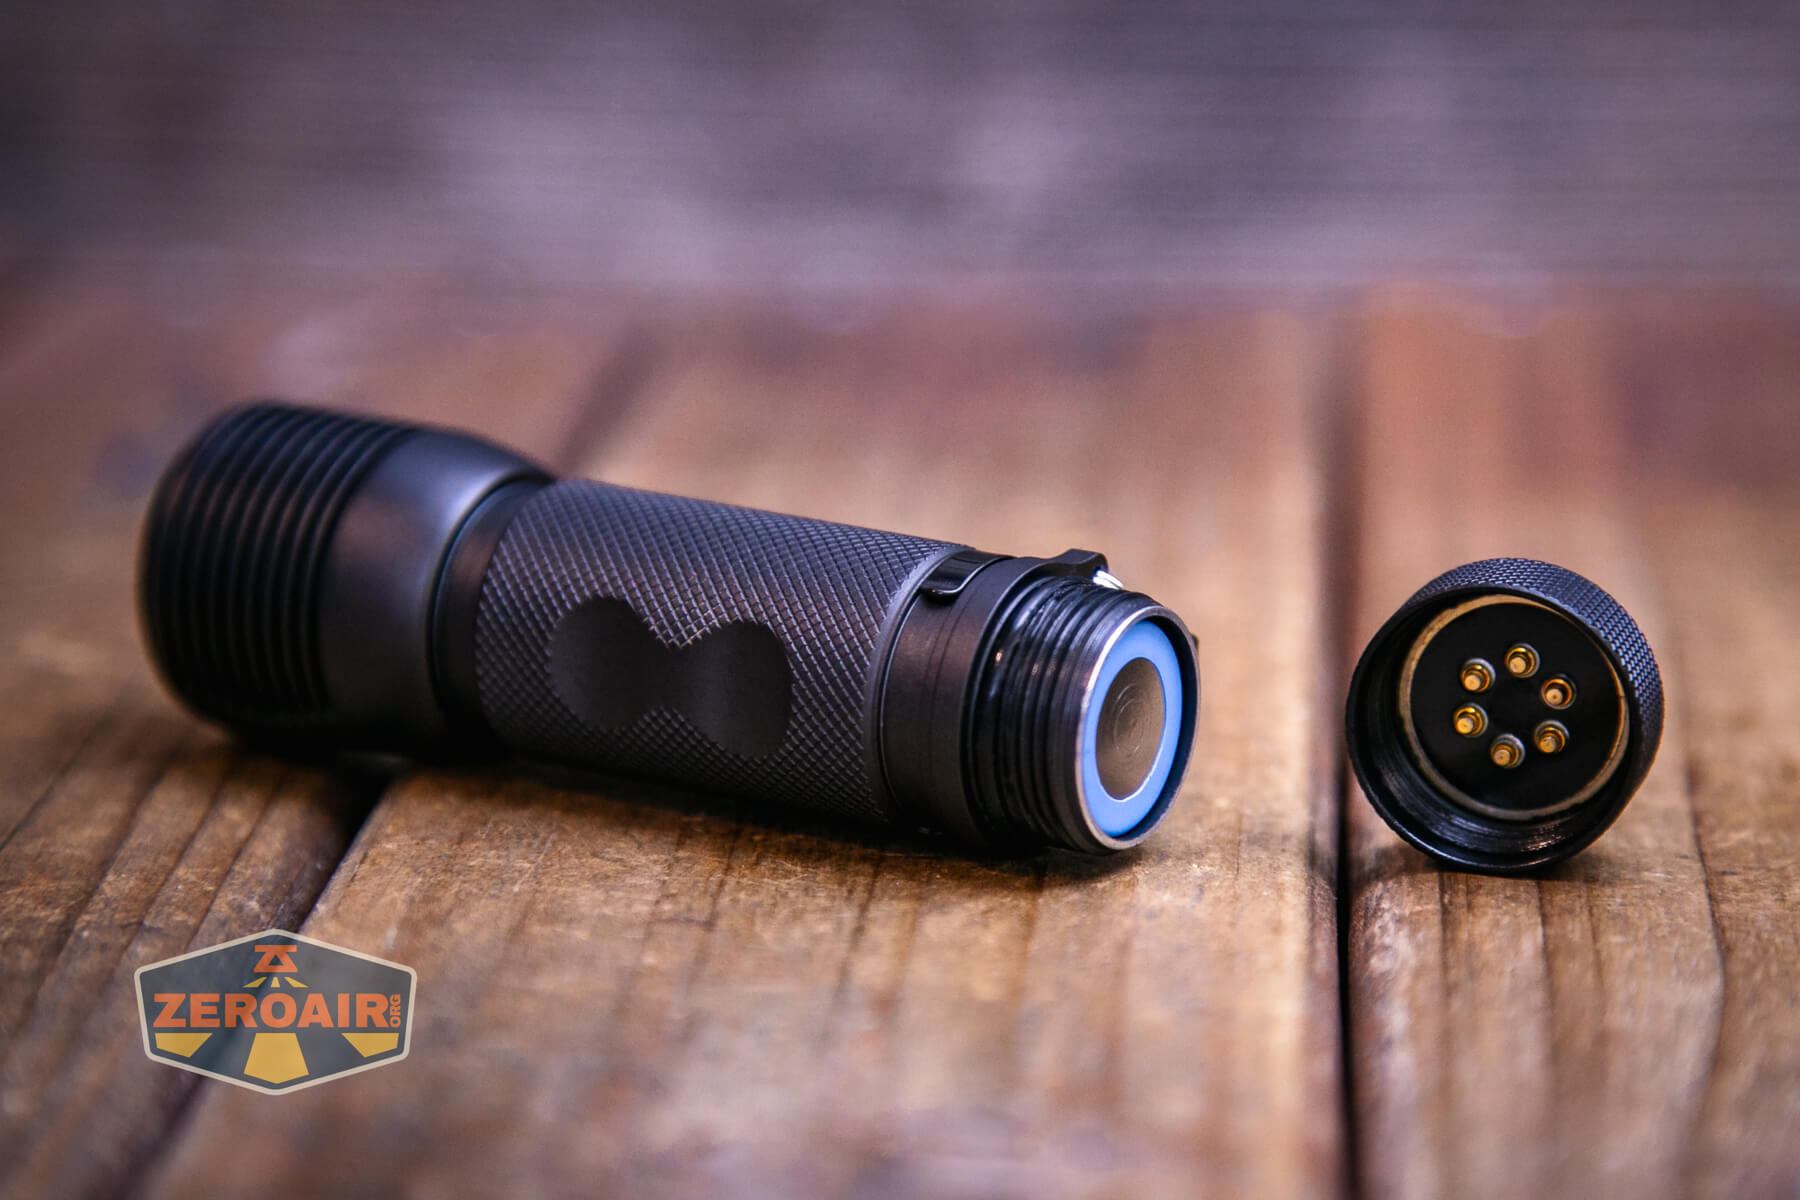
The tail finish has pogo pins!
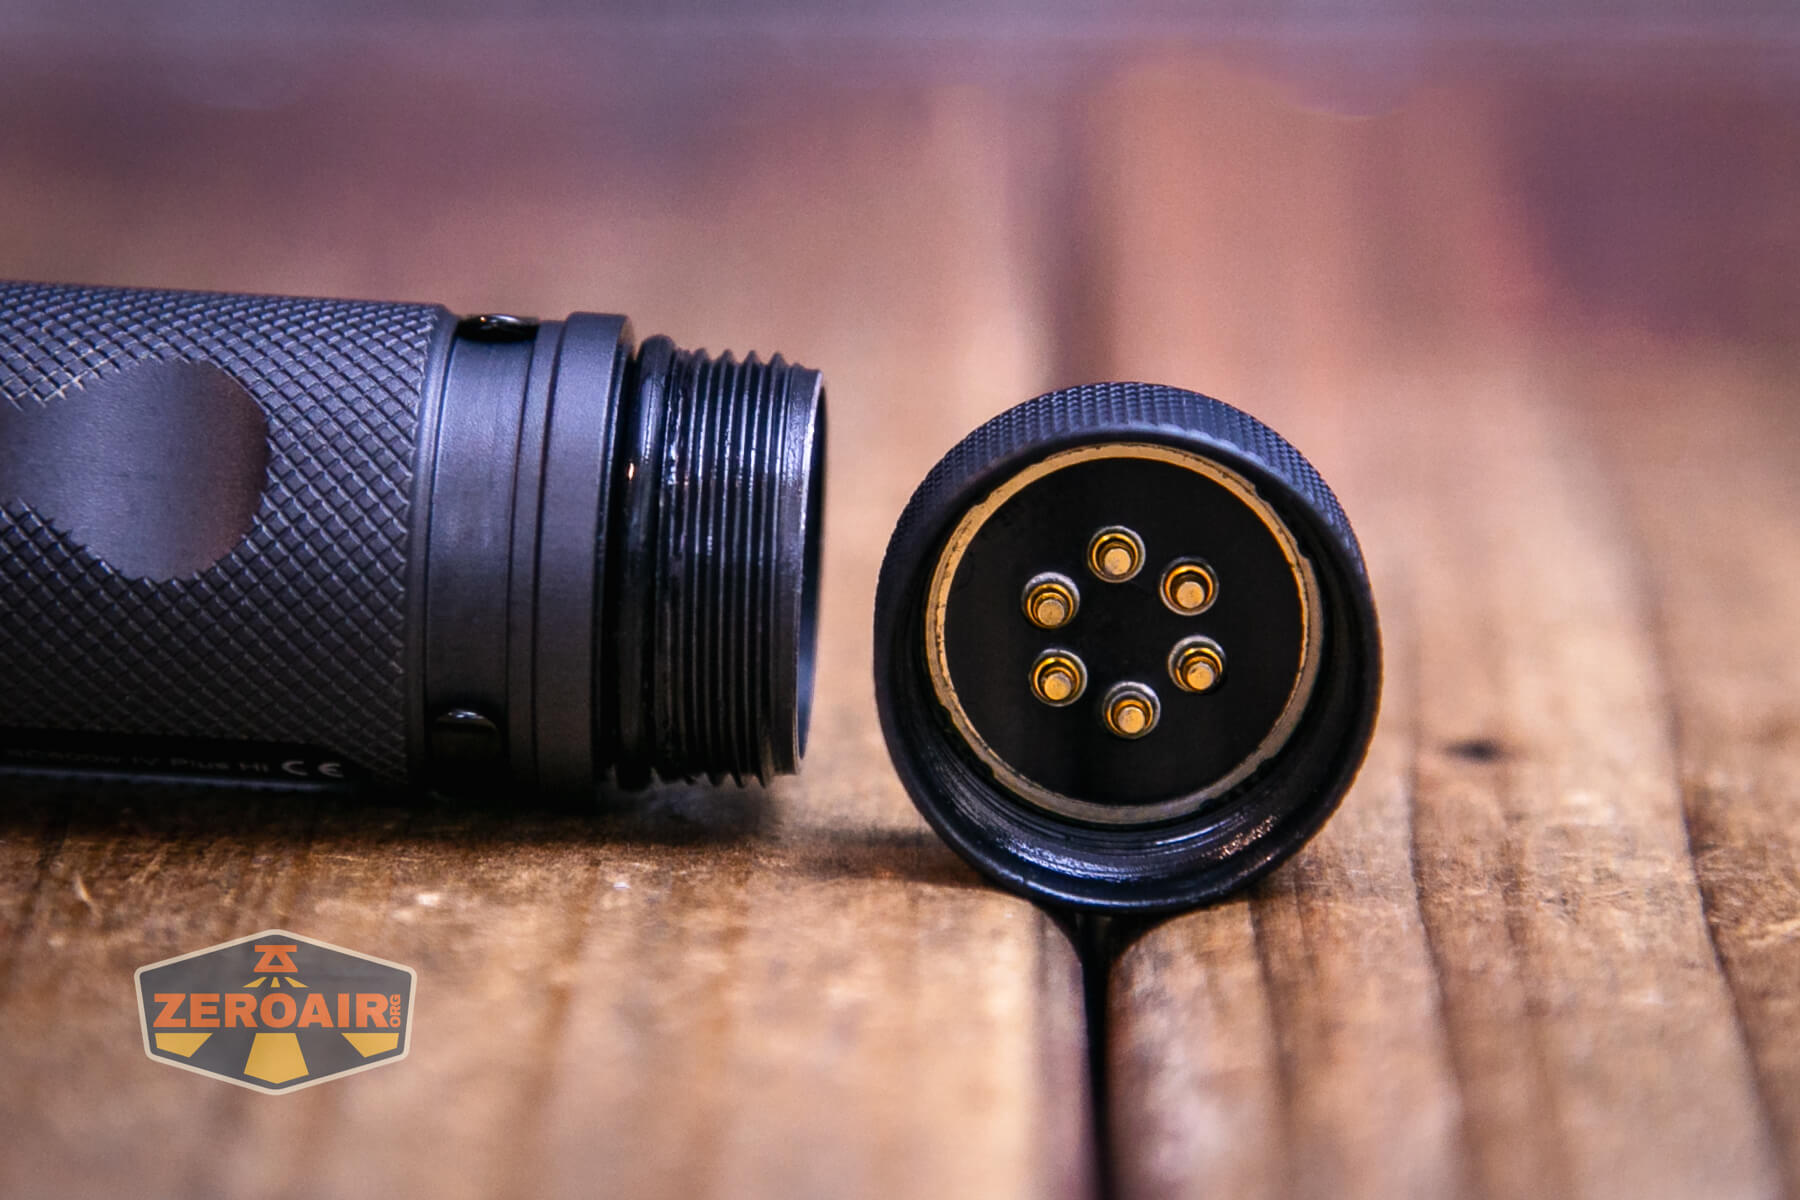
The top finish has the identical!
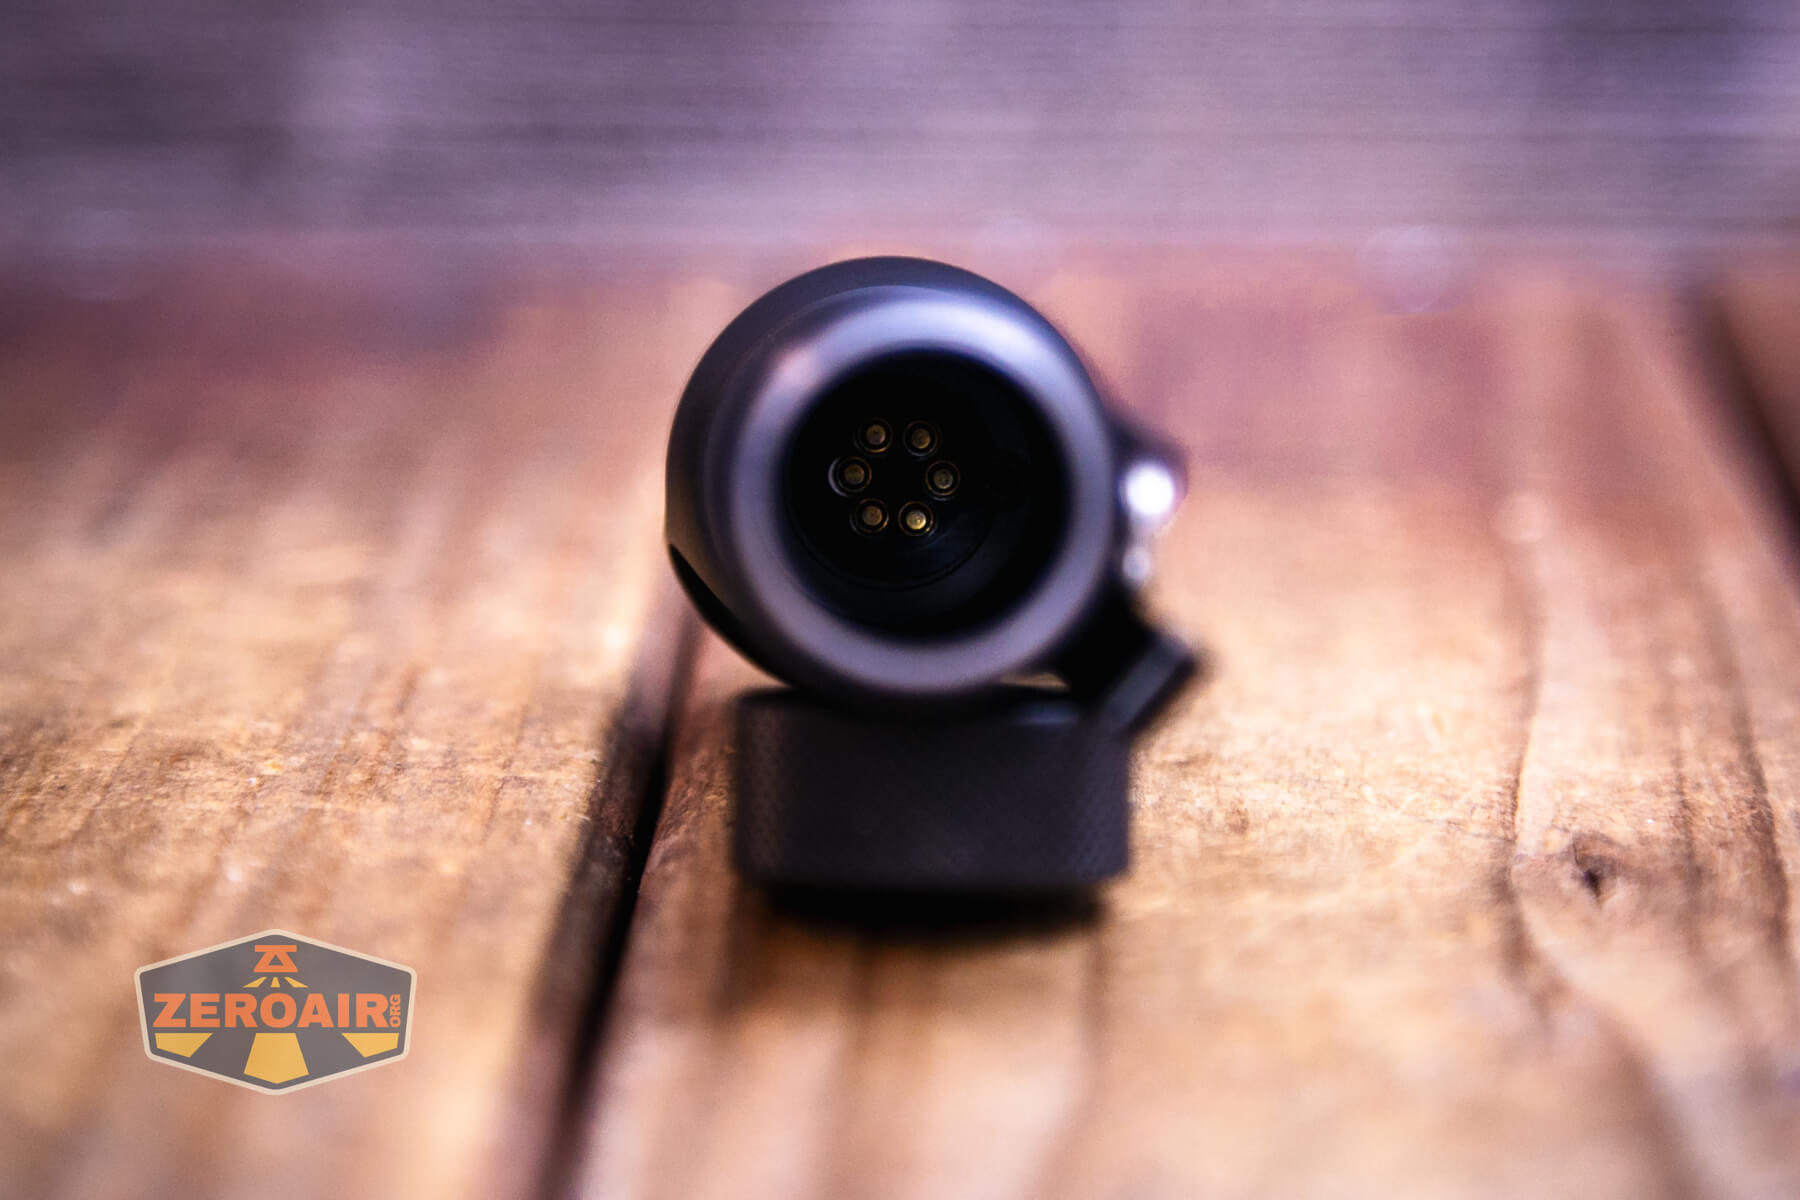
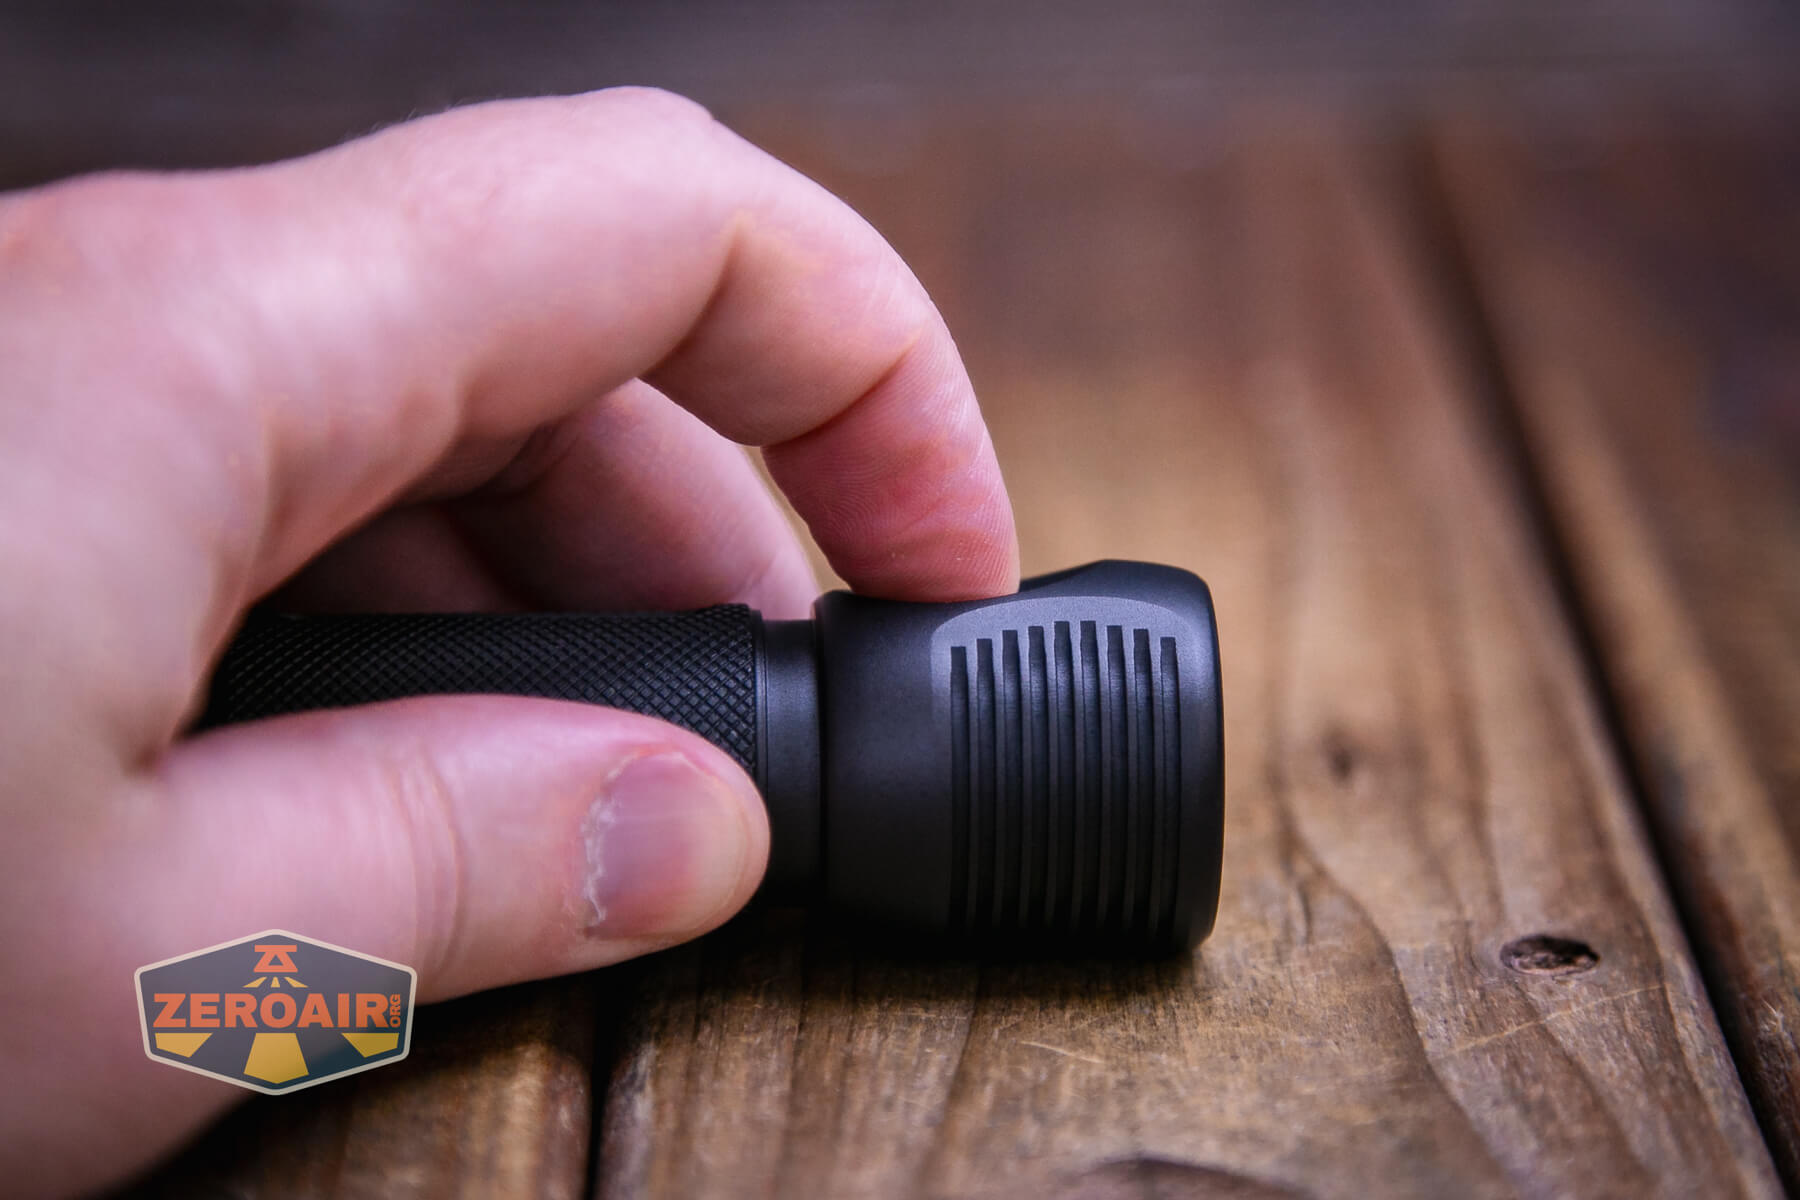
Right here’s the top. I like how the top flares and incorporates this huge, deep reflector. Additionally, these cooling fins whereas not deep, do perform fairly properly to handle warmth. Extra on that later, although. This head could be very comparable, however smaller in diameter, to that of the Zebralight SC700d.

Measurement and Comps
Head Diameter: 1.2 inch (30 mm)
Physique Diameter: 0.98 inch (25 mm)
Size: 3.8 inches (96 mm)
2.26 oz (64g) with out battery
If the flashlight will headstand, I’ll present it right here. If the flashlight will tailstand, I’ll additionally present that right here too!
Right here’s the check mild with the venerable Convoy S2+. The model beneath is a customized laser-engraved Convoy S2+ host by GadgetConnections.com. I did a full submit on an engraved orange host proper right here! Or go straight to GadgetConnections.com to purchase your Convoy S2+ now!
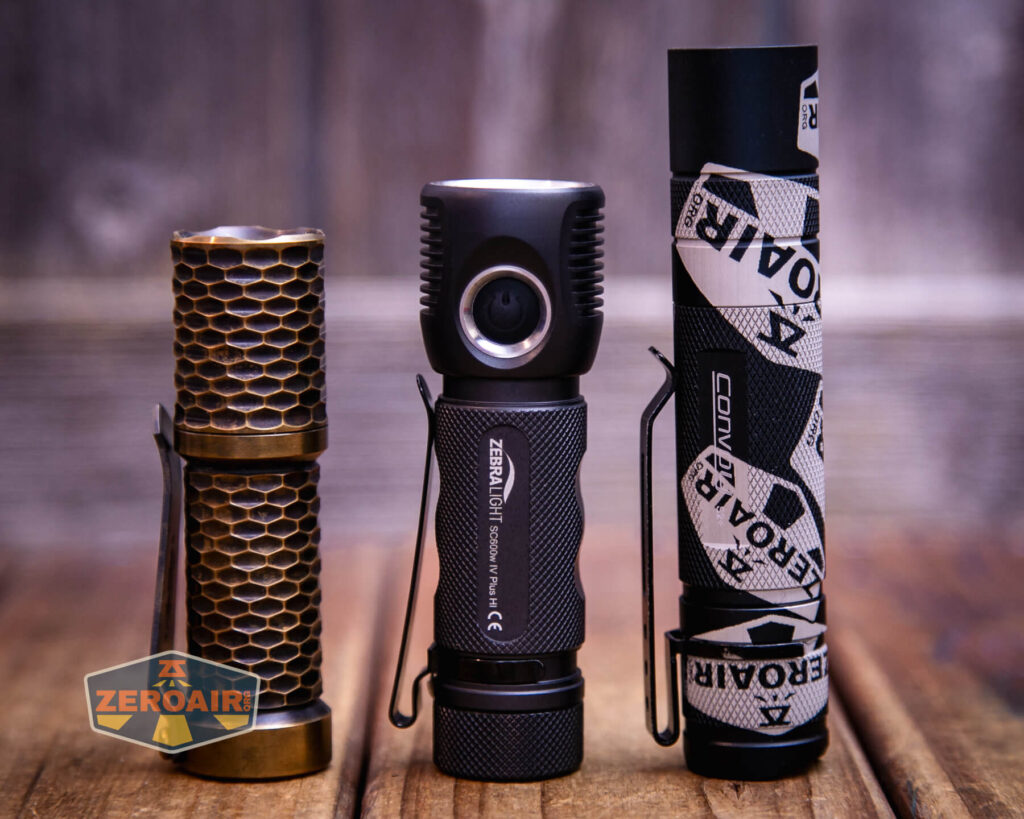
Within the photograph above, you might observe that the SRM (customary reference materials) flashlight for comparability has modified! I used a TorchLAB BOSS 35 for ages. Now, what you possibly can see because the 18350 SRM is the Hanko Machine Works Trident. Whereas I’ve not reviewed or examined the Gunner Grip model seen right here, I’ve examined a Hanko Machine Works Trident Whole Tesseract in brass. I like the Trident, and it’s a placing distinction subsequent to the cheap Convoy S2+, which additionally makes a fantastic customary reference materials.
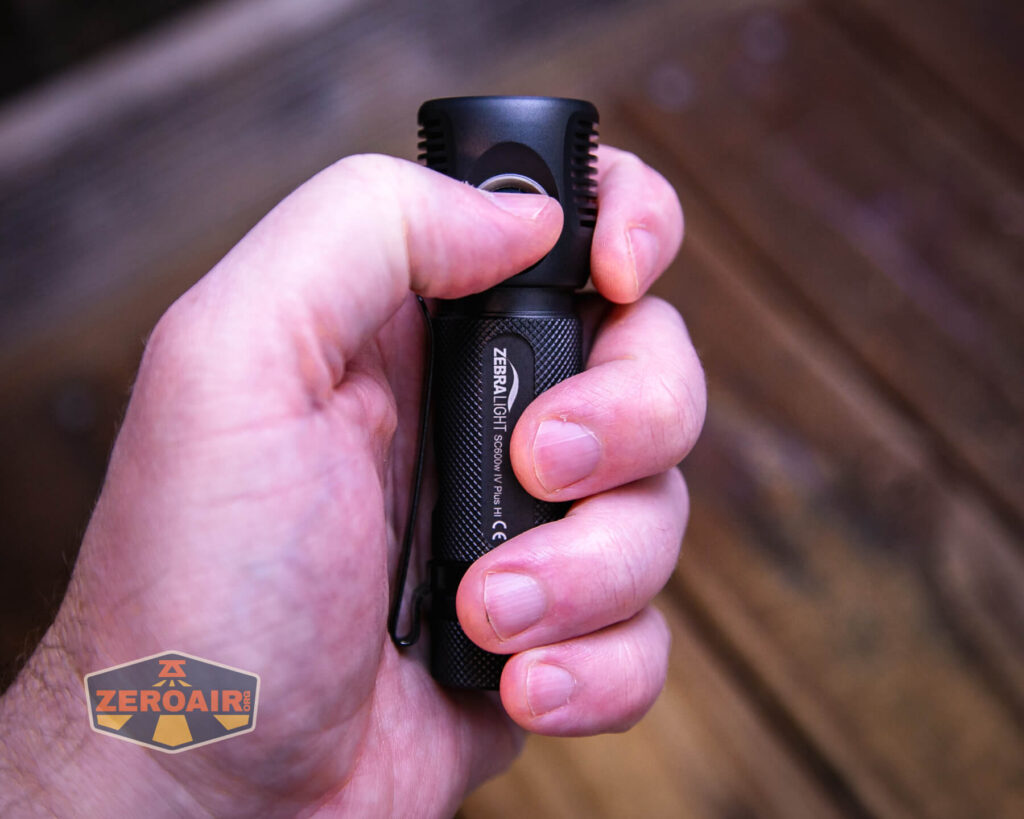
Retention and Carry
There’s a detachable pocket clip with the Zebralight SC600w IV Plus HI flashlight.
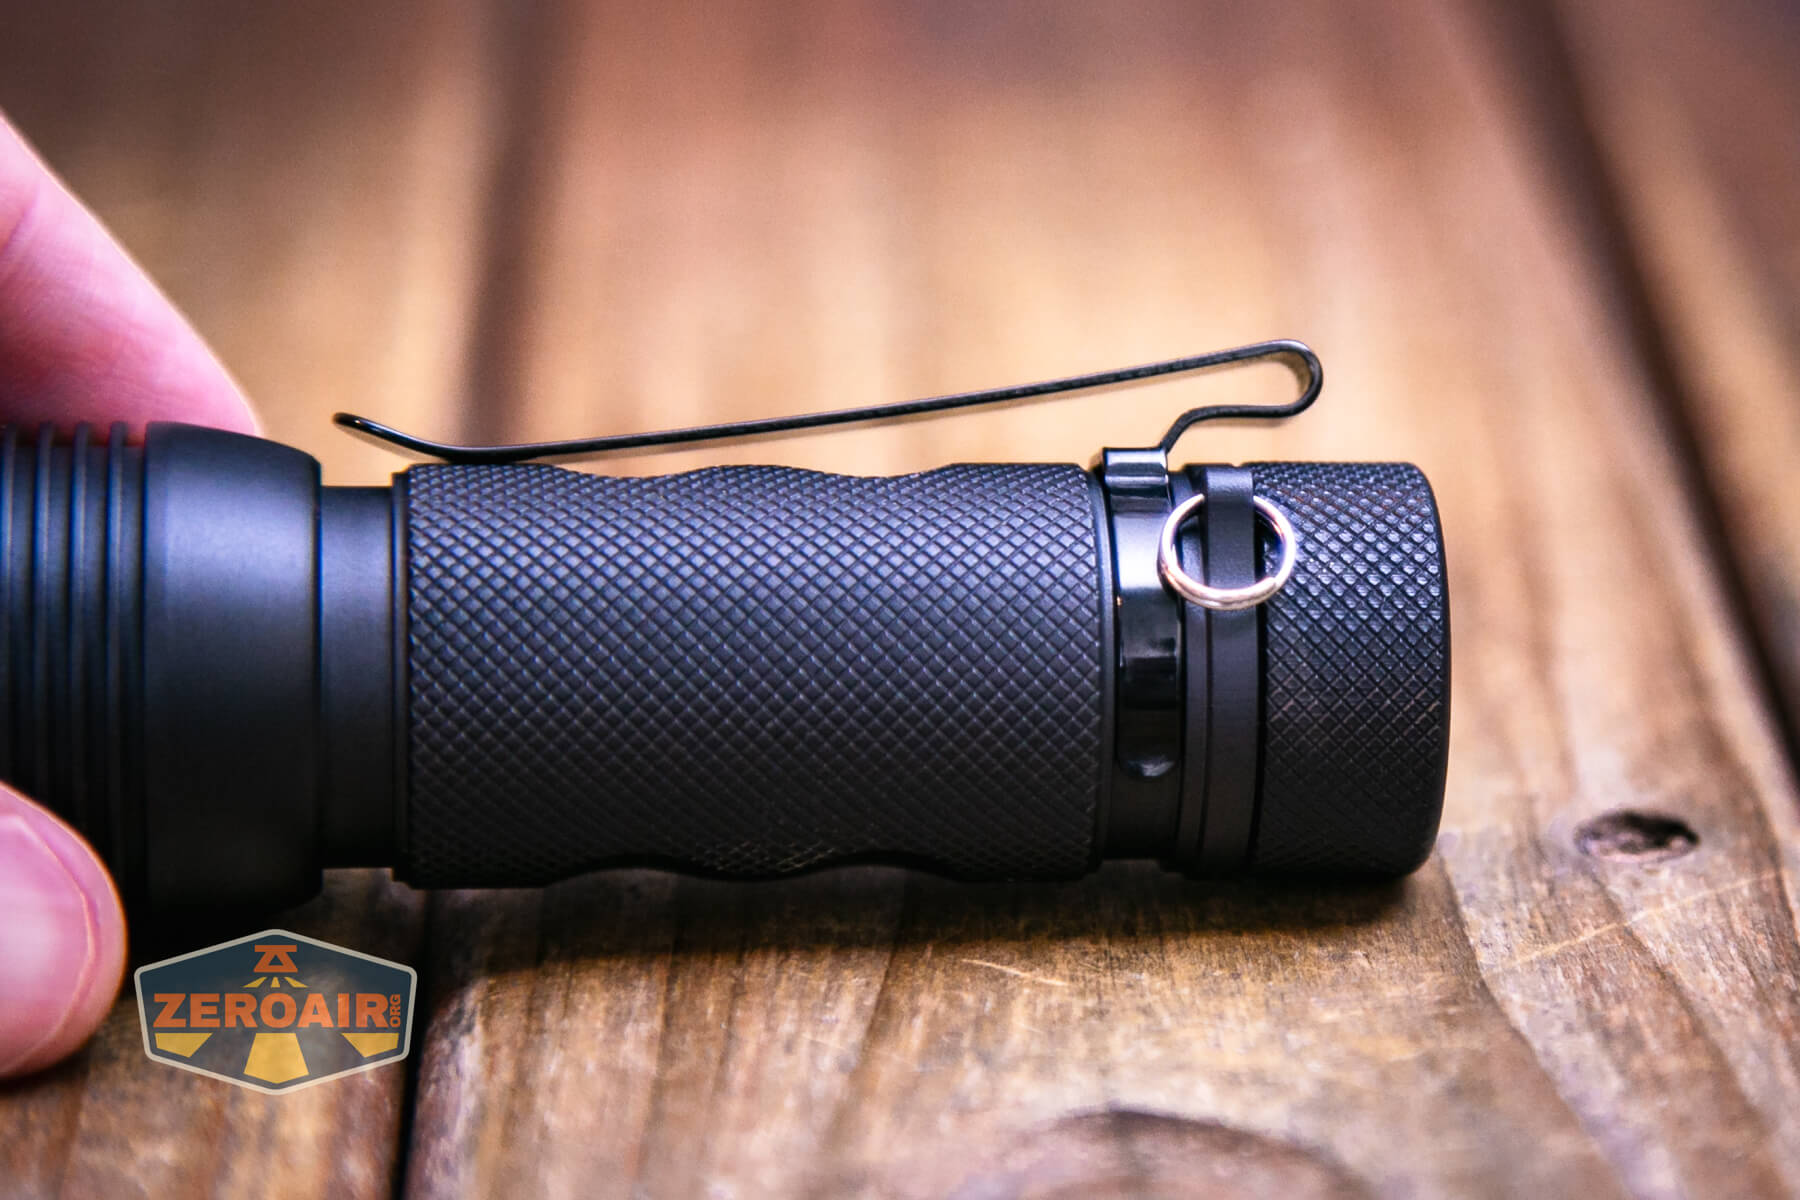
In regards to the clip: This isn’t the run-of-the-mill clip that’s on so many lights these days. These clips are good, however this clip is healthier. It’s extra of a deep carry clip, which additionally has a shiny end that permits simple on and off a pocket. The carry is nearly deep sufficient to place the sunshine flush with the highest fringe of the pocket – the sunshine sticks over the clip by only a few mm. I like these ubiquitous clips simply fantastic: I actually like this clip. (Observe this isn’t simply Zebralight fanboy speaking: the JETBeam Jet-II Professional had a clip on this similar type, and I beloved that clip too.) The clip is not reversible since there is no such thing as a groove on the top of the sunshine for it.
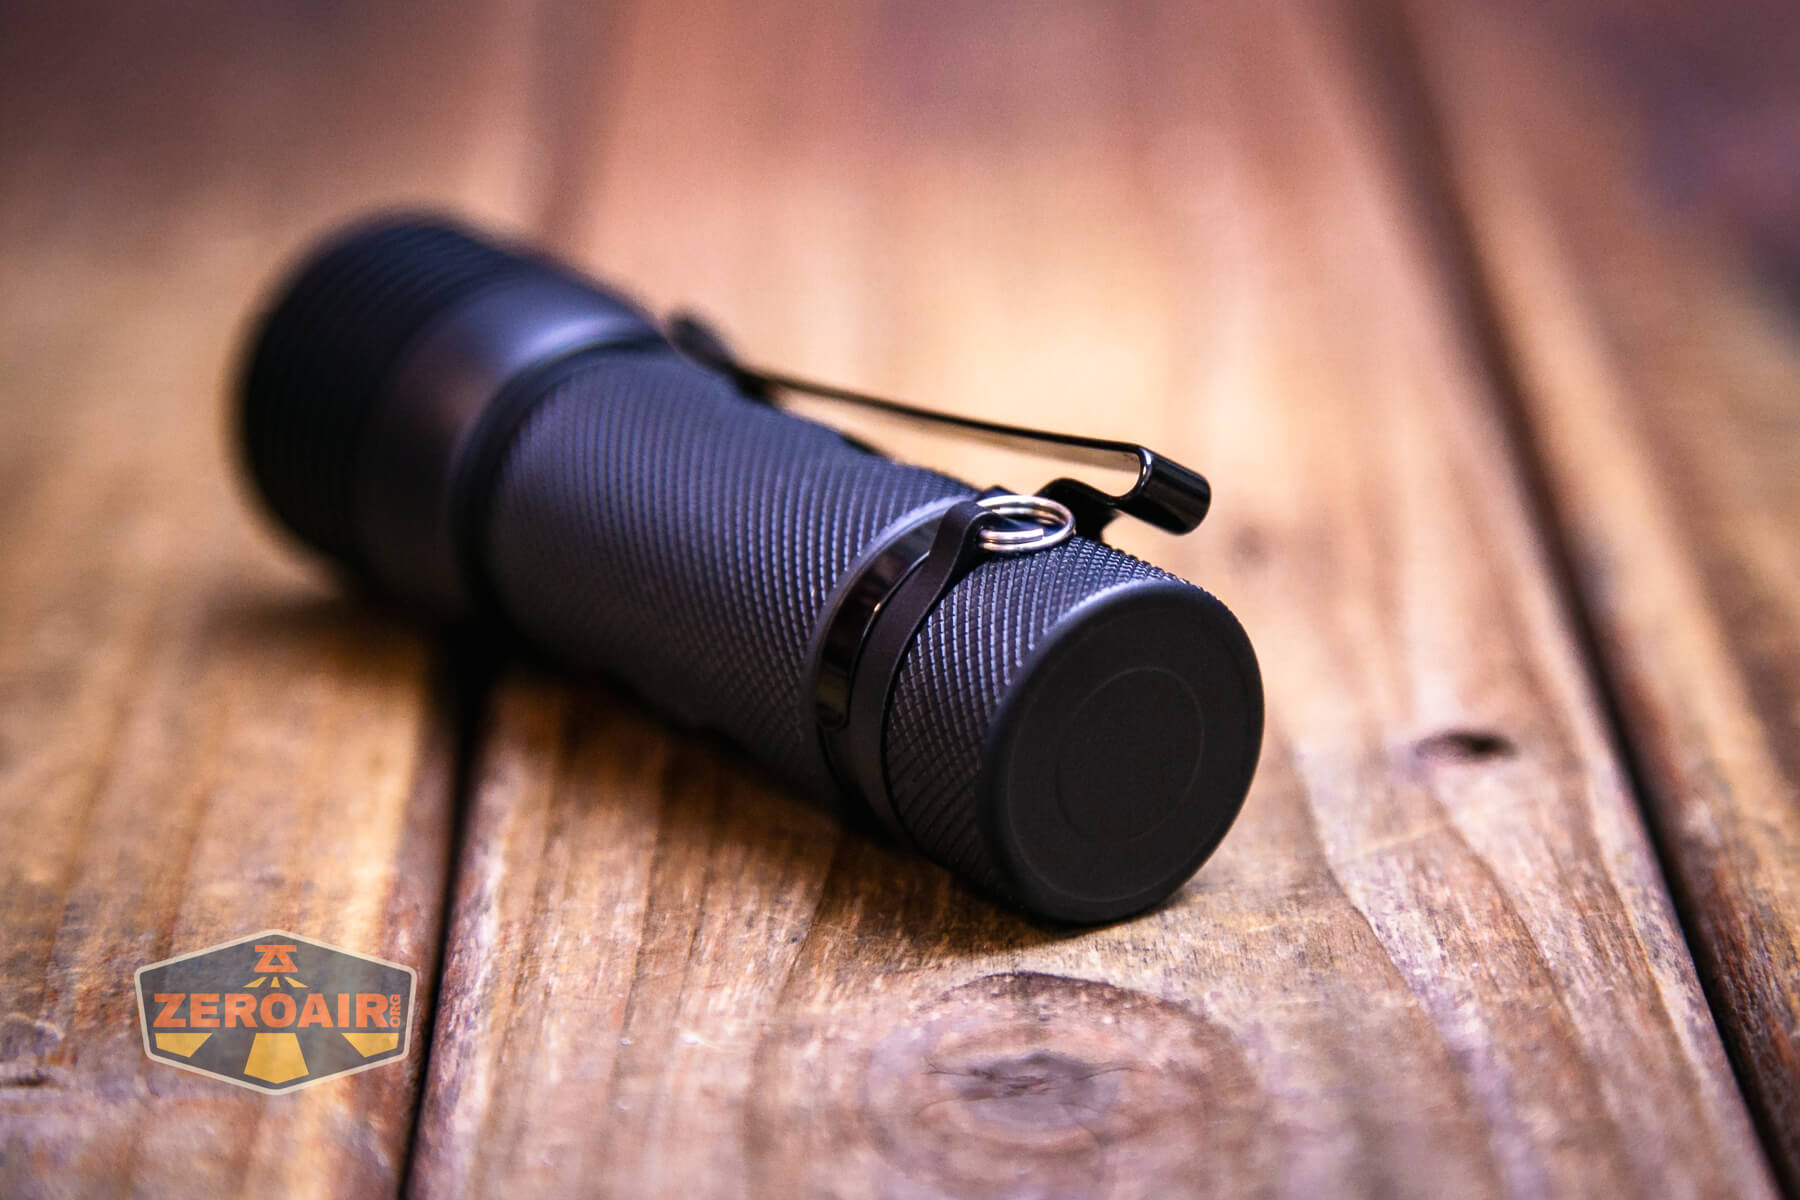
In each images above, you possibly can see the break up ring. That ships connected to the sunshine. Not simply that, but it surely attaches to a everlasting bulge slightly below the tailcap.
Energy and Runtime
The Zebralight SC600w IV Plus HI flashlight runs a single lithium-ion cell. I examined the sunshine with is that this 3.5Ah cell seen beneath.. You’ll want to make use of a flat-top, unprotected cell within the SC600w IV Plus HI.
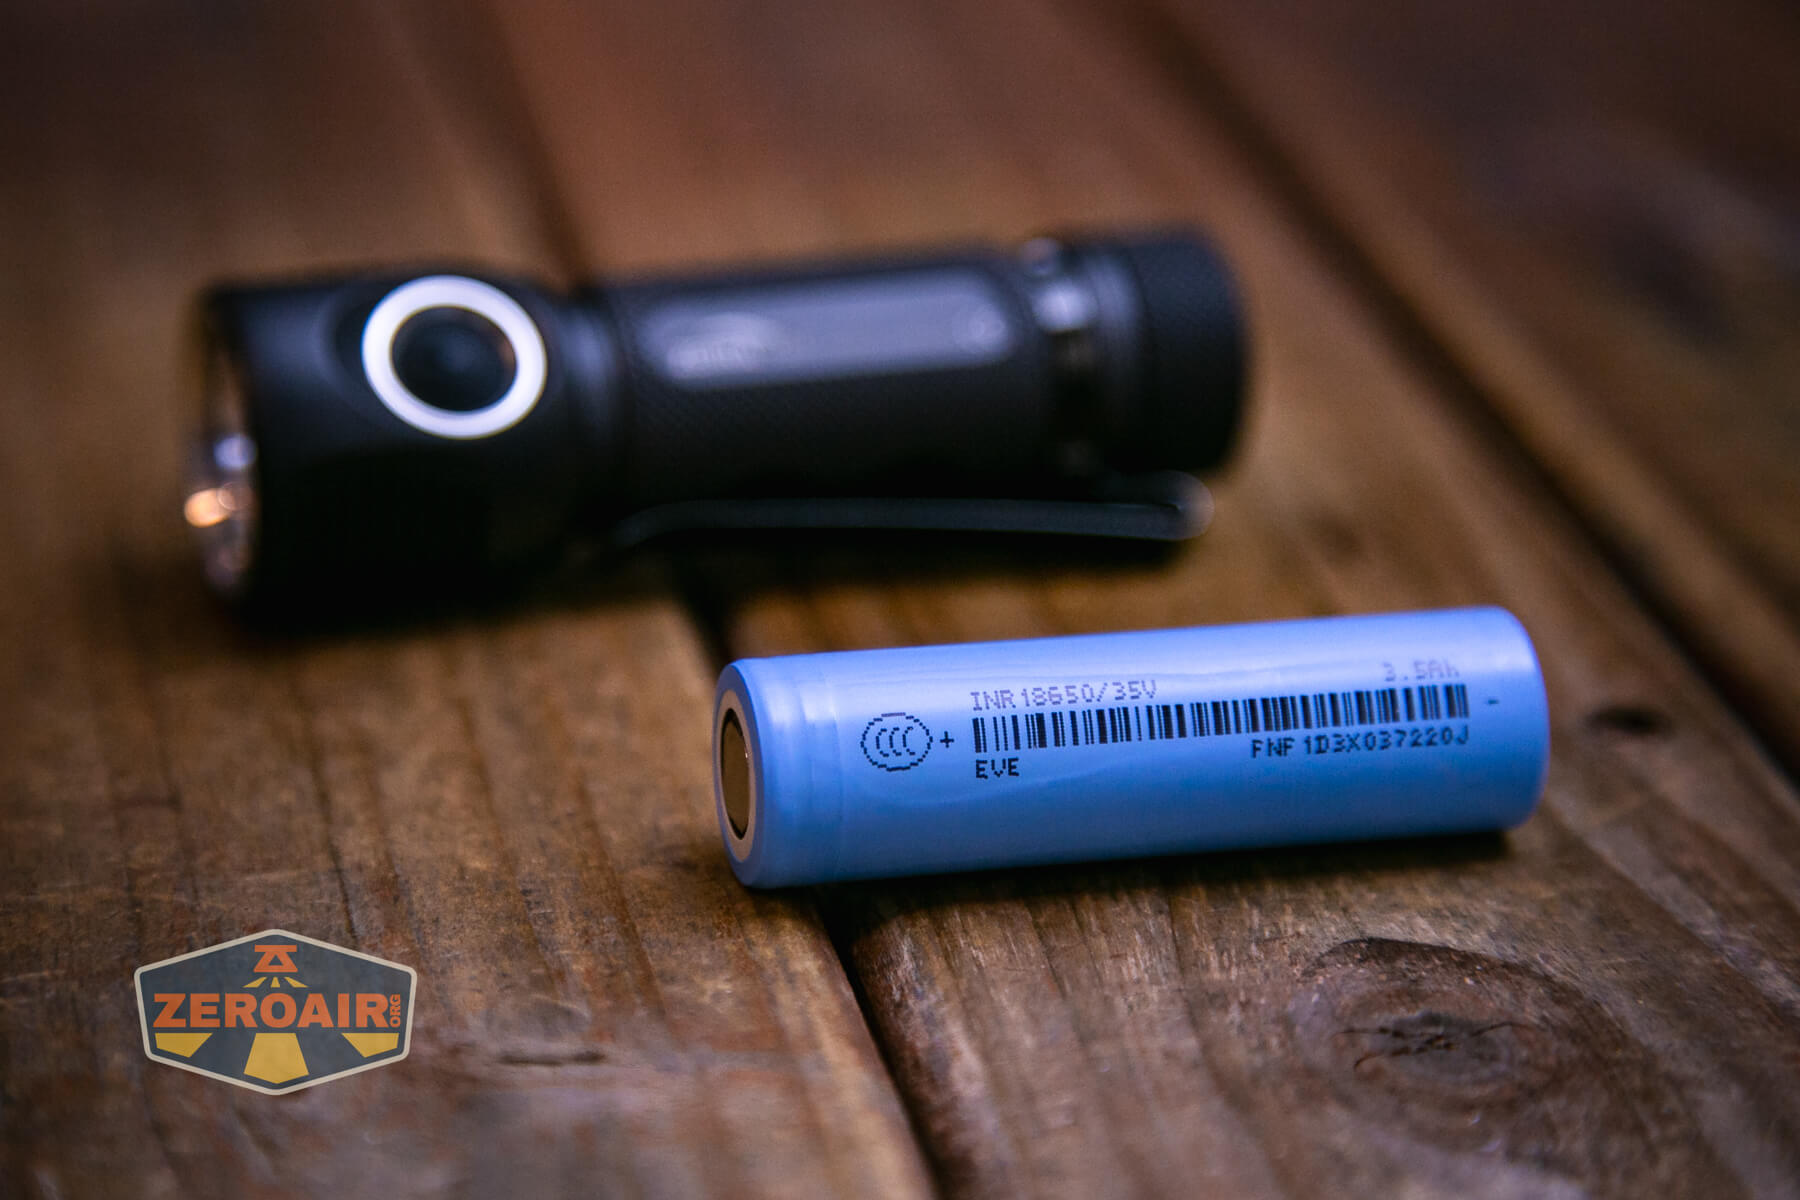
The cell goes into the Zebralight SC600w IV Plus HI flashlight within the ordinary course – constructive finish (button) towards the top.
Listed here are a number of runtimes with the blue cell talked about above.
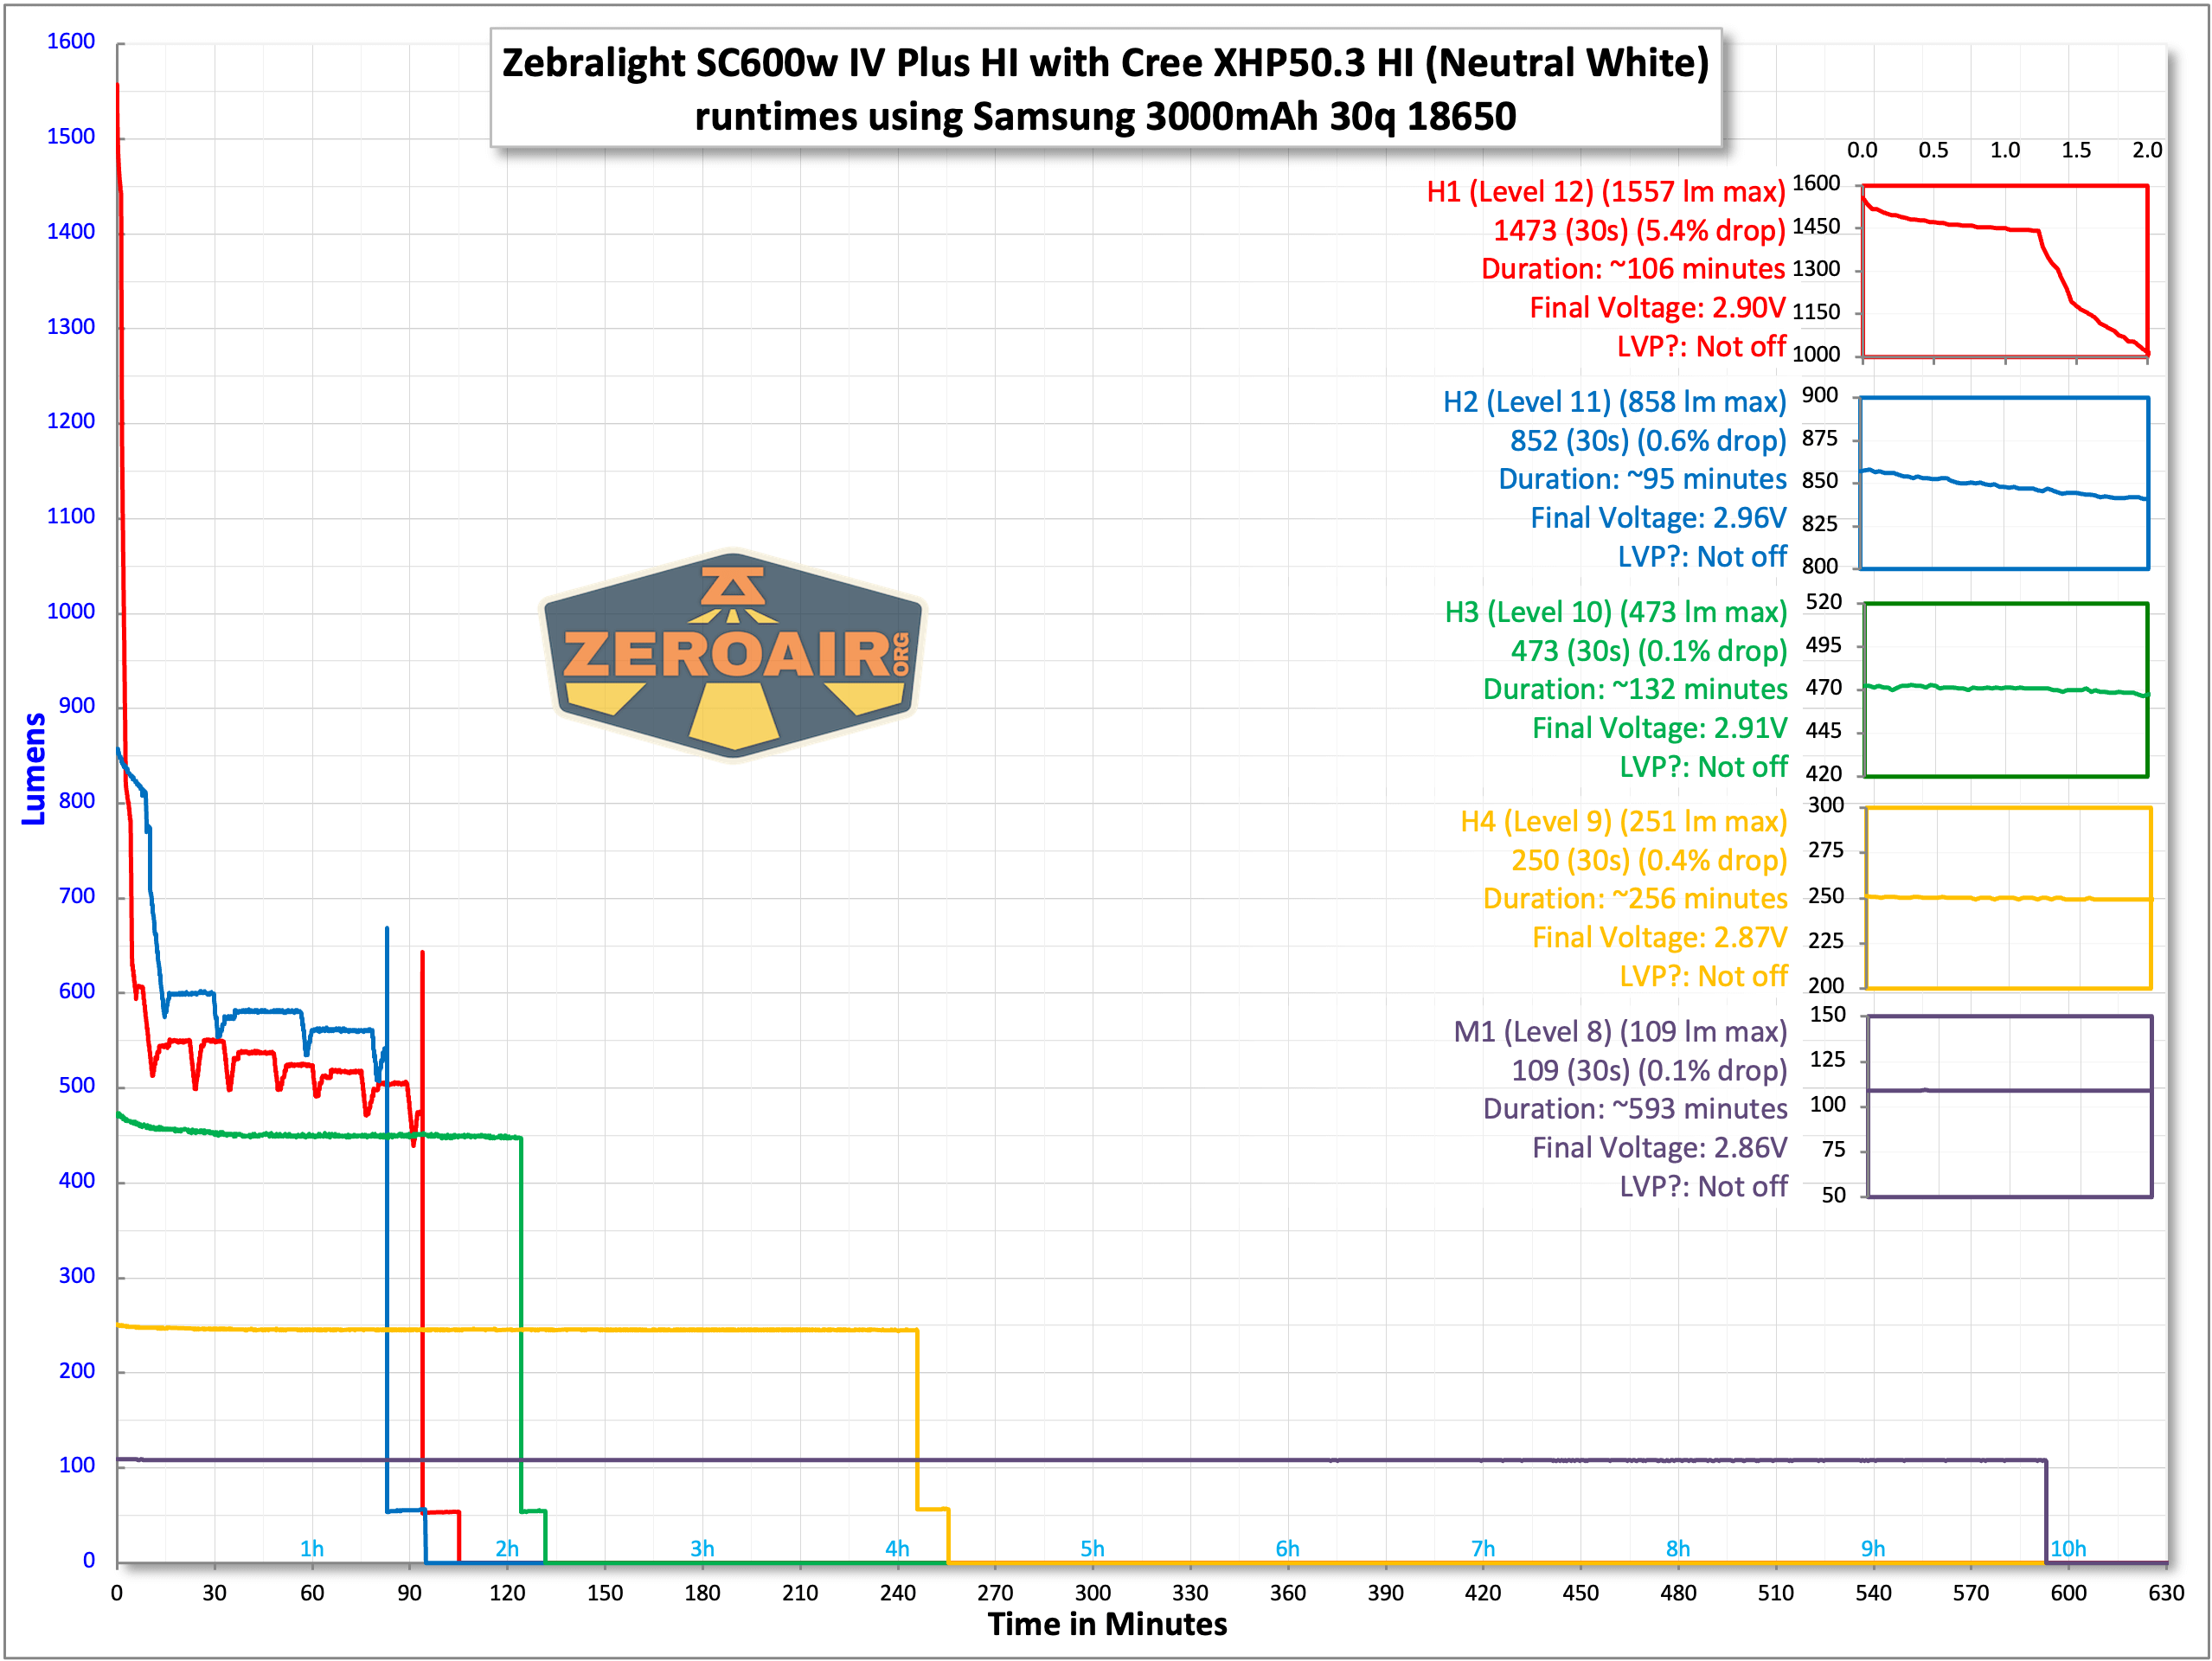
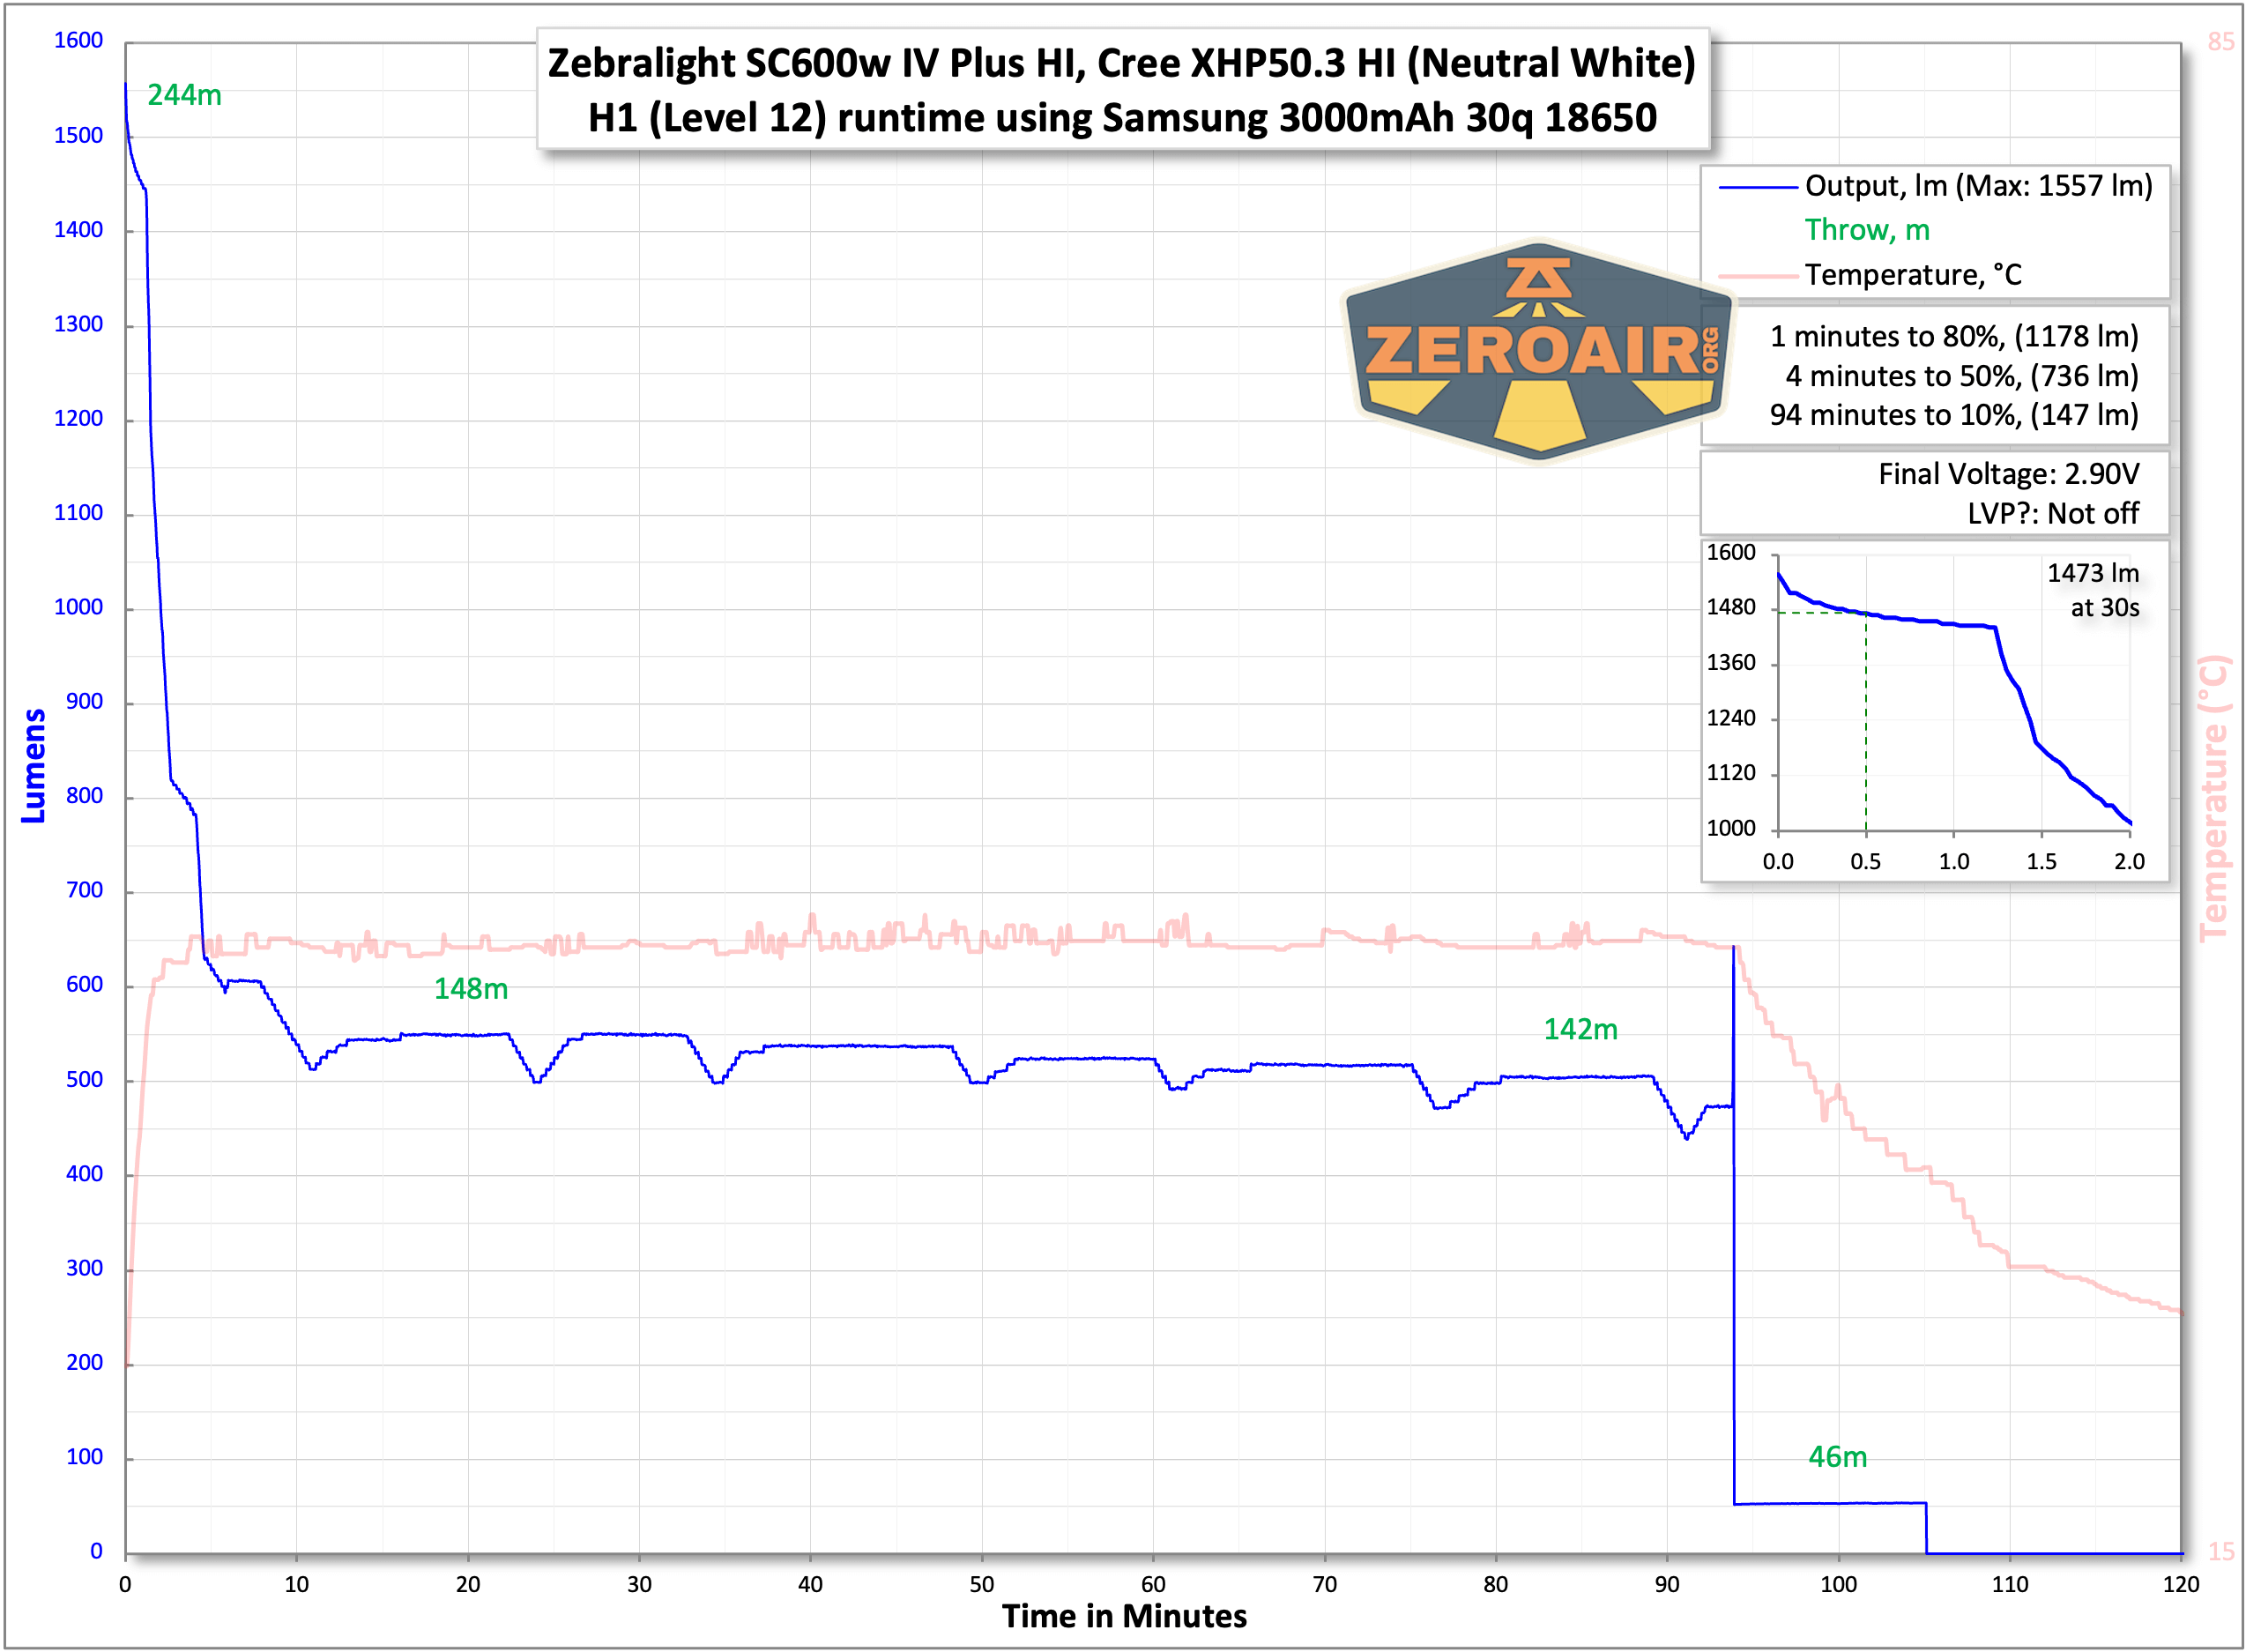
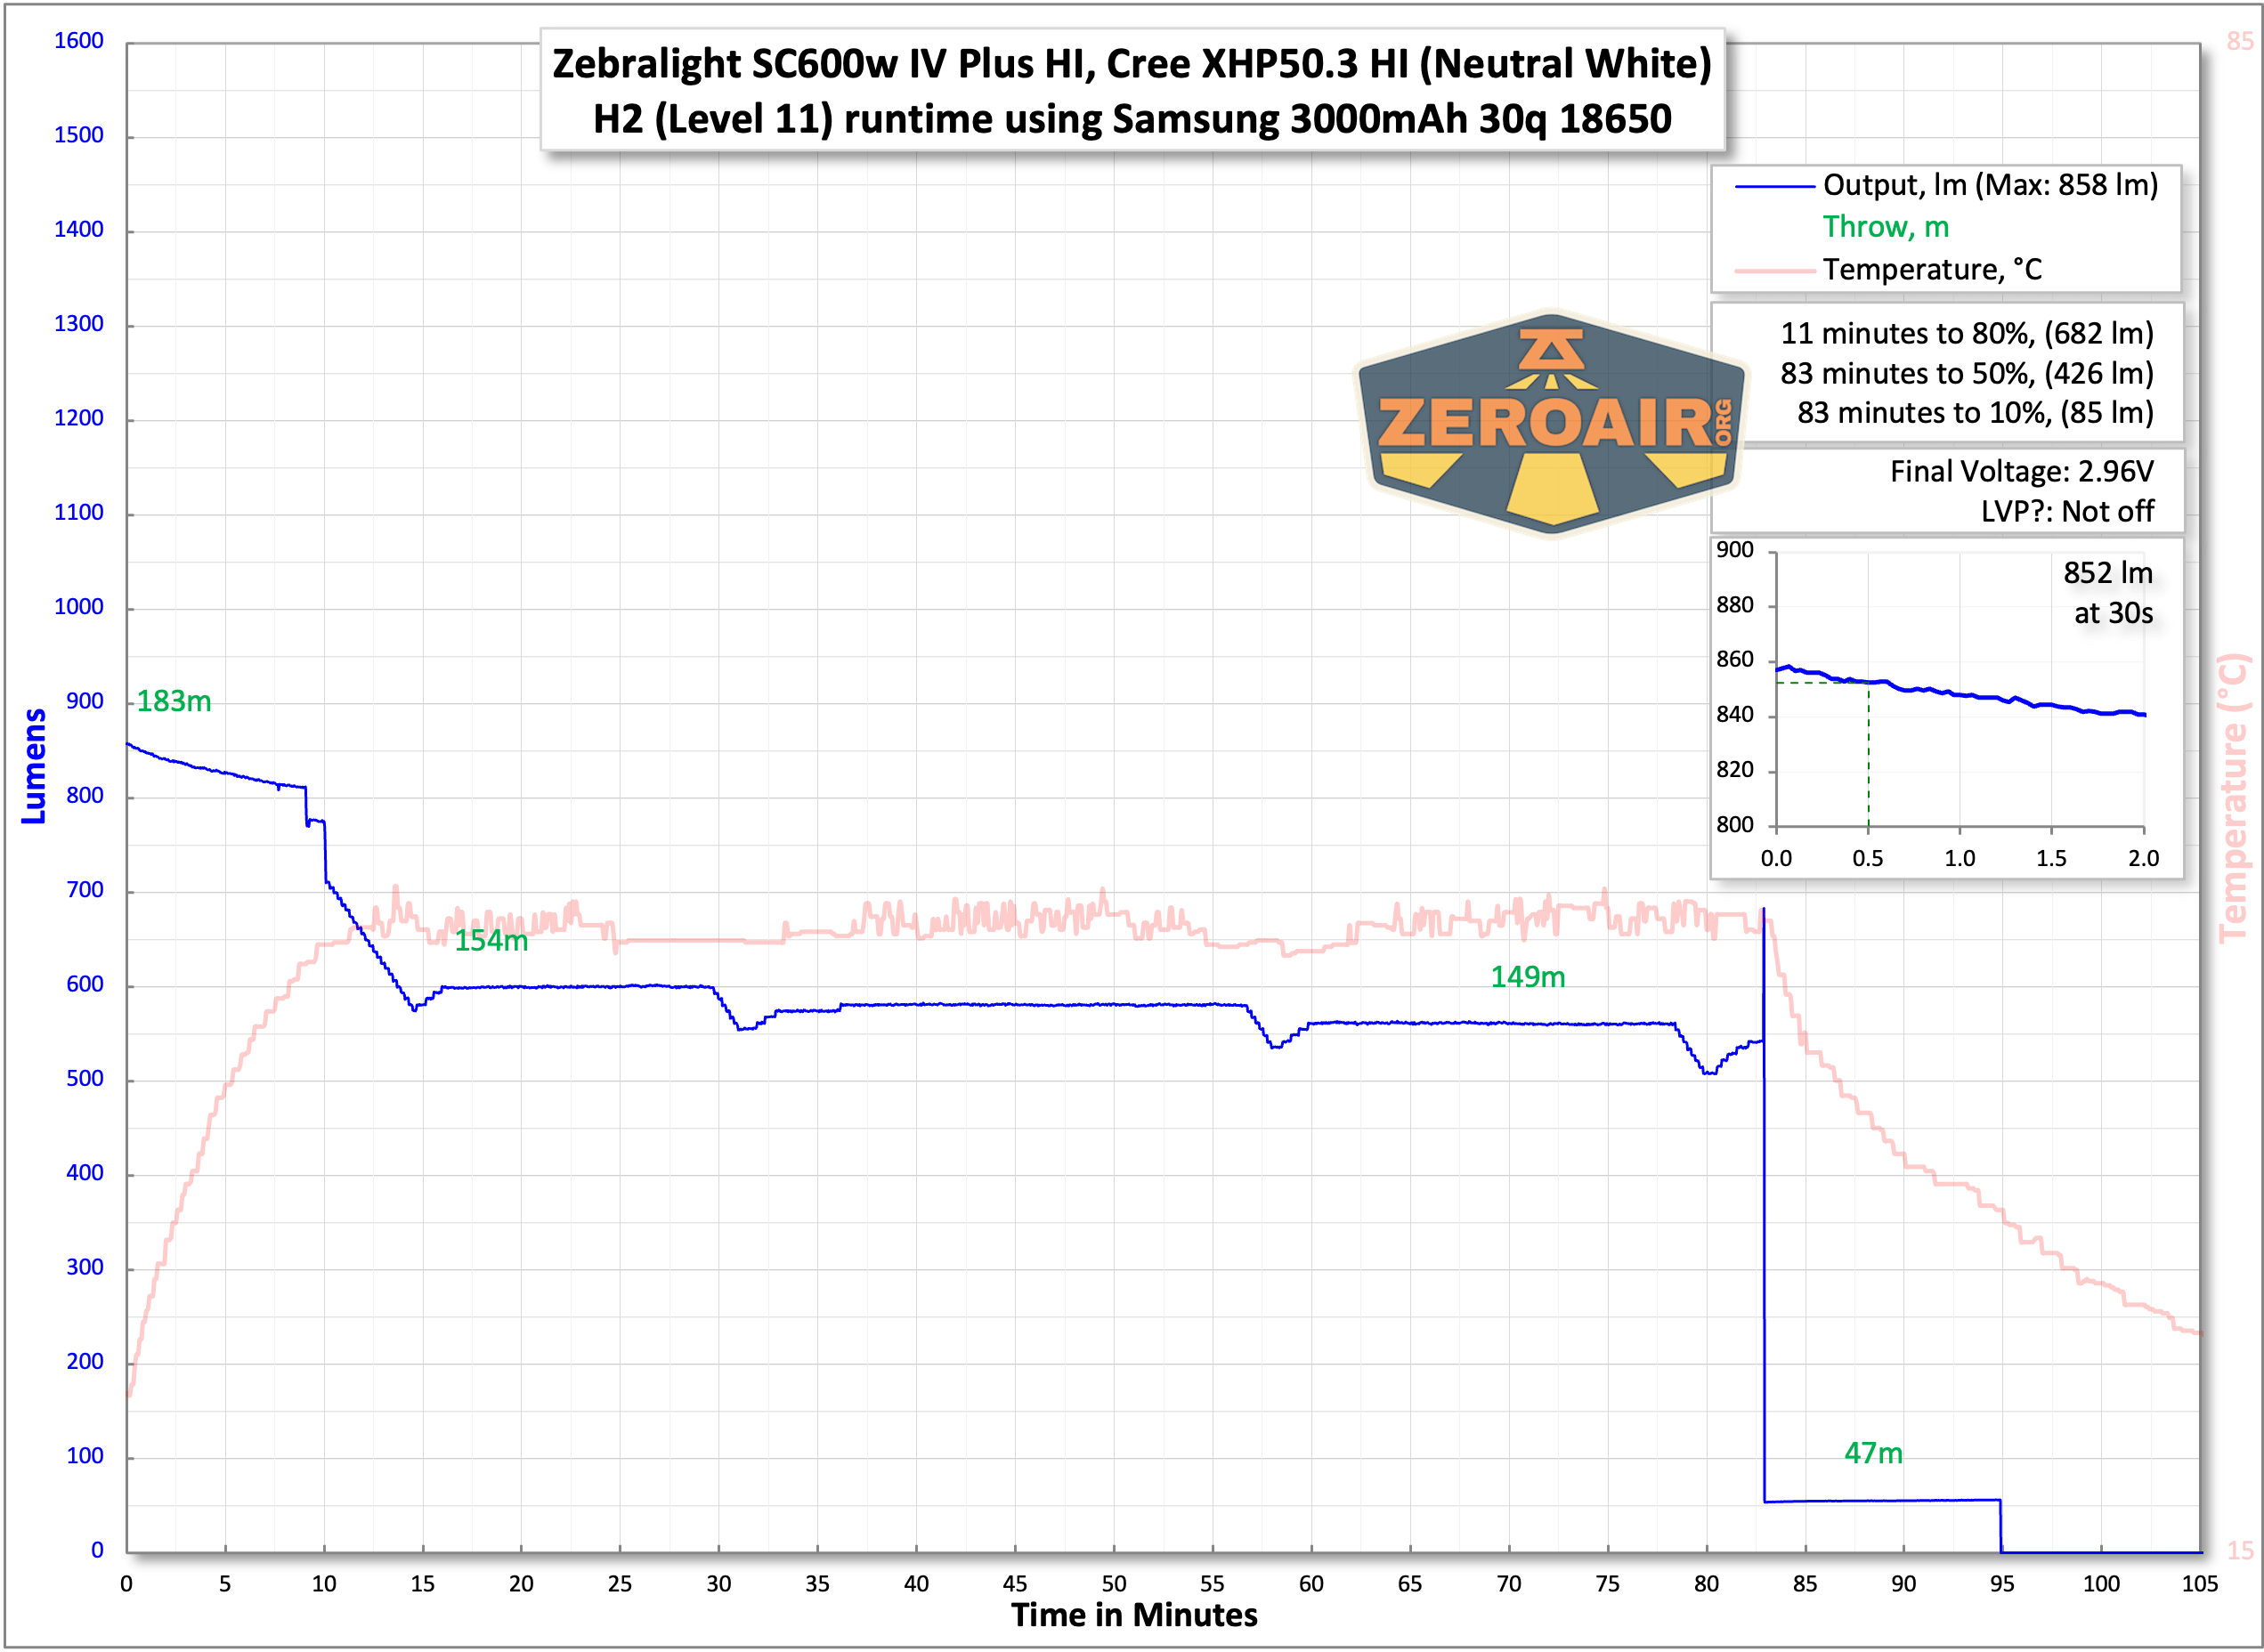
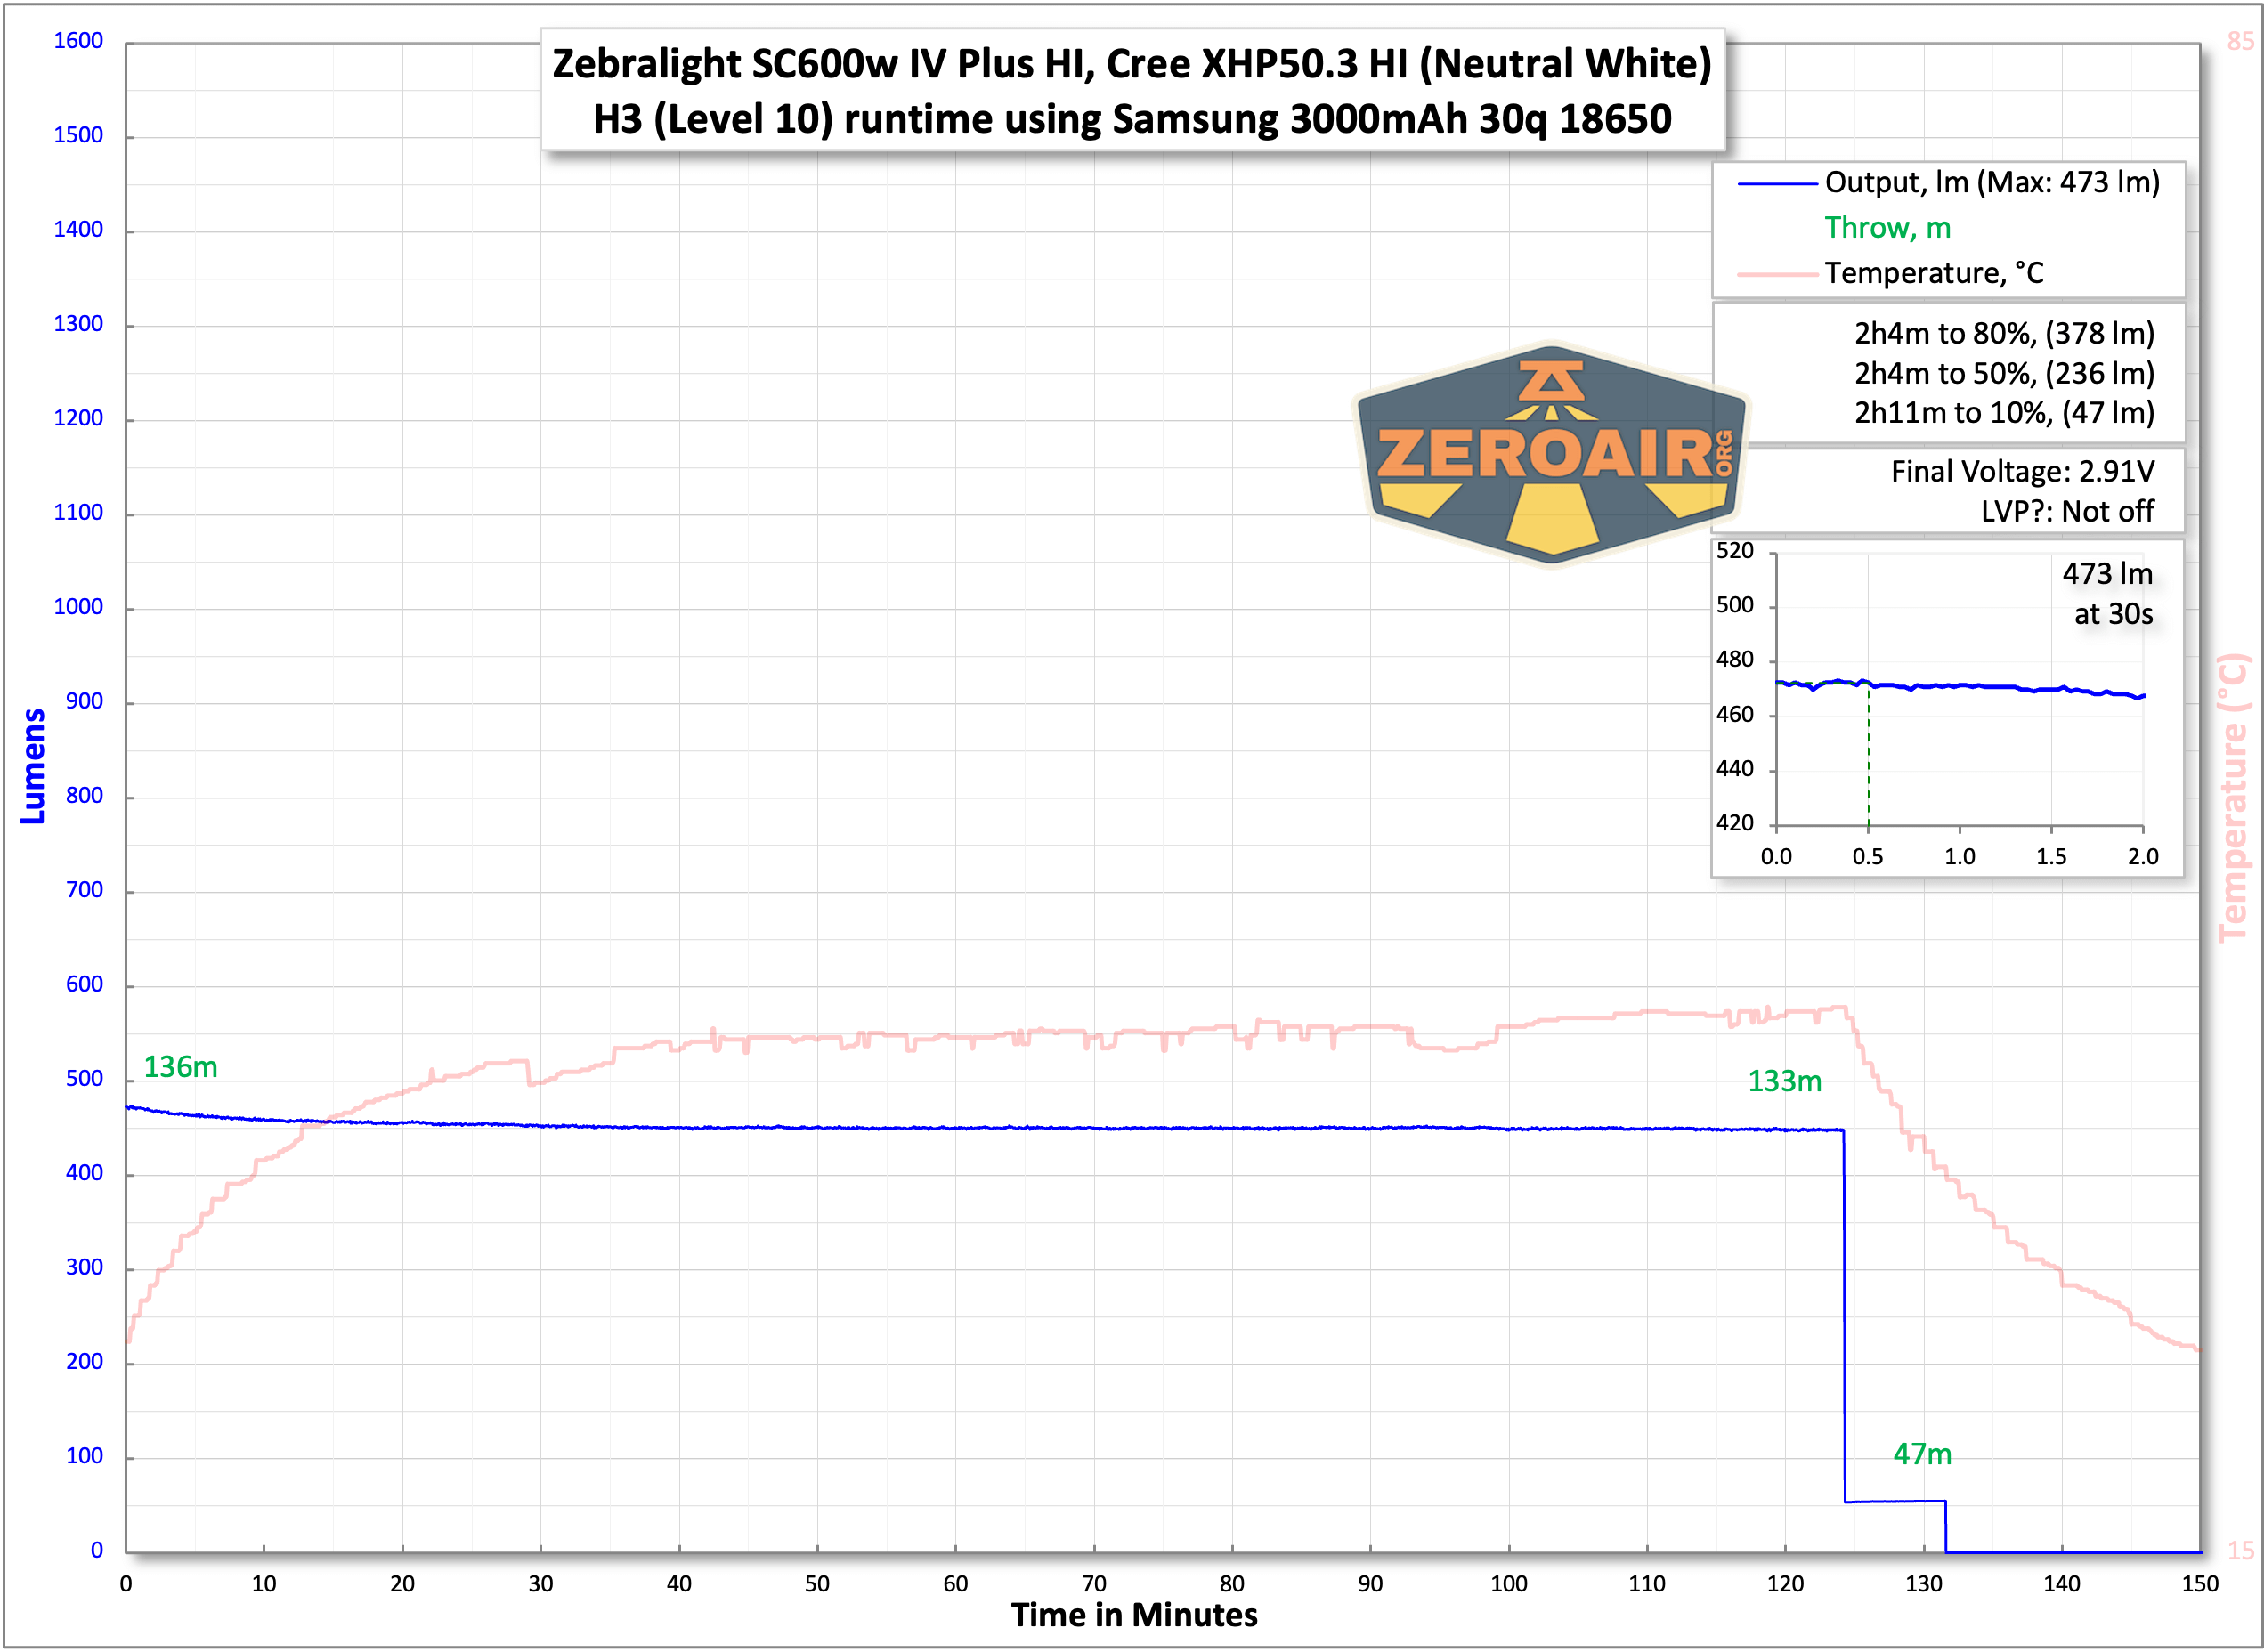
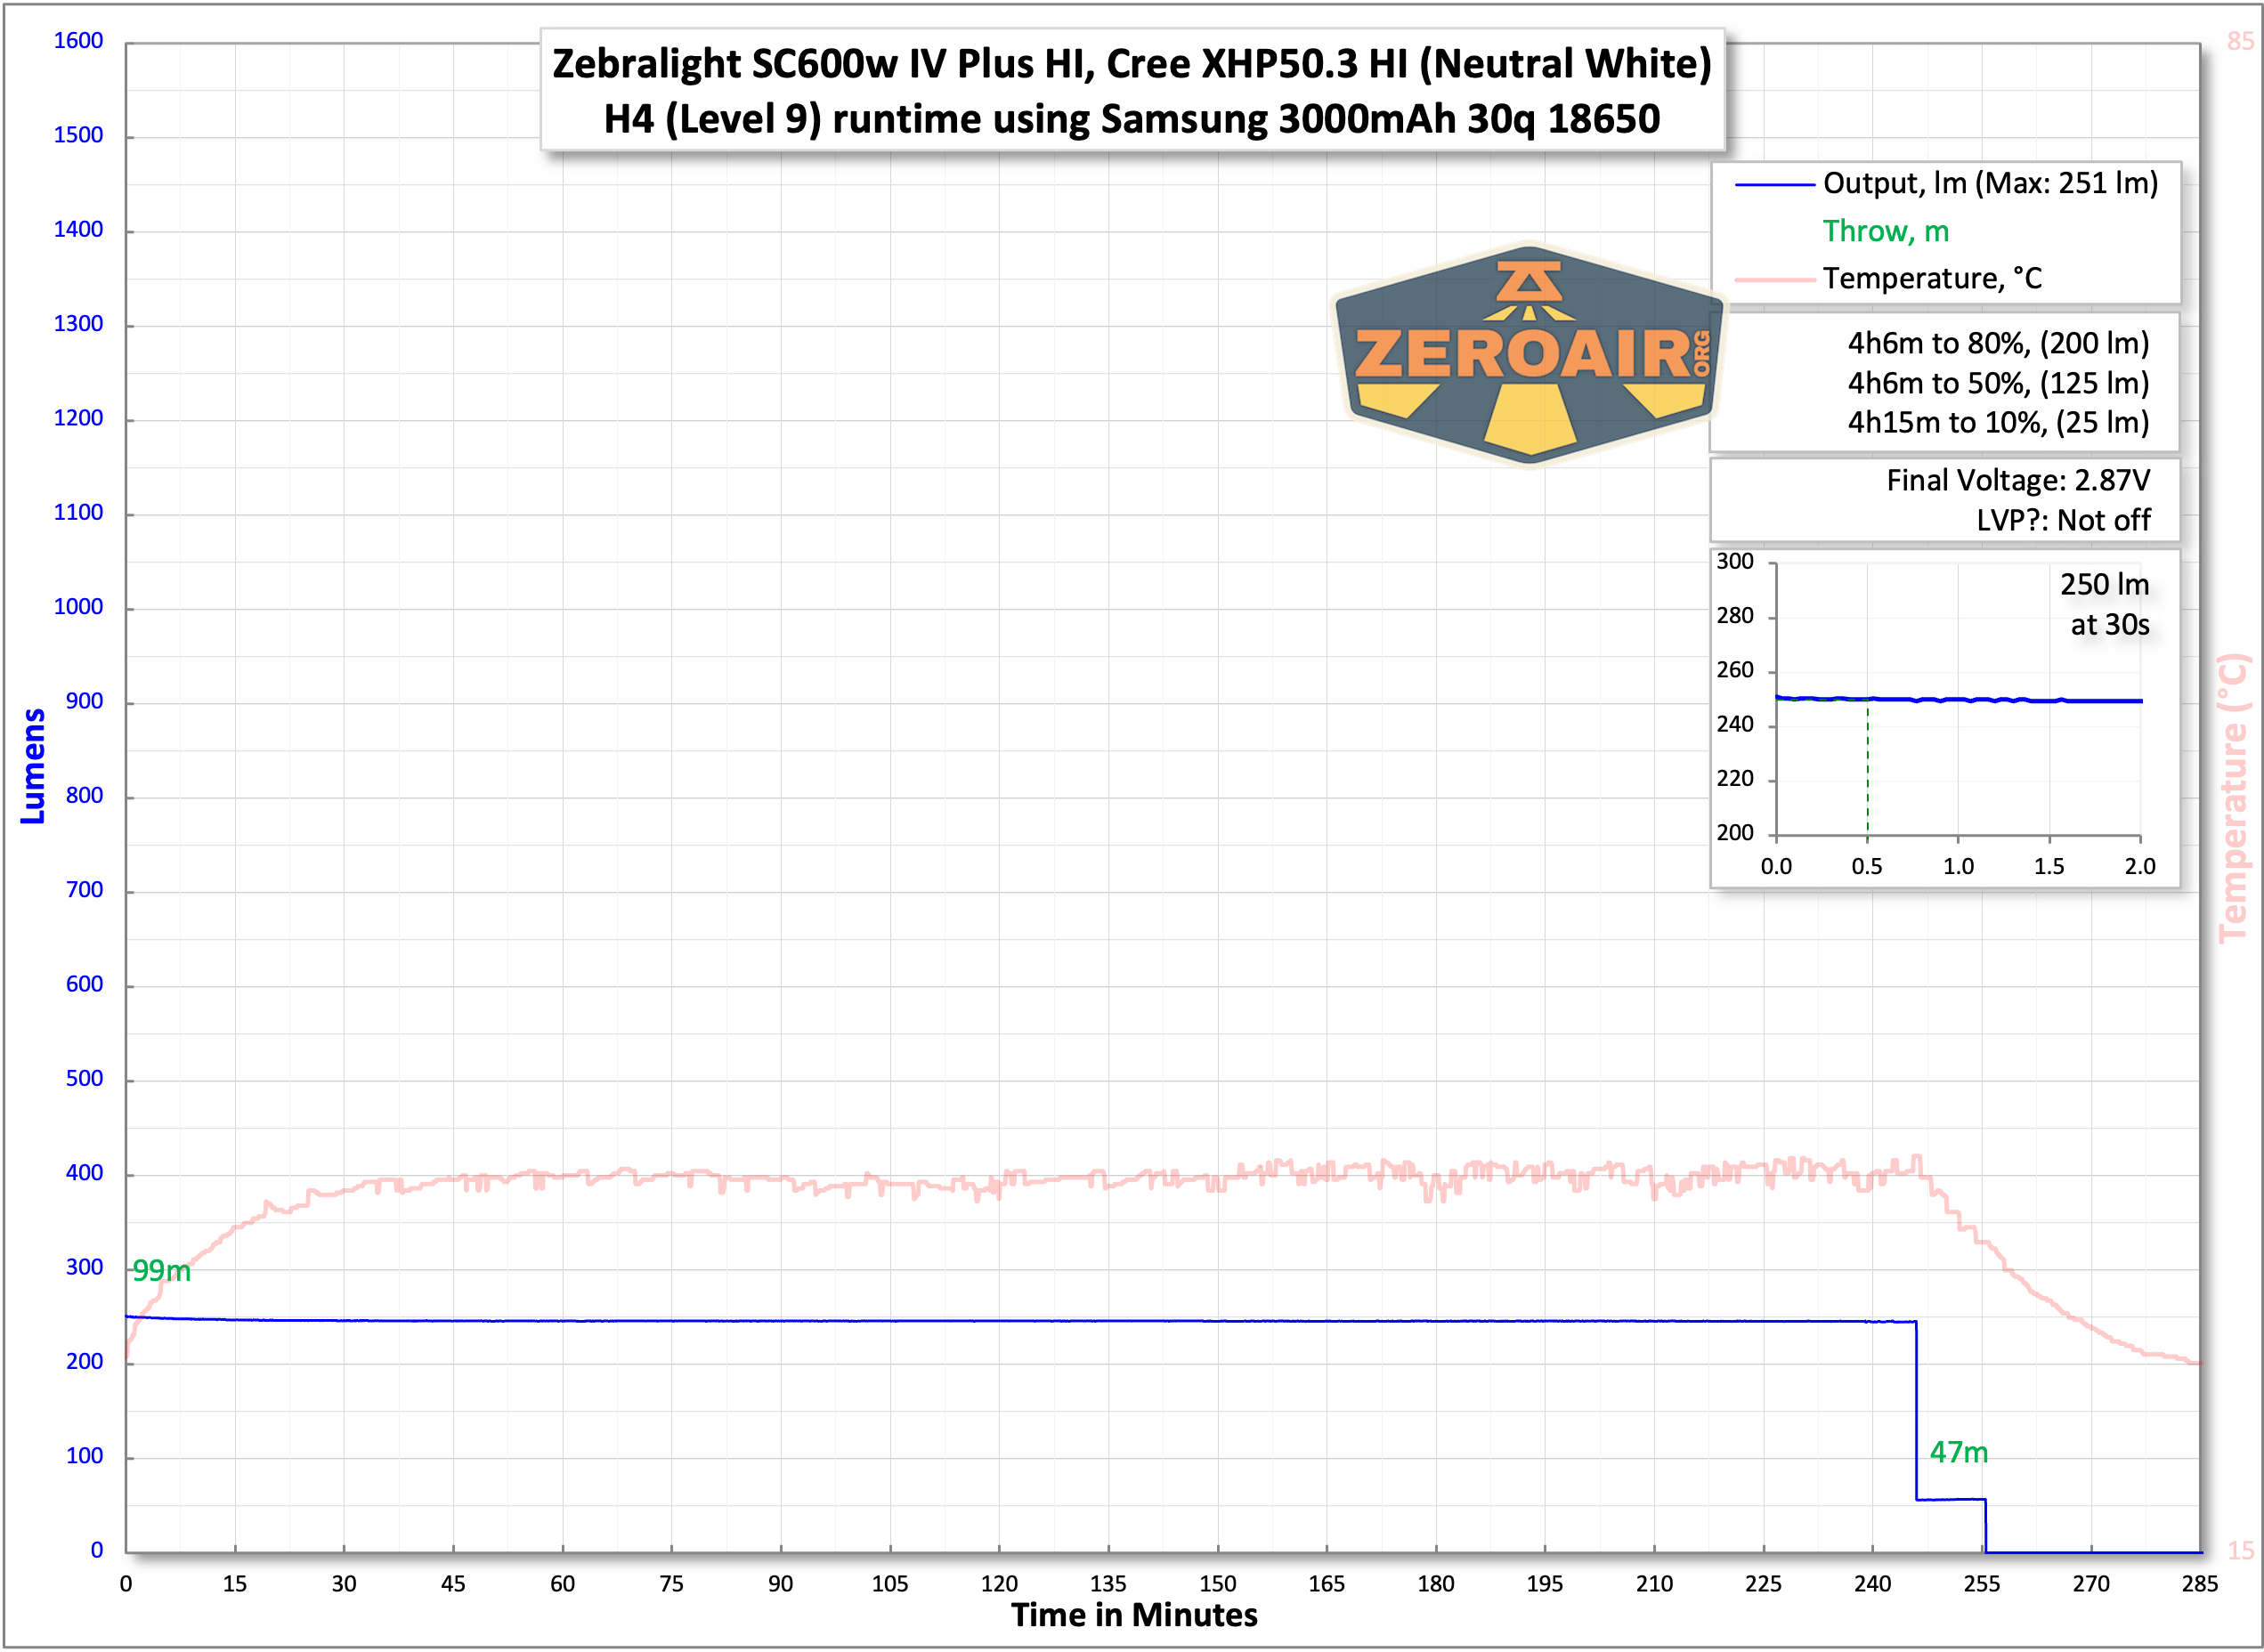
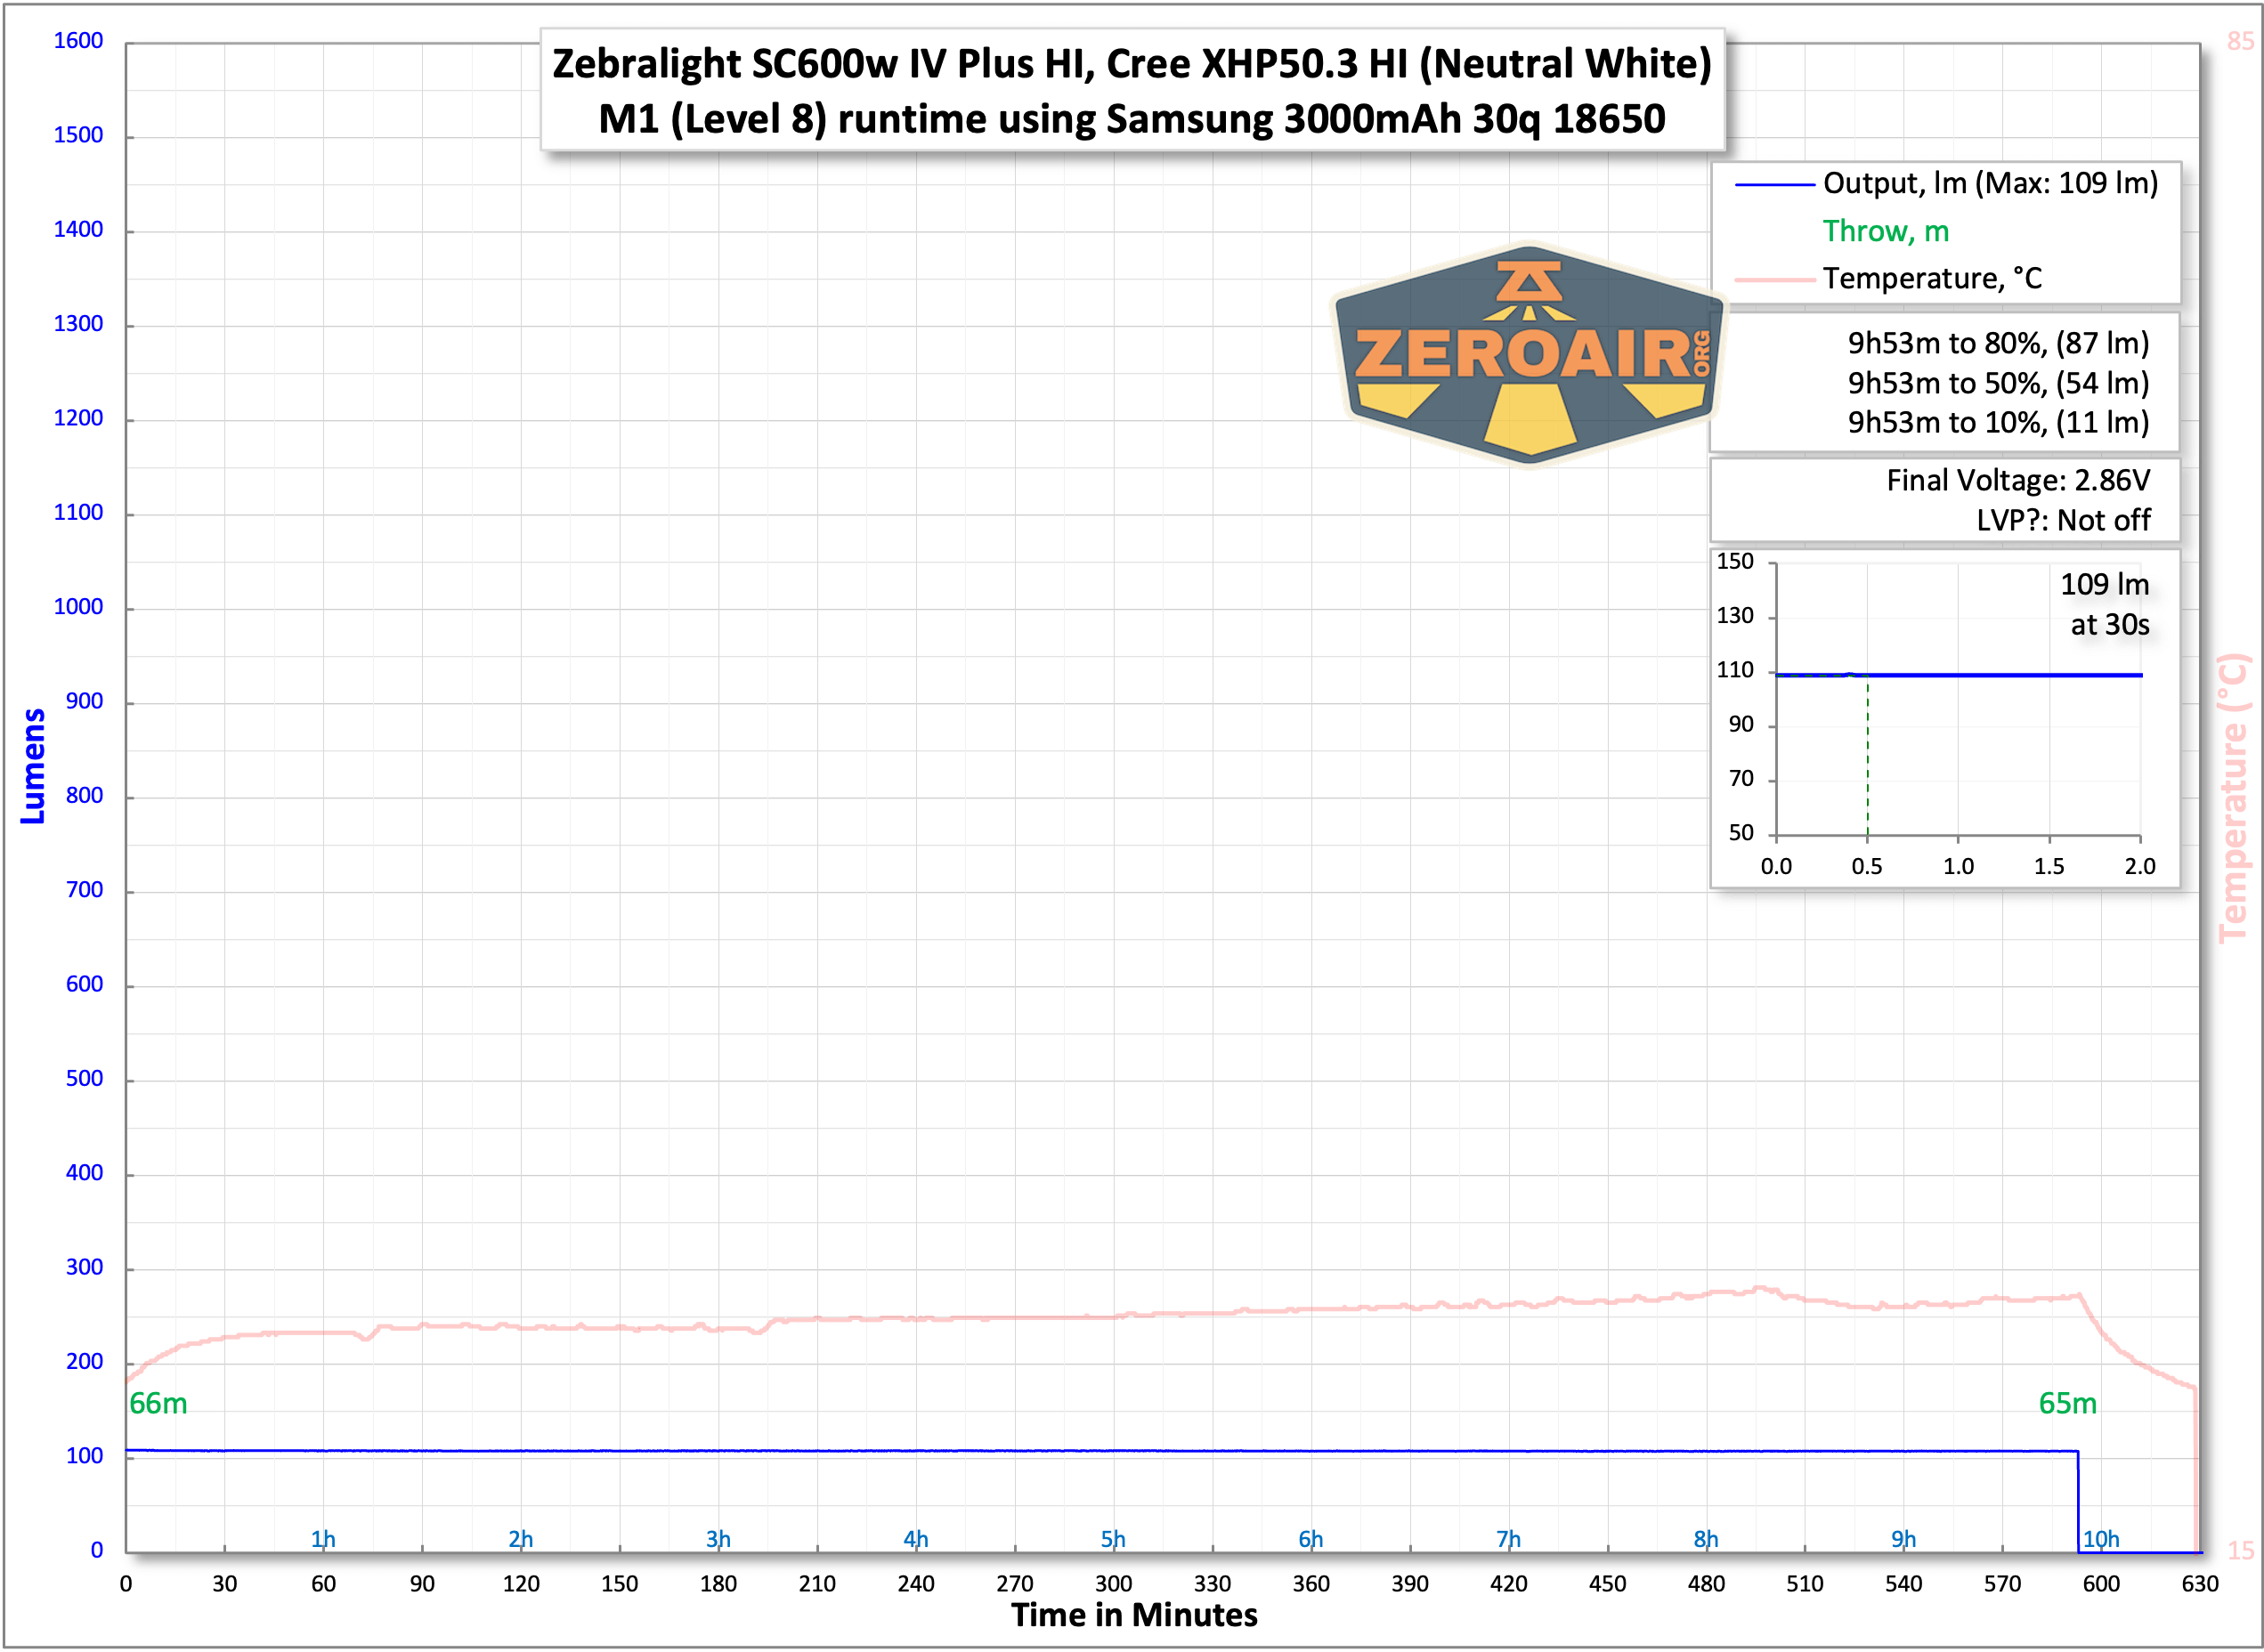
The temperature strains in these charts are included as common context, not exact measurements. The values characterize the vary (min to max) throughout testing, however shouldn’t be taken as precise readings. Temperature sensors are connected nevertheless possible and never at all times on the bezel or hottest spot (assuming that may even be clearly outlined). Even with ultimate placement, too many variables have an effect on temperature to definitively state a particular max worth.
Modes and Currents
| Mode | Mode Claimed Output (lm) | Claimed Runtime | Measured Lumens | Tailcap Amps |
|---|---|---|---|---|
| H1 | 1700 | PID, 2.6h | 1557 (0s)1473 (30s) | 6.44 |
| H2 | 965 | PID, 3h | 852 | 2.49 |
| 521 | 3.2h | 473 | 1.14 | |
| 280 | 5.7h | 250 | 0.54 | |
| M1 | 128 | 13h | 109 | 0.23 |
| M2 | 56 | 28h | 57 | 0.11 |
| 25 | 2.5d | 24 | 0.03 | |
| 11 | 5.6d | 10.5 | [low] | |
| L1 | 3.4 | 15d | 3.5 | [low] |
| L2 | 0.8 | 1.6 months | 0.76 | [low] |
| 0.3 | 3 months | 0.26 | [low] | |
| 0.1 | 4.4 months | 0.08 | [low] |
Pulse Width Modulation
There is no such thing as a PWM right here, fortunately. This mild doesn’t even have the sawtooth output on L1 and all three M2 modesthat another comparable Zebralights had. The modes are lowest to highest from prime left to backside proper (similar to within the different serial images beneath).

Right here you possibly can see a “baseline” – a chart with nearly no mild hitting the sensor.
Then there’s the Ultrafire WF-602C flashlight, which has among the worst PWM I’ve seen. It’s so unhealthy that I used a submit about it to elucidate PWM! Listed here are a number of timescales (10ms, 5ms, 2ms, 1ms, 0.5ms, 0.2ms) to make evaluating this “worst” PWM mild to the check mild simpler. That submit additionally explains why I didn’t check the WF-602C on the ordinary 50us scale.
Person Interface and Operation
The Zebralight consumer interface, a factor of legend. This mild makes use of an e-switch, and a really good one. It’s clicky, with very constructive motion.
The change falls in an ideal “consumer” spot when the sunshine is in hand. I respect that it’s not in the slightest degree uncovered, too. Actually, regardless of the distinction in measurement between the SC65, SC600, and SC700, the change is in simply the precise place on all sizes!

Initially, this consumer interface is principally as arduous (or “featured”) as you need it to be. You may run this as a quite simple consumer interface with simple (or “direct”) entry to 4 modes (low, medium, excessive, strobe). However you are able to do extra! Should you dare. If you want. However once more, you don’t actually need to!
I’m going to attempt to seize the UI in a desk, however I’ve to be trustworthy, I’m unsure how this can go. However let’s give it a shot. Observe that there are three mode teams (G5, G6, G7), and the sunshine ships in G5 group.
| State | Motion | End result |
|---|---|---|
| Off | Click on | Excessive (Your final used of 4 excessive potentialities) H1 3000 Lm H2 1458 Lm 945 Lm 583 Lm (hours) |
| Off | Click on 2x | Medium (Your final used of 4 medium potentialities) (and technically, the sunshine goes to Excessive first, then medium) M1 192 Lm M2 52 Lm 25.2 Lm 11.6 Lm |
| Off | Click on 3x | Strobe (Your final used of 4 Strobe potentialities) 0.2Hz Beacon at Low 0.2Hz Beacon at H1 4Hz Strobe at H1 19Hz Strobe at H1 |
| Off | Maintain >0.6s | Mode cycle: Low^ > Medium > Excessive (repeated) |
| On | Maintain | Mode cycle: Low (at all times begins with Low it doesn’t matter what mode you’re in!) > Medium > Excessive (repeated) |
| On | Click on | Off |
| On | Double Click on | Toggles between Mode and Sublevel.
For instance, between H1 and H2. |
| On | Double Click on 6x | Enters programming for sublevels of a mode.
For instance, in the event you’re in Medium, Double Clicking 6x will enter sublevel choice for M2.) |
| Sublevel choice for any mode | Double Click on | Cycles the sublevel mode choices.
For instance, in case you are programming M2, continued double clicks will cycle 11.6lm, 25.2lm, and 52lm repeatedly. Launch and wait (or click on) on the desired output. |
| Sublevel choice for any mode | Click on | Selects sublevel. |
| Off | Click on 4x | Battery indicator
The principle emitter flashes brightly between 1 and 4 occasions to point cell capability |
| On at H1 | Click on off then on to H1 | Enter PID Thermal Regulation Temperature Programming for 3 highest output ranges |
| PID Thermal Regulation Temperature Programming for 3 highest output ranges | Press and maintain to cycle from Low to Excessive 6 occasions | On the seventh (or extra) cycle, launch the change
|
| Off | Click on 5x | Choose G5 (Group 5) |
| Off | Click on 6x | Choose G6 (Group 6) |
| Off | Click on 7x | Choose G7 (Group 7) |
| Sublevel programming for G6 or G7 | Click on 2x | Goes up a stage in programming |
| Sublevel programming for G6 or G7 | Click on 3x | Goes down a stage in programming† |
| Sublevel programming for G6 or G7 | Click on | Exit programming |
| In G6 or G7‡ | Click on 5x | Reset G5 to manufacturing facility settings |
| In G6 or G7‡ | Click on 6x | Reset G6 to manufacturing facility settings |
| In G6 or G7‡ | Click on 7x | Reset G7 to manufacturing facility settings |
^ Observe that that is technical entry to Low from off, regardless of not being written precisely that method within the handbook.
† Successive triple clicks on the lowest output keep on the lowest output (and don’t cycle “backward” to H1)
‡ It does seem to be manufacturing facility resets (for all teams) may be executed solely when in G6 or G7. So to reset G5, you’ll have to enter G6 or G7.
Listed here are some group specifics:
In all three mode teams
- H may be both H1 or H2; M may be both M1 or M2; L may be both L1 or L2
- from OFF: 1-click to H; 2-click to M; press and maintain to cycle from L, M to H
In G5
- H1 is fastened at 3000Lm, H2 may be 1458, 945, or 583Lm
- M1 is fastened at 192Lm, M2 may be 52, 25.2 or 11.6Lm
- L1 is fastened at 2.1Lm, L2 may be 0.32, 0.12 or 0.04Lm
In G6 and G7
- H1, H2, M1, M2, L1, and L2 may be programmed to any of the 12 out there brightness ranges
- Double-click 6 occasions on the H1, H2, …L2 to enter the programming mode for that stage. As soon as within the programming mode, use double-click to go up one stage and triple-click to go down one stage. Use 1-click to exit the programming mode
Three consecutive 5-click (or 6-click, 7-click) to reset the G5 (or G6, G7) again to the manufacturing facility default settings.
The truth that G6 and G7 enable all regular outputs to be any mode is to not be understated. Should you wished all excessive modes, you can program each stage to H1. It’d be just a little bizarre, however you can be completely sure that you simply’d solely ever get H1 output. On the flip facet, you can program each mode to be from the bottom to highest mode, and the sunshine might peak at round 25 lumens (and principally final ceaselessly).
You could possibly additionally reverse the mode cycles in no matter method you want. Need Excessive to be accessible from double click on? Then program H1 to the M1 or M2 slot.
And eventually, it’s to not be understated how simple it’s to modify between teams. And straightforward to recollect – 5, 6, or 7 clicks from off and also you’ve switched teams. Sadly, there is no such thing as a suggestions that you simply’ve switched teams – a readout of perhaps 5, 6, or 7 blinks on the bottom output could be good. Or perhaps a low blink with G5, M2 blink with G6, and H2 blink with G7 or one thing. Some suggestions could be appreciated.
So far as I do know, the consumer interface between the SC700d and SC700d HI is similar. I’ve copied the consumer interface from that evaluation to this evaluation…
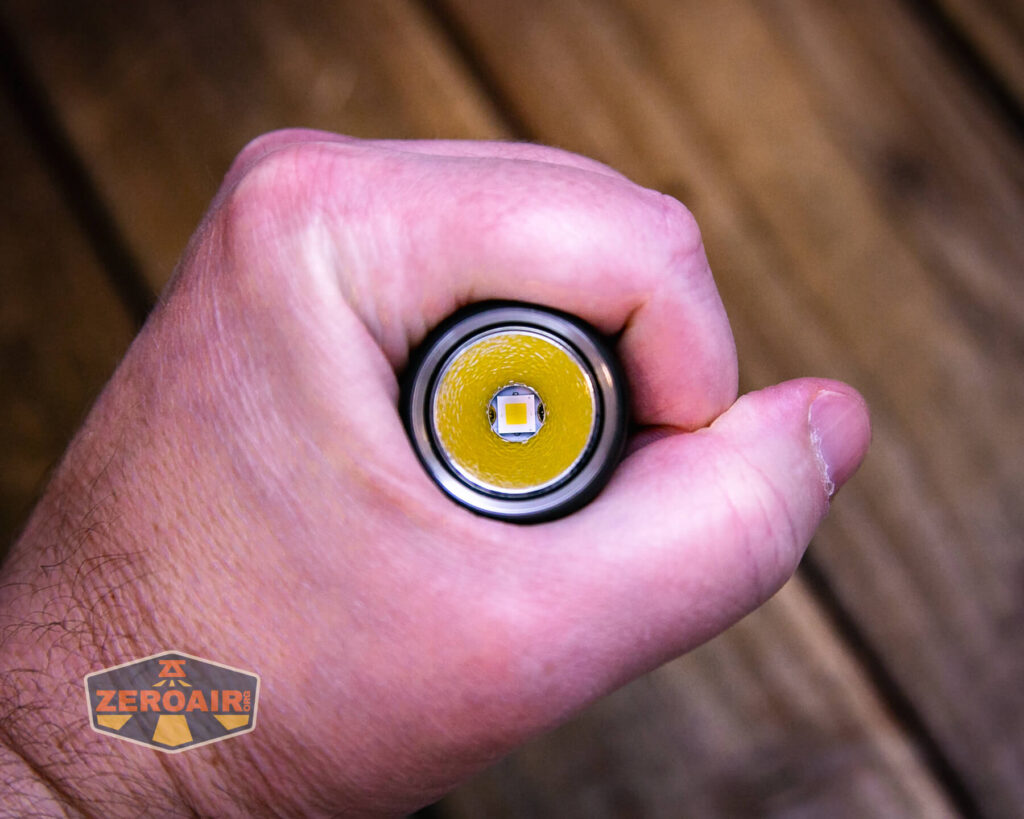
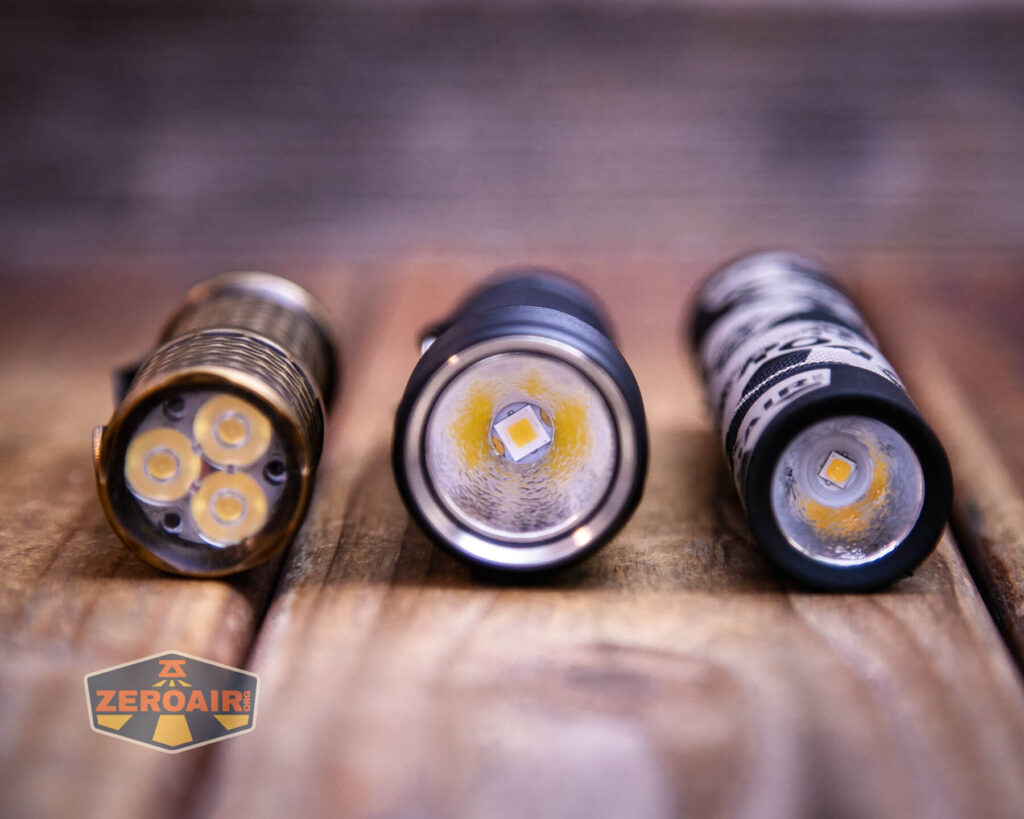
LED and Beam
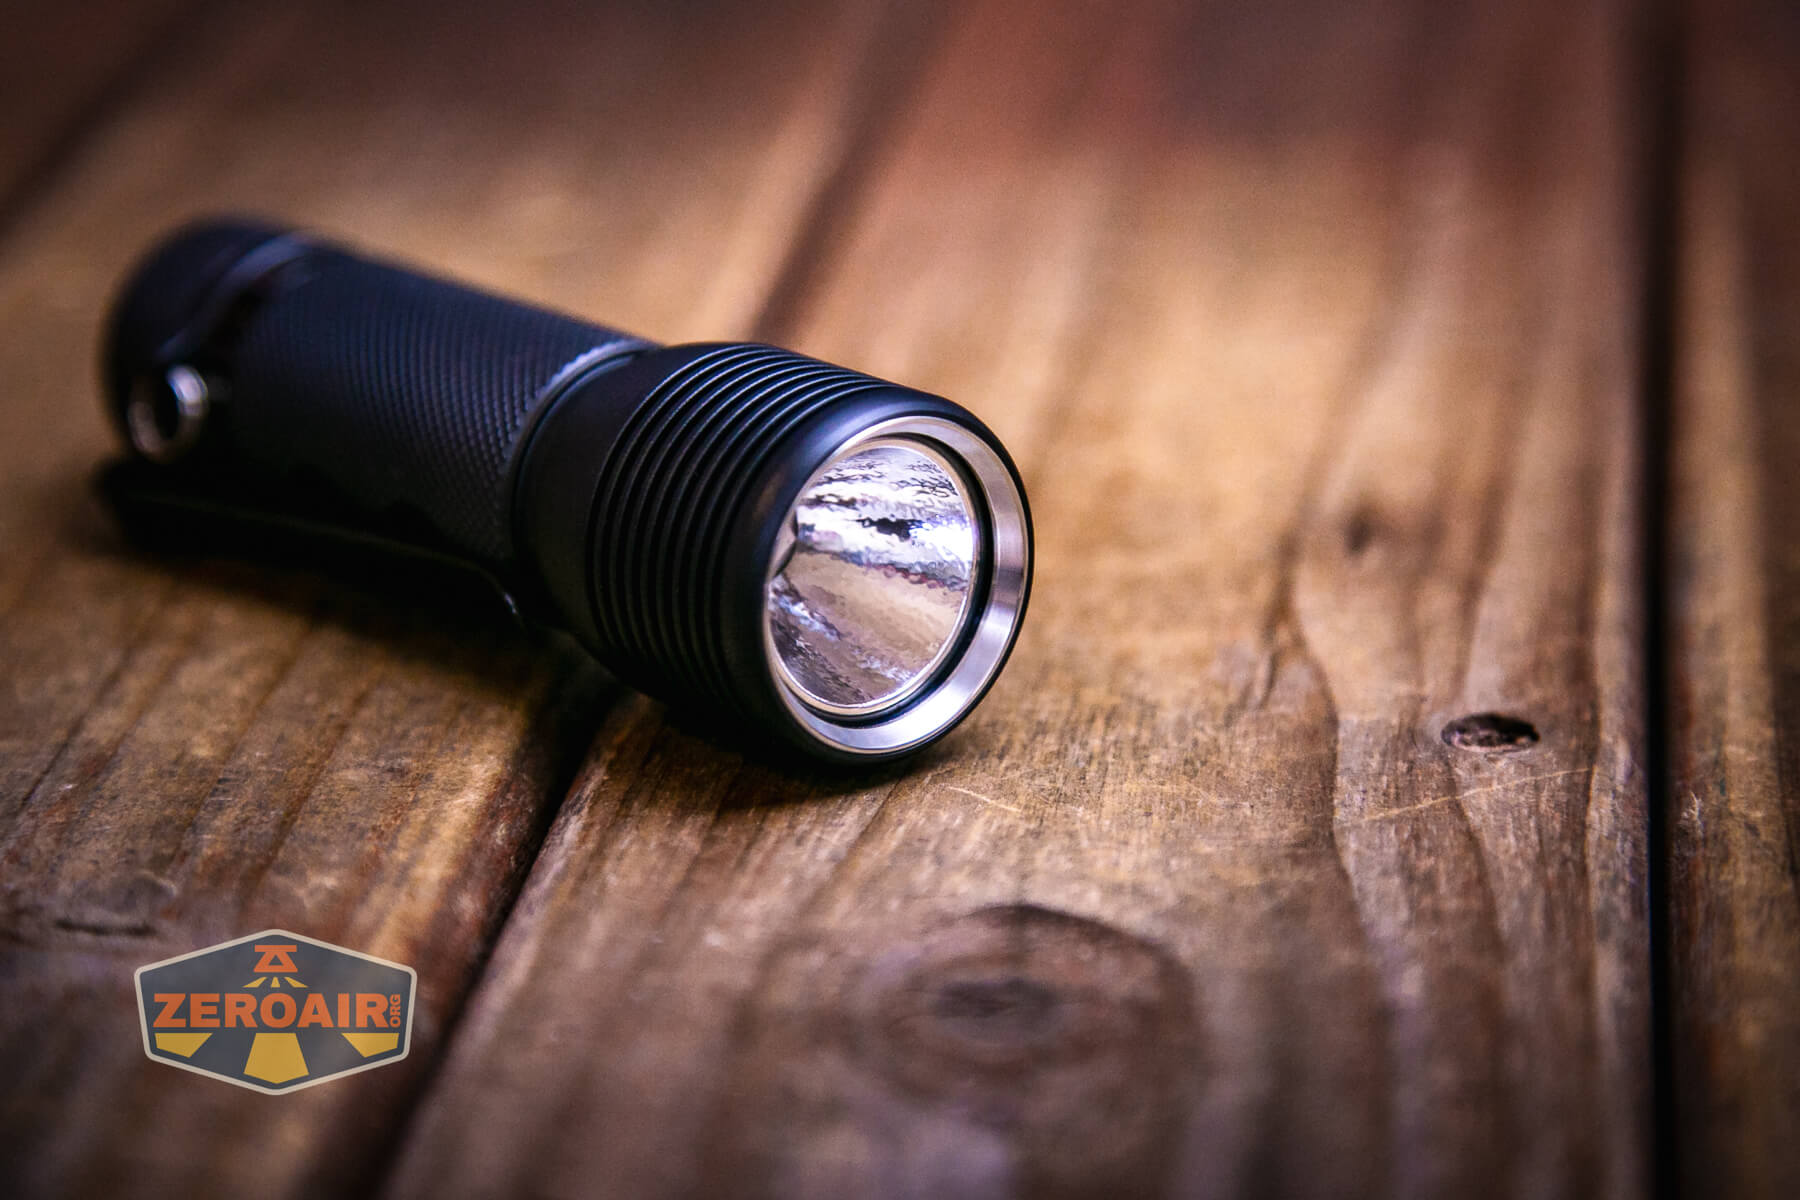
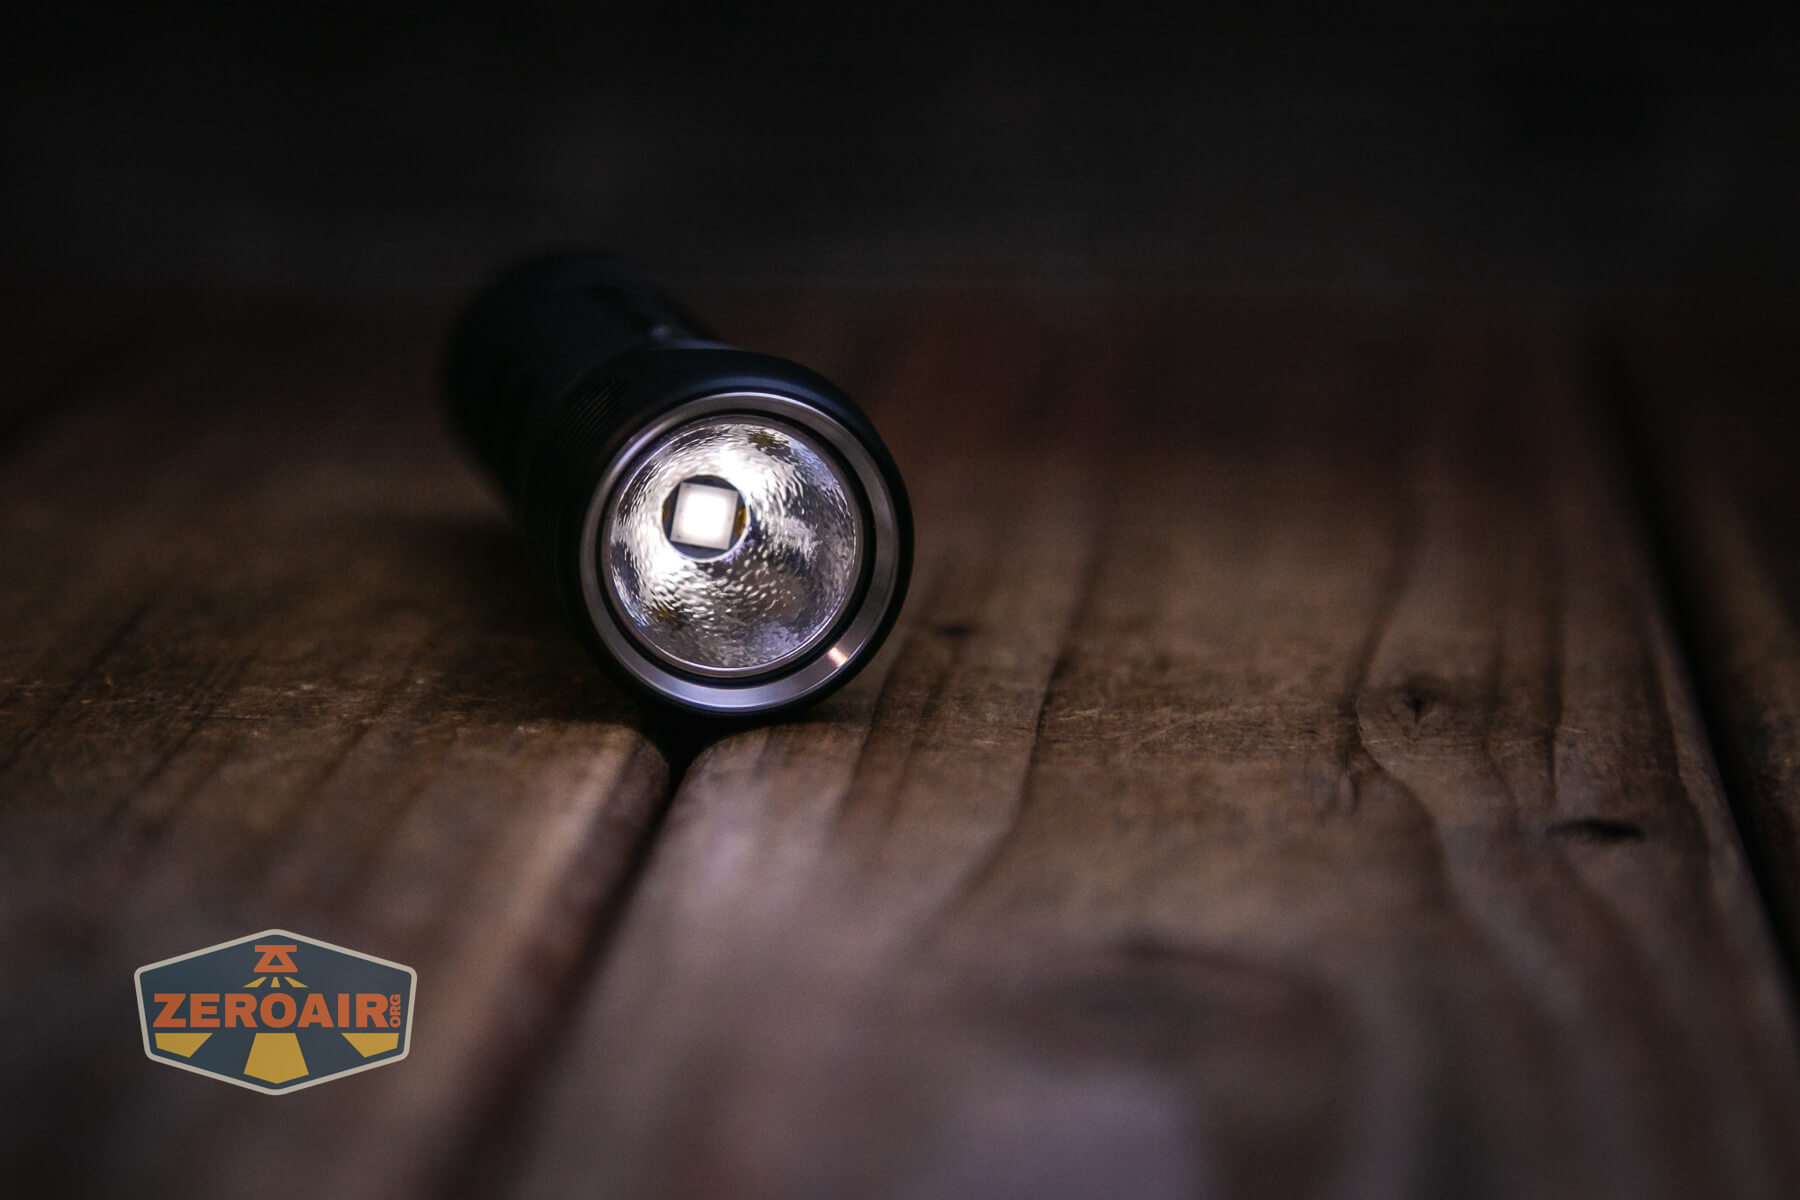
In fact, one of many greatest developments right here is that this can be a domeless (“HI”) emitter. A “excessive depth” emitter. It’s a impartial white Cree XHP50.3 HI, rated at 4500K. I like HI emitters!

That emitter is surrounded by a pleasant and deep flippantly orange peel reflector.
Low on this mild is very low!!
LED Colour Report (CRI and CCT)
Zebralight makes the declare that this can be a 4500K emitter, and it’s. It ranges from 4500K on the bottom modes to round 5100K on the toughest pushed mode. The excessive CRI declare can also be met, averaging round 90.
CCT (Correlated Colour Temperature) refers back to the measurement of the colour look of sunshine, expressed in Kelvins (Okay), which signifies whether or not the sunshine is heat (yellowish) or cool (bluish). A decrease CCT (beneath 3000K) is taken into account heat mild, whereas a better CCT (above 5000K) provides cooler, bluish mild.
CRI (Colour Rendering Index) is a measure of how precisely a lightweight supply renders colours compared to pure daylight. Scored on a scale from 0 to 100, larger CRI values point out that colours seem extra true to life and vibrant, just like how they might look below the solar.
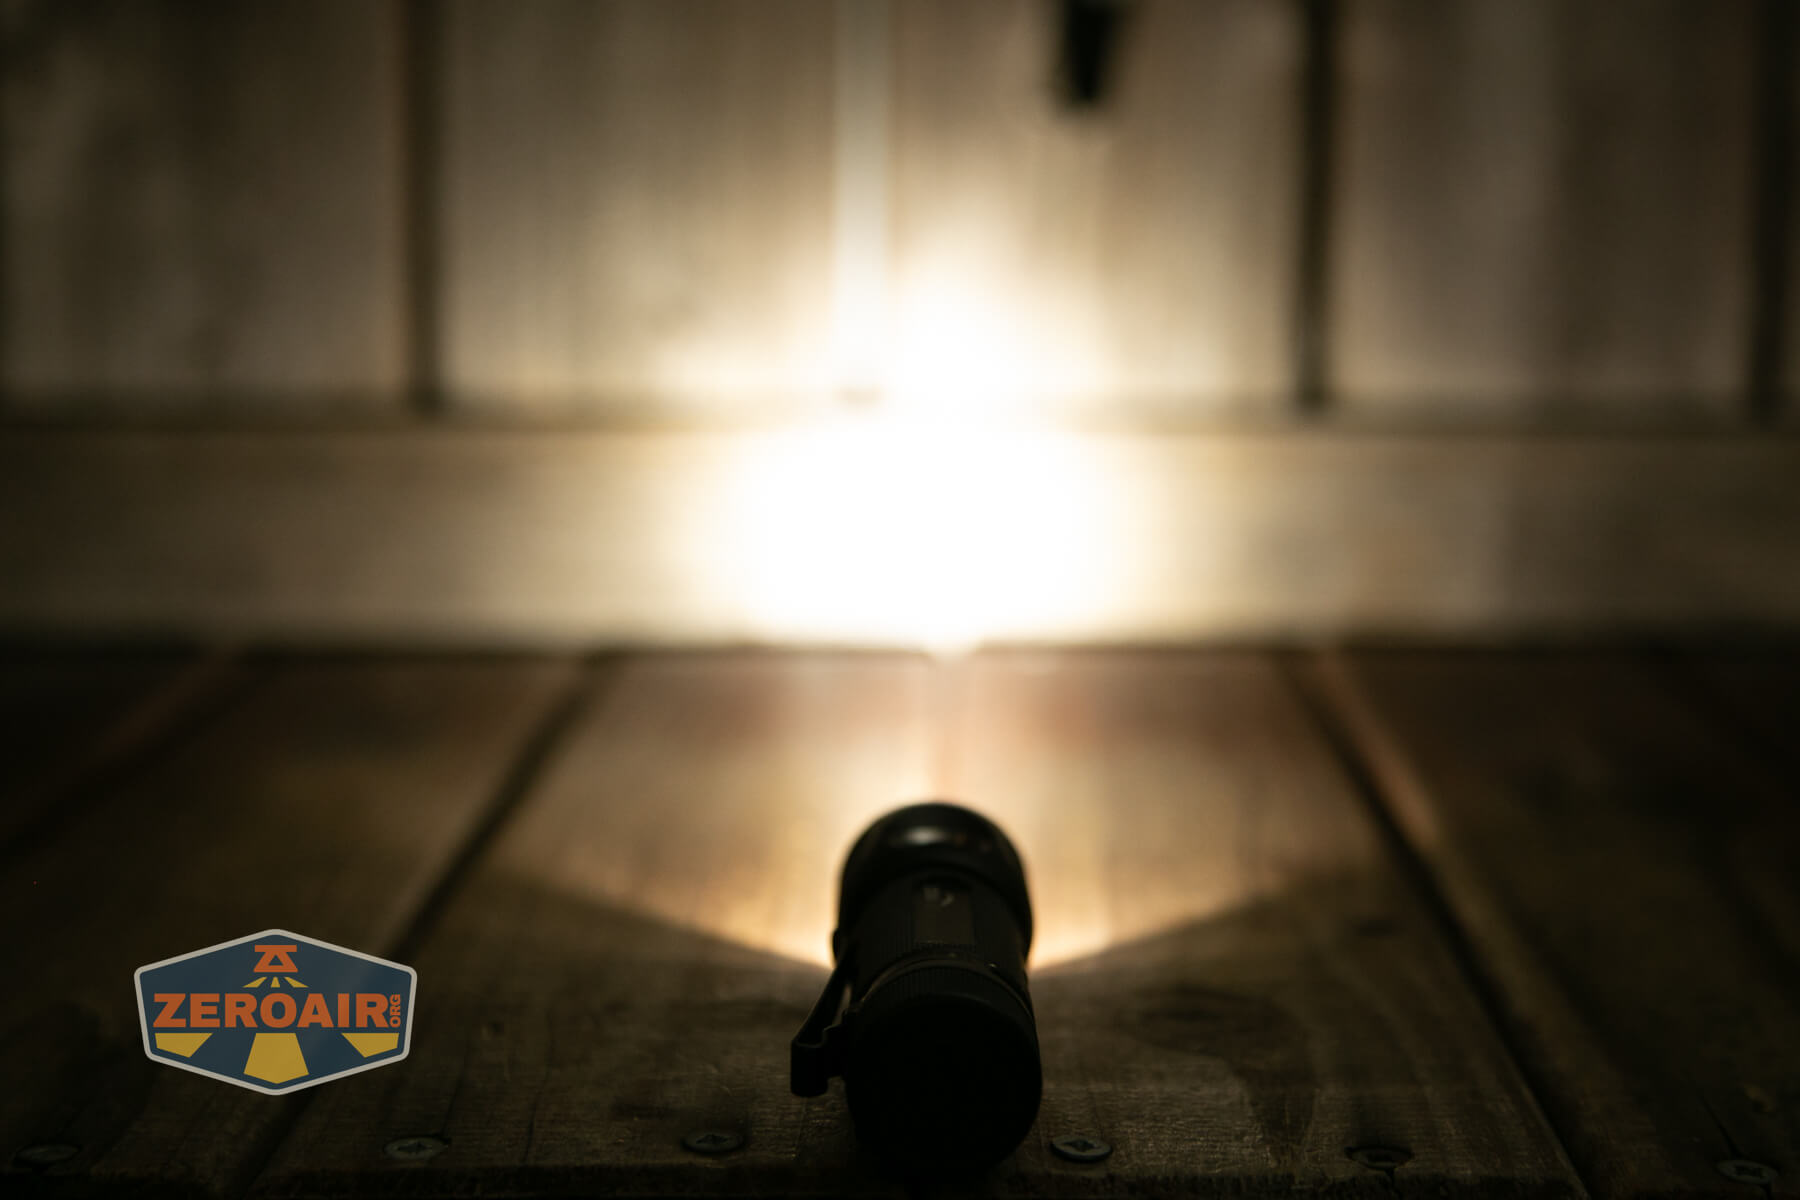
Beamshots
These beamshots at all times have the next settings: f8, ISO100, 0.3s shutter, and handbook 5000K publicity. These images are taken at flooring stage, and the beam hits the ceiling round 9 toes away.
Tint vs BLF-348 (KillzoneFlashlights.com 219b model) (affiliate hyperlink)
I preserve the check flashlight on the left and the BLF-348 reference flashlight on the precise. These images are taken round 18 inches from the door.
I evaluate every little thing to the KillzoneFlashlights.com 219b BLF-348 as a result of it’s cheap and has the most effective tint!
Abstract and Conclusion
I like the largest Zebralights. I beloved (nonetheless love, and use typically) the SC700D HI. The Zebralight SC600w IV Plus HI flashlight is one other incredible mild in the identical vein. Most likely extra pocketable than the SC700, however extra good for bag carry than the smaller SC65. I like this mild! Zebralight’s superb consumer interface, the 4500K output, and Excessive CRI, all from a HI emitter. It’s actually superb. And sure, I do know this isn’t a new mild, however I hope you benefit from the information!
The Large Desk
^ Measurement disclaimer: Testing flashlights is my interest. I take advantage of hobbyist-level tools for testing, together with some I made myself. Attempt to not get buried within the particulars of producer specs versus measurements recorded right here; A specific amount of distinction (say, 10 or 15%) is completely cheap.
What I like
- The dimensions and form.
- That it makes use of a 18650 cell
- The Zebralight consumer interface
- Output on all modes is incredible
- Impartial white is the choice!
- It’s excessive CRI!
- It’s nice “handheld thrower” (at the least, “ish” – cd/lm at 10)
- That it’s not encumbered by charging or indicator lights or something
What I don’t like
- Basically no suggestions from programming
Notes
Preferred it? Take a second to help zeroair on Patreon!
